

Introduction: How to Make Rag Rolls | Curl Your Hair Without Heat | 2 Options Compared!


I like the idea of curling my hair without using damaging heat, and I've seen people use the old-fashioned rag rolls before, but I've personally never tried it...until now!
I thought I would try 2 different methods to compare and contrast the results. I hope you find this tutorial useful!
Supplies
- Thin cotton; I used an old duvet cover
- Water spray
- Scissors
- Ruler
Step 1: Cut the Strips


For both methods you will need some non-stretchy strips of fabric. The fabric should be thin and woven. I'm just using an old cotton duvet cover.
Method 1: You will need at least 12 short strips measuring approx. 8 cm (3") wide and 20 cm (8") long.
Method 2: You will need at least 10 long strips measuring approx. 3 x the length of the hair you want to curl (in my case, 3 x 40 cm = 120 cm long) and 8 cm (3") wide.
Step 2: Method 1; Hair Rolls


For both of these methods, your hair needs to be damp but not wet/dripping. These rag rolls will need to be kept in until the hair is dry i.e. overnight.
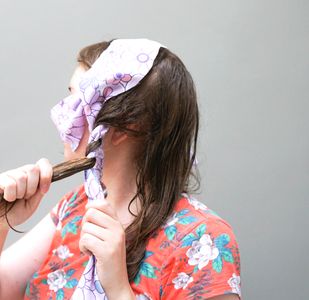
For this method, we're going to take a section of hair and wind it up, from the tip to the root, using a short piece of fabric.
So first separate a section of hair, then place a piece of fabric on top of the hair about 1" from the tip.
Then fold this 1" tip of the hair upwards so it's now on the front of the fabric.
Then roll your hair in this same direction, around the piece of fabric, towards your head. Keep twisting the fabric as you go, trying to keep all the hair in the centre of the fabric piece, not at the ends.
Once you reach the head, you then tie the ends of the fabric together to keep it in place. Make sure you will be able to untie this knot later.
Repeat until all your hair is in rag rolls.
Step 3: Method 2; Hair Spirals


For this method we will need the long strips of fabric, and preferably a helper!
Separate a small section of hair, then take the end of a fabric strip and place it on top of your head. This should be several inches above where you are going to start the curl. If you have a helper, ask them to hold this strip in place on top of your head.
Take the section of hair over the strip and forwards (towards your face :))
Then start wrapping your hair (in that same direction) around the fabric stripe. You want to wrap the hair around the fabric rather than the other way around. You will be able to see in the end result that on 2 sections I must have wrapped the fabric around the hair or not wrapped tightly enough, as the curls are very loose.
Once you reach the tip of the hair, fold the tip upwards, then fold the fabric over the top of this hair and start wrapping the fabric around the spiral (tightly) all the way up again.
Once you reach the top, you will have 2 fabric ends that you can then tie together to secure.
Repeat for all your hair. You may look like Medusa by the end :D
Step 4: After Releasing the Hair


The 1st photo shows how my hair looked after removing the 'spiral' rag rolls, and the 2nd photo is how my hair looked straight after removing the 'roll' rag rolls.
When you remove a rag roll, twist the hair section with your fingers in the same direction as it has been 'set' in.
You don't want to brush your hair as this will eliminate the curls and just give you waves instead. Simply use your fingers to separate the curls.
Step 5: Comparison


Here you can see the 2 results side-by-side.
The 'rolls' method created more 'messy' curls for a beachy look, whilst the 'spirals' method produced neater spiral curls. Personally, I like the spirals better, but it's totally up to you which method you want to try.
And yes, I should have used an anti-frizz product before doing this tutorial :p
I hope you have enjoyed this Instructable!

Second Prize in the
Beauty Tips Contest


