

Introduction: Intel Edison, Proximity Activated, Speaking Calendar


(Above is a Video - but may not show on a mobile phone. Click here to view on youtube. )
This project was planned as an Assistive Technology Device for carers of people with memory disorders. It is a wall-mounted calendar that can be used to plan the day for the home occupier. Mounted,say, in a hall way, the person with memory issues, will be told what they have on for the day as they walk to the front door.
Even with mild memory loss - sufferers might at times be suddenly, for a time, be unsure of the day, or even if its morning or evening.
This project is intended to help such a person, to make continued, everyday living at home easier and safer - assisting them by reminding them of the upcoming events that are important to them - and also warning them of activities that are not suitable or available at this time
Technology like this can give people with dementia help and support to remain independent, safe and socially involved.
Carers should also find the extra help and monitoring useful for the support and reassurance it offers.
Assistive technology devices currently, when available can be quite expensive, especially some of the more high-tech devices. This Proximity Triggered Electronic Calendar aims to be a cost effective solution that can be assembled from the instructions given.
Currently the only similar product I could find was a motion sensor that plays a pre-recorded voice prompt when there is movement nearby - for example, a sensor near the door to remind the occupier to lock the door, or one in the kitchen could remind someone to turn the oven off.
This project will go a step further by, introduce a talking internet calendar and clock, that a carer can manage for the home occupier remotely via Google Calendar.
In my research interviews with carers and relatives of suffers, I was asked to consider several features:
- Triggered each time the door is approached
- Spoken rather than having to read as eyesight might be an issue
- Tell the person what day it is as well as the time as forgetting the day is a common complaint
- Reminding its morning and evening can be important to some sufferers
- Tell them what they have on (from one hour previously, in case they are running late, until midnight)
- And also the option of telling them what is Not available to them today (Sundays)
- Be updatable by their carer/relation remotely without ever having to touch the device
Step 1: Design Decisions and How It All Works
Technology Decisions
Edison, Intel's new micro-controller platform, was chosen as it makes available in one module all the technology, connectivity and the power to run this project.
Google Calendar was chosen as the management interface for the features it offers. It allows the carer to place items into the schedule even when remotely.
The calendar can be accessed securely via the Edison hardware. As soon as an entry is placed into the calendar - it is live and will be spoken the next time the home occupier approaches the door.
The main text is spoken out loud - and the short description placed in the calendar event is displayed on the screen.
A display shows the current time and the next event in their schedule. The time is kept correct always from the internet.
A Sonar distance sensor was used instead of a PIR - as it was desired to trigger the device only when the device was approached - closer than 1 meter, rather than any movement at all in the room.
The project is to be housed in a suitably discrete case mounted next to the front door. Internet connectivity is via wifi so the only external wires to the device are the 12V wall adapter.
Other uses
I have reduced all my research down to the simplest way I have found to configuring and installing the features I needed on the Edison - hopefully this can assist others.
There are many tips and tricks throughout that hopefully should be useful for other projects.. Including...
- We will cover How to initialize the Edison WiFi,
- Setting Time zones,
- Setting up the Edison to play sound.
- Configuring external USB devices to be default
- Text to Speech
- How to install new features in the linux environment
- Python coding
- Google API and secure server to server authentication
- Arduino coding
- The code requried to Measure distance and work a LCD display
- Arduino calling Python code and returning results
And Some good tips showing how to return results from python without writing temp files to flash memory causing unnecessary wear to the flash media.
Step 2: Gather the Required Parts


I list here some Amazon sources and some rough best prices I have seen the components at - search though for whats best for you including delivery options.
The LCD display is recommended but of course optional - but must be the I2C version.
- x1 Intel(R) Edison - Arduino break-out board & Power supply
https://store.arduino.cc/product/E000051
- x1 Ultrasonic Module HC-SR04 Distance Sensor Measuring Transducer (Aprox 2 to 3 Euros)
http://www.amazon.co.uk/gp/product/B0089VA3AY
- x1 LCD 16x2 - again, very important to get the I2C version (Aprox. 4 to 5 Euros)
http://www.amazon.co.uk/WER-1602-Serial-Module-Display/dp/B014H6VBVO
- x10 aprox. mix of Male to Male, and female to male breadboard jump leads (Aprox 4 Euros)
http://www.amazon.co.uk/Jumper-Leads-Cables-Arduino-type/dp/B012XEUYOW/ref=sr_1_sc_1
- x1 USB Soundcard (Aprox 3 to 5 euros)
http://www.amazon.co.uk/USB-Stereo-Sound-Card-Adaptor/dp/B003UR9B8M
- x1 Amplified speaker (Aprox 3 to 5 euros)
http://www.amazon.co.uk/iLuv-ISP160-Amplified-Speaker-Laptops/dp/B009WTXIV8/ref=sr_1_1
or
http://www.amazon.co.uk/N-Cube-Portable-Powered-3-5mm-Speakers/dp/B00HSLQZCQ
- Housing for project.
A 3D Deep Box picture frame from IKEA if you can get one deep enough would be ideal.
You can add a breadboard if you like - a really mini one (like this or even this) would be sufficient as there are very few connections to be made. However you may find there are enough plugs on the Edison Arduino Kit board already for this project.
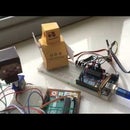
Step 3: Assemble the Electronics


We connect...
- The LCD connects to +5V and one of the GND's - the other two wires (SDA and SDL) go to A4 and A5 in that order.
- The Sonar Distance detector connects to +5V and GND - it has a trigger wire that connects to pin 7 and an echo that I connect to A0.
- Notes: If you cannot wait for the postman - some Male to Male breadboard wires, the ones with square plastic plugs, can have either or both their ends converted to female.
- Note: Use Female to Male connectors to connect wires to the LCD and Sonar device - these are not always provided in kits but are very useful to have.
Tip - If you are stuck - some Male to male breadboard cables (the ones with square ends) can be converted into male to female with some careful disassembly, wire snipping and reshaping...
Trouble-shooting
When these I2C displays are new or being reused on a device with a slightly different voltage than the previous project - sometimes no text is visible.
This is usually down to two issues:
- When the LCD powers on - look for a half screen of solid squares displayed as it boots - if these squares do not appear, and the display lights but remains blank, if may be the contrast is not set correctly - there is a tiny contrast screw on the back that can be adjusted.
On the LCD linked to in the last step - the text should appear as bright white on a dark background. - Or... Re-check the wiring - especially that the LCD data wires to A4 and A5 are not reversed.
Step 4: Set Up and Configure the Google Account


There are quite a few steps to this part that have to be just right.
We need to give the Edison permission to read the calendar securely.
- Create a new Google account
Nothing difficult here. You could use an existing account, but this project will be making exclusive use of the calendar so best create a new one - Configure
Full documentation on the server-to-server access to the Google Calendar API via Python we require is available on the Google Developers site: https://developers.google.com/google-apps/calendar/quickstart/python
But basically, the Steps to take are: (See also screenshots on this page)
- Login to Google - and browse to https://console.developers.google.com
Create a new project (by clicking ok on the dialog that appears) - Click on the "Go To Credentials" link
(if you dont see this option - goto https://console.developers.google.com and select the project from the drop down - see the attached screenshots for location of the option) - Click on "Api Auth" Menu on the left - "Credentials" and "Service Account"
- Select "P12" and press "Create"
- You will be asked to save the p12 file - call it "EdisonCal.p12" (the filename is important)
You will need this file in the next step when we upload it to the Edison. - Press OK to go back to the main page - you will see an email with a log name- use copy-paste to record this.
The new email address will be generated with random letters and look something like:
765393421924-981vkp2skjkrhttcircibnqpjtak09ar@developer.gserviceaccount.com
Keep it safe in notepad or similar for the next steps.
You should now have three pieces of information:
- The first short Email Address you created that you want to use for the project (@gmail.com or @googlemail.com)
- The EdisonCal.p12 file
- The long google auto created email address (@developer.gserviceaccount.com)
Note: of course - don't copy any of my email addresses etc that you may see above - they wont work for you and will give access errors in later steps - use must use the ones generated especially for you by Google.
Step 5: Configure the Edison Part 1 - Wifi and Network Tools

Configuring the Edison steps proved a lot of research, trial and effort to find out.
I have reduced the steps I took down to the minimum required below - all steps are necessary for the reasons given.
Be careful not to miss any. If you get errors at any stage follow the suggested links to resolve the problem.
- Get the board assembled and powered up and software installed - we will need the Arduino IDE and the Telnet software described in this Intel link.
https://software.intel.com/en-us/iot/library/edison-getting-started - Note: When flashing - As we will be using Arduino (as well as Python) - I have choosen to use the previous version (146) firmware as the current version (159 - September 2015) has a known issue that causes the code not to be preserved when you loose power. See here for details.
You will need a terminal connection open for the next steps
- username is root - by default there is no password.
- Setup Wifi - run this from the terminal to connect to WiFi
configure_edison --wifi
- Check you have the correct firmware version
configure_edison –-version
See notes above about which firmware might be best currently
- Setup FTP over WiFi
configure_edison --password
It will ask you to create a password, then enable FTP - (remember this password as you will need it to telnet in again)
Step 6: Configure the Edison Part 2 - Enabling Sound and Speech
Install Sound card
Insert the USB Sound card - you will also need the 12V power supply at this stage
Switch SW1 to HOST mode (right) and Test USB
Set the soundcard to be default device and enter this at the telnet command prompt
aplay -Ll
You will get back something like:
card 1: Headset [Plantronics USB Headset], device 0: USB Audio [USB Audio]
or
card 2: Device [USB PnP Sound Device], device 0: USB Audio [USB Audio]
The important part is the device name that appears after the first colon(:) - it can read "Headset" or "Device", or something else - depending on the usb hardware you are using to play sound.
Edit the supplied file (asound.conf) using Notepad - so this device name is placed after the colon in the text file.
The file (attached) is currently supplied set to "Device" which is a USB sound card.
pcm.!default sysdefault:Device
If you are having issues - or for more details see:
http://alextgalileo.altervista.org/blog/lets-make...
Upload this edited file (asound.conf) to (/etc/asound.conf) using FileZilla(see screenshot of Filezilla)
Install OPKG Installer
Update OPKG (so we can install new software)
The supplied file base-feeds.conf contains these three lines to an unofficial but often referenced respository
src/gz all <a href="http://repo.opkg.net/edison/repo/all"> http://repo.opkg.net/edison/repo/all</a><br>src/gz edison <a href="http://repo.opkg.net/edison/repo/edison"> http://repo.opkg.net/edison/repo/edison</a>
src/gz core2-32 <a> http://repo.opkg.net/edison/repo/edison</a>
Using FileZilla - Upload the file to the Edison at this location (to overwrite the default empty file there):
/etc/opkg/base-feeds.conf
Now We can install the text to speech module
opkg update<br>opkg install espeak
Try these for fun - they show the different voices possible:
espeak -v+m4 "You have nothing on today"     (Male)<br>espeak -v+f5 "You have nothing on today"     (Female)
espeak -ven-sc+f5 "You have nothing on today" (Scotish)
There are many more settings such as speed, different voices
and other accents. See here for more options.
Attachments

Step 7: Installing Google API


Install PIP and SetupTools
(Note: to do this on 146 - I had to delete folder /usr/lib/python2.7/importlib first)
root@edison:~# opkg install python-pip
(Note on the next command firmware 146 requires you to append on --no-check-certificate)
root@edison:~# wget https://bitbucket.org/pypa/setuptools/raw/bootstrap/ez_setup.py --no-check-certificate<br>root@edison:~# python ez_setup.py
Install Google API Python Code
(for more info see: https://developers.google.com/api-client-library/python/start/installation)
root@edison:~# pip install --upgrade google-api-python-client
You need this also for crypt ssl for https links- this takes a few minutes to complete:
root@edison:~# pip install PyOpenSSL
Step 8: Update and Install the Python Code


- Edit the file pyc.py using notepad
Notepad++ is free text editor and better as it colour codes the python code
or even better again - use the Python editor called 'Spyder' if you are making a lot of changes as you can edit and run and debug the script on the pc with that. - The two things you need to change are at the top of the file - are the two email address's you recorded previously.
Make sure to leave it in the single quotes and do not add any extra spacing at the start of the line or before the closing quote.
Anything after a # is a comment and ignored
#your short email you created<br>#and the google generated one
cal_owner= 'iot_account_name@gmail.com'
client_email = '123456789-lah4q37unkni1joj9plg@developer.gserviceaccount.com'</p>
You will need the following files on the edison
- Using Filezilla or equivalent - FTP these files across to the Edison root
1. The EdisonCal.p12 file
2. The pyc.py file you edited above
Step 9: Update the Arduino Code

Arduino Code
Code is attached.
No changes need to be made.
To upload - switch SW1 to the left - and upload via Arduino IDE with board set to Intel Edison and the com port set to the comport identified in Window System Device Manager as a "Virtual Com Port".
Operation
The Arduino code is the starting point of the device - the code checks the distance sensor - and if it sees something within 1m - it will first speak the time - then it will call the python code - the python code makes the call to the calendar api to retrieve the calendar events and then speak them before returning control to the Arduino code.
Every few seconds the arduino code will update the screen time.
If the device is unused for 15 seconds - the LCD back-light is turned off.
Attachments
Step 10: Future Development

I made the case for it from a biscuit tin with a picture on it the user liked. The holes I drilled with a rotary tool.
Its a neat setup now only requiring one power cable and I am happy with it for its purpose - it is working as I intended.
If you do make one yourself - here are some ideas you could add to give it even more functionality:
- Email alerts to the carer if no movement was detected during the daylight hours
- Add temperature monitors (its cold outside - bring a coat)
- Add Weather (It might rain - bring an umbrella)
- A pause button so a carer can disable it for an hour at a time when they are present if they choose.
- Send a warning if presence is detected during normal sleeping hours
- Possibly a larger Screen - maybe a small TV screen.
Here it is all boxed up and completed :) (video)
All the best...

Participated in the
Intel® IoT Invitational


