

Introduction: Kids Wood Bed and Shelves From Pine


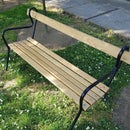

After looking all over the internet, I came to the conclusion that I wasn't happy with offer in local stores any of the beds where to expensive or quite bad. The only one I did like was super expensive. So I decided to make my own (I used a mattress that I have and build the rest of the bed around the mattress dimensions).The bed is made out of pine, legs, railing and support. All edges of bed and shelves are not routed yet. Shelves are also from pine and we are using french cleat technique to hang it on a wall, it is much easier to clean shelf and put it back on the wall, also the possibility to rearrange is priceless. I did not put finish on the bed and shelves, it is winter time and the temperature is around 0°C (need at least 10°C) so that will wait till the summer. Bed was assembly with mortise and tenon joint...as all together it weight about 25-30 kg and it is movable. On the upper picture you can see how kid testing the bed :)
Tools :
- Miter saw
- Hand saw
- Table saw
- Drill/Driver
- Orbital Sander
- Router
- Woolcraft Jig and Dovels
- Measuring devices and square.
- Brushes
- Spray Gun (optional)
- Hand plane
- Planer
- Thicknesser
Other stuff: - Drill bits
- Polyurethane base coat 0.5L
- Polyurethane finish coat 0.5L
- Router fillet bit (roundover)
- Glue
Costs (without machines): - Pine wood - 30$
- Polyurethane base/finish - 25$
- Sand paper - 10$
Step 1: Buying Material, Rough Sawing and Marking


So the first step was to expect the boards at the lumber yard, also pick a few extra boards just to be sure if something go wrong. Everything is pine 25 mm thick before plane the wood. So after the boards was plane, it was time to glue boards for shelves. The shelves dimension are 30x20x30cm (L x W x H).
Step 2: Shelves Assembly


This is really simple job, after everything was cut to the final dimensions and than glued together, I did not use any dovels or screws, this shelves is going to carry a few books or some toys, I am 100% sure that only glue can hold more than 10 kg on this shelves. But if you want you can put dovel or a screw to give an extra strength.
Step 3: Mounting on the Wall


In the process I created 1 bigger shelf, and had some leftovers. I started with the biggest one, then put other shelves around that one. So the mounting on the wall is simple and accurate. First you need drill the holes through the wood that is not on the shelves. After that you pick the shelf together with other piece. Using bubble level find the center, than mark the holes and drill it on the wall ( at home we have brick wall so I used wall hanging plugs).
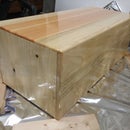
Step 4: Preparation for the Bed


Like before this step will show you preparation of wood for the bed. First you need to plane the wood, the thickness should be 2.2 cm. Than you need to start gluing 4 boards to create legs that should be 7.5 x 7.5 x 55 cm (L x W x H).
Step 5: Driling the Mortise


Idea was to create bed with mortise and tenon joint. You do not need to have machine like this, you can drill holes with drill and some masking tape, just be careful on the first and last hole. In between is not that crucial to be accurate. This machine is build from scraps, electric motor, some drill head, some tube for linear motion and steal for frame (this was firstly designed to be planer ;) ). The most important thing is that you need mark everything correctly. Before drilling stand up your legs and check one more time everything. In my case the boards was 15 cm height and I choose to drill the 13 cm mortise so that gave me 1 cm around board (top and bottom).
Step 6: Cutting Tenon


Cutting tenon is possible in many ways, I will show you 3 examples.
- 1. First and by my opinion fastest and mostly accurate is the table saw (don't have picture sorry). First cut needs to be on the chick side of the board. Than adjust the height of the saw to cut out that chick, it will only take about 15 min for the hole process.
- 2. Second example is with the router, the most slowest of them all. I used a steel square for driving the router. I do not love about this technique is finish that you get. You will also need to take a chisel and clean it, especially if you do not have sharp router bit, like me in this story.
- 3. Third example is with a hand saw, hand planer and chisel. With right saw you can be sometimes quicker than with electric tools. My hand saw is slightly curved from falling down, but even with bad saw you can still cut and clean. Technique is similar to the first one, you only need to pay more attention for the part when you need stop cutting before it goes too far. After cutting with saw I cleaned with hand planer 2-3 strokes just to be smooth, and than used chisel to get everything flat.
After any of this steps I used file to set the radius on the sides to fit my mortise. Look at the video
This is not my videos, only to see options for cutting:
1. https://www.youtube.com/watch?v=4CvMccfXKnk
2. https://www.youtube.com/watch?v=aXEzU8zYyPo
3. https://www.youtube.com/watch?v=yuc6emr-_lY
Step 7: Assembly of Support for the Bed


After few test fittings it is time for glue, I used Kleiberit 303 D3. Because I do not have clamps that are long enough I used 2 F clamps to pull one another, Do not tight hard when doing tenon and mortise, just slowly put pressure on clamps so that glue have enough time to fill the spots. If you rush with clamps sometimes glue can create a lot of pressure inside the wood and cause it to crack. Some times is good to cut a little rail on the tenon so air/glue can escape that area.
Step 8: Bed Rails


Similar like head and leg support, now it is time for rails. But now you will have a problem with short clamps.I resolved that problem with a simple jig from 3 cm thick pine so that does not brake when put pressure. Jig only have 2 holes for the Clamp head and it works beautifully. Also do not rush with clamps, please take your time and check diagonal side.
Step 9: Mattrase Base


Mattress spring base is going to sit on the top of this rails. It was glued and then I used dovels to get as much strength that I can get. I used some oak that was laying around the shop, but you can use any hardwood you have.
Step 10: Finish


Here we tested the finish product without the mattress, she sad I need to check if I fit inside of it :D. As I said at the start it is winter time and I do not have spray booth so I need to wait temperature around 10°C with sun on the sky to put the finish. Also I am thinking that I will made a few shelves more to fill the left side of the wall. That's it folks!
Also you can see toy chest for kids from fir and pine on this link
Please if you find some mistake in the text or something is not clearly typed please leave a comment I will try to explain better.

Participated in the
Furniture Contest 2017

Participated in the
Design For Kids Challenge


