

Introduction: Laser Engraved Terrain Sleeves for Tabletop Gaming


Hi gamer peeps,
This isn't so much a new instructable as a remix of my last instructable: Portable Sleeves for Terrain or Battlemaps. (https://www.instructables.com/id/Portable-Sleeves-for-Terrain-or-Battlemaps/). While I was generally happy with how those sleeves worked out, and how cheap the materials for them were, I was still disappointed in how difficult I found working with markers and removing smudges to get something consistent looking was.
Since I work with a laser cutter/engraver at work, I thought I might try a quick remix that replaces my own butterfingers with a precision engineered, computer controlled manufacturing device. In this instructable, instead of printing and tracing the grid onto a plastic sleeve, we'll use a laser engraver to directly engrave the grid image onto a plastic cover that you can slip your maps into.
Supplies
So in this project you will need:
-Access to a printer (you'll still need to print your maps)
-Document sleeves (A3 in my case still)
-A laminator (the same size as your document sleeves)
- Laminator pouches. (same size as your document sleeves)
- Clear binding covers (same size as your document sleeves)
- Clear tape (like cello tape works fine)
- Laser engraver (I used a Trotec Speedy300 100W laser)
- A flat board to tape your job to for engraving.
Step 1: Prepare Your Plastic Sheet for Engraving.


So I knew I would need something a little stiffer than a document sleeve to use on the engraver, but I didn't want to work with acrylic (my usual engraving material) because it's heavy, thick, and brittle (can chip or crack pretty easily). I had a brainstorm looking around my office, and settled on the idea of laminating a clear cover sheet from my binding supplies.
This creates a slightly rigid clear panel that's just under 1mm thick, and covered in polyethylene which is fit for engraving.
So the first thing I noticed is now much static is present on the binder cover and laminator pouch before being run through. This attracts dust and lint, which the heat then sets into the plastic... not ideal. So the first step is to clean EVERYTHING. I wiped down the table, the engraver and the outside of all the sleeves with an isopropyl based cleaner, wiping with lint free tissues. I then let everything dry (you don't want wet bubbles inside your sheet).
Once everything was clean and dry, I slipped the binder cover inside the laminator sleeve and ran it through the laminator. What came out was one sheet about 0.5-1mm thick, which unfortunately had a bit of a a wavy warp to it from the laminating process. This affected the engraving later, so you might want to try and get rid of this at this point (maybe using an iron? I didn't have one to work with so I'm not sure).
Step 2: Prep Your Artwork for Engraving


Because I wanted this to be a remix of the other instructable I published, I wanted to use the same grid pattern (more precisely the corner grid pattern) from last time. I've attached the file I used, that I originally downloaded from Incompetech (incompetech.com/graphpaper). Remember this is scaled for A3 printing, if you print this out at A4 your squares won't fit 1" minis.
I used CorelDraw 2018 to convert this pdf for engraving on the Speedy300. Corel isn't free, but does import a wide variety of files and convert them to nice vectors for laser cutters, so I tend to use it as my default. In this case I just imported the original file to a Corel Drawing that I scaled *slightly* bigger than an A3 page, then drew a box around it that was 420x297mm (the dimensions of an A3 sheet). This way I knew I could position the job at the corner of my engraving sheet, and it would be spaced out evenly across the whole sheet. Note, I have the engraver set up to "see" the green colour I've used for my outside border, but to ignore it from an engraving and cutting perspective. I can then use green lines to make the job a specific size, and to include offsets or positioning marks for jobs that involve multiple cuts or applications.
After I did this, I converted the line thickness of the corner cross marks to 2.5mm thick, so they're a bit more visible.
Attachments

Step 3: Prepare Your Sheet for Engraving


Remember I said the laminating left a wavy distortion in the laminate? It wasn't perfectly flat, and I knew that was going to impact the engraving. The engraver works by focusing the laser on the surface of the material, then running a lower power beam back and forth across the surface. This rippling of the material would mean that some parts of the job would be out of focus during the engraving.
I tried to get around this by taping the material down to a flat surface (a flat board, in this case). As we'll see later, the results were less than 100%, but this step did still help a little.
Step 4: Engrave!


So this part is pretty straight forward for people who've used a lasercutter regularly. Simply put your sheet (taped to your board) on the bed of your laser engraver; set the height of your head relative to the material surface, position your job on the engraver software, and CHECK YOUR MATERIAL SETTINGS! Honestly using the incorrect settings is most common mistake people make with laser cutters, and the best case if you do so is that you waste your time (and your job doesnt mark the material you're using). The worst case is you start a fire or wreck your engraver. So take a second to do that crucial step.
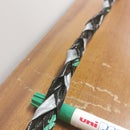
For this process, I experimented in a corner and found that 50% laser power, with 85% speed, gave me a reasonable engrave on this material. I then used those on the whole job. This caused issues, however, as the ripple meant that the laser wasn't equally focused across the whole engrave, and it had different affects on different parts of the job.
You can see that in some places, the PET has marked a clean white colour, but in others its discoloured to a brownish colour, because of the different laser intensity in different spots. I decided to go with this anyway, because I thought it would look pretty good with some of my printed maps, and I thought it might give them a"vintagey" or "rusticy" look.
Step 5: Tape Your Engraved Sheet to Your Document Sleeve


So you're almost finished at this point. Simply lay your engraved sheet over your document sleeve, and align the edges. In reality the sleeve will be *slightly* bigger than your laminated sheet, as it's designed to hold them. I pick an edge that I want to work from, line up the edge of the two pieces, and run a line of tape along the edge, half on the top sheet and half overhanging. I then flip the two sheets and fold the tape over the other side, making a seem along the outside of the two sheets.
This leaves you with a bit of tape overhanging the end of the sheet, just clean that up with scissors.
I only taped the two "vertical" edges, and the base edge, leaving the end at the opening of the document sleeve open. I didn't want to risk taping the sleeve up by mistake.
Step 6: Play!


Now take your top down print outs and slip them in the sleeve. Instant battle maps. Use for all your encounter needs. You can also use dry erase or permanent markers on this sheet to add extra objects or conditional effects.
Enjoy!
Please help yourself to making a version of this yourself, or remixing and improving it (although let me know so I can see how it's evolved :D)

Participated in the
Games Contest


