

Introduction: Bottle Lamp Night Light


I have a lot of lights in my house. Not just ceiling lights. Nor lamps. I have lights under beds, under tables, even inside the stairs, as you can see. Using an extra puck light in my garage, I was able to craft a illumination device as an activity not only for an engineering class, but the betterment of my creativity skills and kinesthetic abilities.
And I made this just for an engineering project last year hehe
And with my fascination of lights and bottles, as well as lamps, I present to you: the Light-Up Bottle Lamp.
Step 1: Materials

The materials you may need:
- 3-D Printer
- 1 Puck Light (I am using an Ikea Grun dtal Cabinet Light for this)
- CAD Software
- Bottles (you can experiment with different types)
- Felt
- Hot Glue
- CAD Experience (recommended)
- Paint (optional)
- Wire Strippers (if required)
Step 2: Making the Base

Here are some guidelines into making a base:
- A hole on the top to let light travel from the puck to the bottle
- A slot in order to slide the puck light into the base
- Measure your puck-light in order to use appropriate dimensions and shapes in CAD software
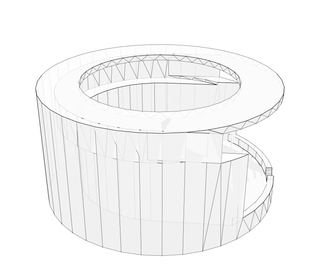
For example, I have attached my own CAD design here in STL format. I made this in Autodesk Inventor, but you can also use other CAD programs such as Solidworks or TinkerCAD to design the base. It is a cylinder with the characteristics above, but I also added a mechanism that would keep the puck light in place and not slide out, as well as a little indent near the bottom for a wire to stick through.
Alternatively you can use wood to make the base but I find this method more difficult for me because I lack the required tools to produce certain parts that are needed for this project.

Step 3: Printing CAD Part Out

Make sure the printer is in a good condition, meaning the temperature of the extruder and the base are in their correct ranges, before you start printing. You may want to check up on the printer periodically in case you need to emergency stop it.
Step 4: Unscrewing Power Adapter


For the Ikea Grundtal Cabinet Light, the cover of the power adapter must be removed in order to access the wire ports. In order to do this, I used a flat-head screwdriver to unscrew the cover. Some puck lights do not have an adapter and instead connect directly to an outlet. If this is the case, then you can move right along.
Step 5: Insert Wires Into Power Box


Here, you can see that there are twelve wire ports. Because the puck light uses two wires, it requires two ports to be completely connected. To insert the wires into the ports, I shoved both wires into adjacent ports, one at a time, until the little buttons on the ports clicked into place. This means that the wires are fully in. To actually check for it, you need to pull on the wires as hard as possible to see if any lose wires are not connected. If the wire seems "stuck", then you did your job.
If you want to remove the wires, you have to push down the button as much as possible and pull the corresponding wire out. I recommend that this is done one wire at a time to ensure that the wire does not get severely damaged. (If it does, you may need to use wire strippers to expose more of the wire)
Step 6: Insert the Puck Light Into 3D Printed Part

To insert the puck light into the base, you need to push the puck light into the opening on the back side of the part. You may need to use a file or sandpaper to soften edges to allow the light to slide in more easily. If you used the base that I made, then the top part of the light should be able to rest on an extrusion inside the base.
Step 7: Felt


Just in case you really want to use this lamp as a coaster, you can put felt or other material to prevent liquid from getting into the light. I simply measured and cut a piece in a circular shape and hot-glued it onto the top of the base.
Step 8: ¡Viola!

The finished product.

Participated in the
Make it Glow Contest 2016


