

Introduction: Magic Dress: Dream It, Remake It, Wear It.


A laser cut remake of a seventies toy.
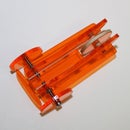
“Magic dress” was a “construction system” for garments. Magic dress simply consisted out of coloured plastic discs (punched or injection moulded I guess) and injection moulded plastic hooks to connect them.
We used to have it at home, but our set was lost over time. When I recently rediscovered it in a book about things from the 50’s, 60’s 70’ and 80’s, I tried if I could find an old set somewhere. The name Magic dress being used for other products and Volchima, the company selling it, having disappeared doesn’t help. I’m even not sure if it was ever distributed outside Belgium. Having failed finding any, I decided to recreate it myself (but anyone knows where to find an original set, please let me know).
With thanks to my models/builders: Lupa, Zita, Imme and Tika.
Step 1: Materials and Equipment


To recreate it in a small volume, laser cutting was an obvious choice. I made it out of 0.75 mm thick polypropylene, available at art supplies stores (mine came from Schleiper). It has the right medium stiffness and is very though. It comes in a small range of basic colours, both opaque and translucent.
I did the laser cutting at Timelab in Ghent, which I recently joined. Timelab is a great initiative, check it out.
The cutting was done on a 25 Watt LaserPro Spirit.
Step 2: Design
The design of the discs was pretty obvious. I first made them about 45 mm in diameter, but later made them 58 mm when scaling up together with the hooks. Making them larger also meant I need less to make the same size of garment, lowering the laser cutting costs. 58 mm fits both A4 sheets and the Ponoko 181mm and 362mm laser cutting templates pretty well.
I designed the hooks from memory (spanning a very long time) but simplified the shape and put them back to back in pairs to save in laser cutting costs. The first attempts turned out to narrow and too much distorted by the heat from the laser cutting. In a couple of steps, Increasing the overall size about 30% and the “width/thickness” significantly (about double) resulted in suitable hooks. Further improvements, a.o. to improve cutting time, are certainly possible.
The design included as pdf fits 15 discs and 40 hooks on an A4
Attachments

Step 3: Laser Cutting


I saved my design as a pdf and imported it in the readymade CorelDraw template provided by Timelab. I checked the complete drawing is in RGB black and in hairline and followed the manual to do the laser cutting.
Polypropylene is not the easiest material to cut by laser. The edge shows a lot of melting and small parts tend to restick after cutting. I got the best results with power at 100% and a speed of 2.6%. Obviously these values are very dependent on the machine.
An A4 sized sheet costs 0.60 EUR and cutting 15 discs and 40 hooks from it just under 5 EUR
Once the parts were cut and the sticky ones pulled loose, I washed them in soapy water to remove the white residue left on part of the surface. I rubbed all discs with a soft cloth (polypropylene scratches easily) and let it dry.
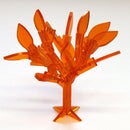
Step 4: Playing With Magic Dress


Then it was up to the kids and me to start playing with it.
Assembling the discs and hooks needs some practise and was just about doable for a patient 5 year old. To make really make a garment, these youngest ones needed some help, but older kids can experiment on their own. I’m showing just some basic models we made.
Obviously one can expand on this with more discs, more colours and other shapes…

Participated in the
Vintage Contest

Participated in the
Dream It, Draw It, Wear It Contest


