

Introduction: Make a Simple Wooden Cutting Board


A couple of friends are getting married next month and since I know they like the cutting boards I've made for myself I thought I'd make one for them as a gift. I don't have a table saw (or laser cutter) at home so I made it at techshop.
I used a few pieces of cherry and a piece of purpleheart but any hardwood would work. In addition to the wood you'll need some waterproof glue (I used Titebond III) and a food-safe finish (I used Good Stuff).
Let's get started.
Step 1: Prep the Wood


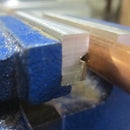
Use a chop saw to cut the wood to the same length, then run it through a planer to make it all the same thickness. After planing the wood, cut it into 1" strips using a table saw.
Step 2: Arrange the Wood and Glue It Together


A few minutes of messing around putting the strips in order should make it clear what pattern you like the best.
Move the wood to some scrap paper, flip each piece on its back and smear some glue across every piece except one (the last one in line gets glue from its neighbor). I've apparently learned nothing since kindergarten since this step always ends with my fingers coated in white glue.
Flip the pieces back to standing and make sure they all line up before clamping everything together. I used a few pieces of scrap wood to prevent the clamps from denting the cutting board.
Wipe off any excess glue after everything is clamped.
Step 3: Personalize It


Laser etching, what's not to like? If you've got access to a laser cutter and you're making someone a gift, might as well personalize it. I added their names and wedding date.
Step 4: Sand and Add a Finish


Use a palm sander to smooth everything, round the corners, and get rid of the smoke marks from the laser. Switch to sanding by hand to finish the job with a finer grit.
Put on a pair of gloves and smear the Good Stuff all over the cutting board. The directions say to wait 10 minutes or something before getting rid of the smudge marks but I've had good results just smoothing the finish off as I go. Two or three coats of finish seems to work well for the other boards I've made.
The final step is to ruin your surprise gift by cleverly posting photos of it on instructables a month before you give it to your friends.


