

Introduction: Mini Basketball Hoop


I needed a mini basketball hoop to work with a set of robots (Wonder Workshop's Dash) but I didn't want to spend 5 bucks for a plastic suction cup toy that might not work out for us. I found a YouTube video online that details how to make one out of recycled parts along with how to tie the string to form the basketball net.
Check it out here (no affiliation):
I searched around at the hardware store and found an o-ring that might work but it was too small. Searched on Amazon and found these silicone o-rings that work and the color is pretty close to the basketball hoop (except you can't use most glues on it):
Step 1: Gather Materials
For this project, you will need:
- 2-5/8" ID, 3" OD, 3/16" - silicone o-ring red-orange color
- #21 white nylon string
- print out of backboard on 8.5"x11" paper (see attachment)
- print out of hoop mount support (see attachment)
- cardboard 7 7/8" x 5 1/8" for backboard
- cardboard 3.5" x 4" for the hoop mount support
- cardboard for hoop support mount
- acrylic paint to match hoop ring (mix your own to match with yellow and red or buy pre-made)
- X-acto knife or box cutter
- super glue
- glue stick or spray adhesive
- paper clip
- stapler or staple gun
Feel free to add some customizations to the backboard!

Step 2: Make the Basketball Net

Cut 8 pieces of string 45 cm long. Seal the ends of each string with glue or melt the tip quickly. If you don't seal the ends, it'll be difficult to tie the knots as the strings start to unravel. You will be sectioning off the hoop into 8 equal parts so starting at 12 o'clock, fold the string in half and tie a knot onto the hoop, ensuring both string lengths are the same. Repeat directly across at 6 o'clock, then 3 o'clock, 9 o'clock , and then the 1/8 locations. After this is done, check and make sure all the tied strings are equidistant before sealing the knots with a small dab of super glue. This ensures they remain tight and don't come undone.
Follow the youtube video in the intro to create the diamond pattern about 1 inch down. Grab one string from one tied point, grab the neighboring string from the neighboring point. Tie the knot at about 1 inch (or whatever you choose) and make sure both sides are equidistant, forming a triangle. Repeat for all the other 7 knots, checking your knot locations often to ensure they are all at the same length.
For the second row, tie neighbor strings together to form a diamond pattern, about 1 inch down as well. Check knots often to make sure they are again at the same lengths.
Do one last row, but this time, tie the neighbor strings at 0.75 inch, a little shorter. Once you are done, seal the bottom row knots with a dab of super glue on the knot only. Trim the strings, leaving about 1/4 to 1/2 inch string length. Fray the ends a little for decorative purposes if you like.
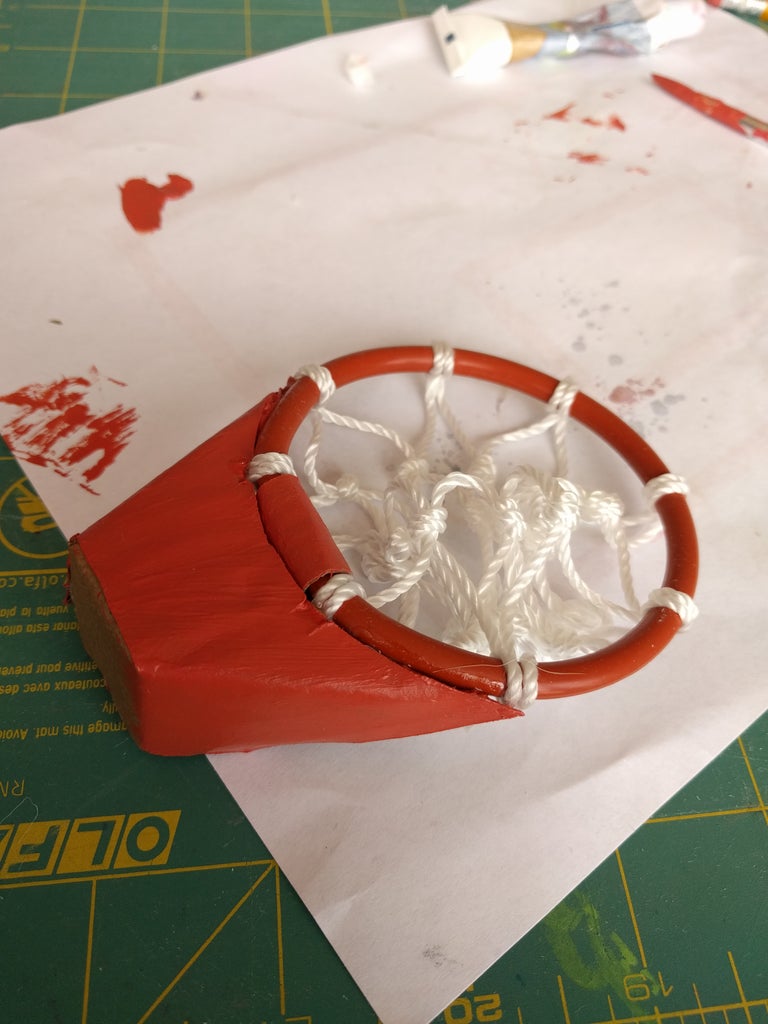
Step 3: Make the Hoop Connector


Cut a strip of cardboard 0.75" x 2.5". Make sure this strip fits in between the glued string points. This will be used to connect the hoop to the hoop mount. Make sure the net is oriented down (as if you were throwing the ball into the hoop). Fold the cardboard around the hoop and push down to make sure the cardboard tightly wraps around the hoop. Adjust the mounting strip so that it is slightly lower than the hoop. The bottom of this strip should be flat, the top of the strip should be indented in a little. This is so that the hoop will sit a little higher when glued to the hoop mount support. Glue the strips together as shown in picture.
Step 4: Make the Hoop Mount Support Piece

Take the hoop mount support pattern in the intro and cut the piece out of cardboard. Corrugated works better as it is thicker. Put the hoop on the edge of the top support (as labeled in the pattern). Trace and cut out the arch opening with the X-acto knife. You can score the inside of the cardboard paper (don't go all the way through) to get a cleaner fold. Glue with your adhesive choice (super glue works quite well and dries very quickly).
Once the glue is set, paint the support with a matching color. You can also mix yellow and red with a little patience to get the right tint.
Carefully paint the cardboard hoop connector carefully so the paint doesn't get on the net. If you get it on the hoop, you can wipe it off easily since it is silicone.
Paint all around the hoop mount support except for the back square AND the underside of the top mount support piece. That is where the hoop connector will be attached to. You can finish painting the underside and touch up anywhere else after that is glued in place.
Step 5: Attach Hoop to Hoop Mount Support Piece

Use super glue or glue of choice to mount the hoop connector to the underside of the mount support. Make sure the hoop is centered and touching as tightly as possible to the arch opening. You can use a few dabs of super glue around the arch opening so the o-ring and the nylon string can be glued to the cardboard. There were 4 contact points for the nylon string on the arch opening and it was sufficient in terms of holding the ring in place on the mount support piece.
Step 6: Make the Backboard


Center the image and glue the cardboard onto the back of the backboard print out. I held the paper up on a window, then centered the cardboard on the back, making sure the orange edge was evenly spaced on all 4 sides. Once that is nicely centered, fold and glue the paper edges to the back of the cardboard.
Step 7: Mount Basketball Hoop Onto Backboard


Center the hoop onto the "glue" box on the backboard. Glue onto place and hold firmly while the glue sets. I just used super glue.
After the glue is dried, reinforce the hoop to the cardboard with staples. Either shoot staple gun staples through or if the cardboard is thin enough, a regular stapler will work. Flip it over and tape over the staples to ensure nobody gets poked.
Step 8: Add Mount on Back (optional)

Lastly, I just secured a paper clip on the back with duct tape. I can always change this later on. The backboard can slide over a box when you want to use it. Now it's ready to be used! Go shoot some mini hoops!!!


