

Introduction: Model Rocket Launch Controller Added to Power Tool Battery Charger


Summary: This project uses a handful of electronic components and relatively simple circuit to modify a power tool battery charger to also function as a model rocket launch controller. Importantly, the controller-charger fully retains the standard battery charger function. The example shown here is based on a Harbor Freight 18 volt NiCd battery and battery charger.
Features: The launch controller has all the standard safety features defined by the National Association of Rocketry (NAR), including an arming key, arming light, and pushbutton firing switch that returns to the open position upon release. The 18 volt battery has sufficient power for a 30 foot rocket ignitor cable and can easily handle cluster rockets. The binder posts allow the rocket ignitor cable to be easily connected / disconnected.
Operation:
Mode 0: Arming Key removed - battery charger works in the normal way.
Mode 1: Battery installed & Arming key inserted - the "armed" LED will illuminate if a rocket igniter is connected correctly to the ignitor cable alligator clips. If the ignitor is not properly connected, the LED will not illuminate
Mode 2: Battery installed & Armed key inserted, ignitor correctly connected, and firing pushbutton pressed - the ignitor gets full battery current firing the rocket motor. When the pushbutton is pressed the LED goes out briefly as that portion of the circuit is "shorted out" to enable full current to the ignitor.
Skill level: The project requires basic circuit construction skills including soldering. The circuit is mostly based on the Mono Launch Controller described in Make: Rockets by Mike Westerfield.
Step 1: Parts and Tools


Parts:
For all items listed, you can substitute something similar ...
Power tool battery and charger - I used a Harbor Freight (HF)18V NiCd drill hardware I already had. The battery should be at least 12 VDC. The charger should have a bit of extra space inside to fit additional components required for the launch controller function. Since you can still use the battery and charger for their intended purpose, there is no need to get anything special just for this project.
Momentary SPST pushbutton - Radio Shack (RS) 2751566
18 gauge copper speaker wire at least 30 ft long - Menards SKU: 3014967 (this was the cheapest source in my area)
Micro clips RS 270-0373 or Digikey 314-1018-ND
The rest of the parts needed I already had on hand, but I'll give suggested sources for similar parts - not necessarily the actual parts I used in this project.
3.5MM STEREO MINI-PHONE JACK W/ 2 NC SHUNTS link it's important to get the type with NC shunts.
Red 10 mm LED RS 276-0015
Banana Jack / Binder Posts RS 274-0661
Banana Plugs RS 274-0721
Mono 1/8" phono plug RS 274-0287
1K ohm 1/4 watt resistor link
E6000 Glue
Tools:
Wire cutters and wire stripper
Solder and soldering iron
Power drill with 5/16" and 3/8" drill bits
Dremel with cut-off wheel
Optional to test the circuit : Multimeter with continuity tester 12V auto stop light bulb #1157 with lead wires
Optional - Dyno Labeller
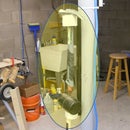
Step 2: Disassemble the Charger and Plan Component Locations


Disassemble the charger and map out location of key components: pushbutton, 3.5 mm jack, LED and resistor, and binder posts. It's important to make sure component placement will not interfere with the normal charger operation. For example, I made sure none of the components will be proud of the cover plate, because during normal battery charging, the charger sits on its cover.
Drill one 3/8 inch hole to mount the pushbutton and two 5/16 inch holes for the binder posts. Installed both the binder posts and the pushbutton in the charger body.
Step 3: Make Arming Key


Solder 1/8" mono phono plug terminals together (that is - short them together). Also solder a short length of red wire to the plug. The wire does not have any electrical function - it's just to make to harder to lose track of the launch key.
Step 4: Circuit Construction


I have provided diagrams of both the original "charger only" circuit and the final launch controller / charger circuit.
Since the 3.5 mm jack terminals can be a little confusing, please study the illustration. For additional info on "phone" type connectors look here
Detach original black wire from the charger PCB to the battery connector negative terminal. Replaced with a wire from charger PCB to the Switch terminal of the 3.5 mm jack, and another wire from the Tip terminal of the 3.5 mm jack to the battery connector negative terminal.
If you have a multimeter with continuity test function, you can do the following test: without the launch key plugged into the jack there should be continuity between the black charging PCB black wire and the battery connector negative terminal; with the launch key plugged in there should not be continuity between the black charging PCB black wire and the battery connector negative terminal.
Leave the original red wire from the charger PCB board to the positive battery connector in place, and add the additional circuit elements as shown in the diagram and photo.
After the circuit was soldered together, I glued the 3.5 mm jack to the inside wall of the charger case. Be sure to let the glue setup for at least 24 hours so that inserting the plug into the jack does not break it loose. Position the LED upright. Install binder posts and pushbutton in their mounting holes. Of course, different charger case designs may require different component placements.
Step 5: Modify Charger Cover for LED Viewing and Arming Key Access


Drill a 3/8" hole in cover above the LED so that with the cover installed you can easily detect if the LED is illuminated.
Using a drill and Dremel cut out a portion of the cover to allow access for the Arming Key.
Optionally add labels.
Step 6: Optional Circuit Testing


A 12V automotive stop light bulb #1157 with lead wires is used in these tests because it has resistance similar to a rocket ignitor
Plug controller into power tool battery.
Test 0: Arming Key removed - battery charger works in the normal way.
Test 1: Battery installed & Arming key inserted, 12V bulb not attached across binder posts- the Armed LED will not illuminate.
Test 2: Battery installed and 12V bulb attached across binder posts, but Arming Key is not installed - the Armed LED will not illuminate.
Test 3: Battery installed & Arming key inserted and 12V bulb attached across binder posts - the Armed LED will illuminate, but the 12V bulb will not illuminate
Test 4: Battery installed & Armed key inserted, ignitor correctly connected, and firing pushbutton pressed - the 12V bulb illuminates. When the pushbutton is pressed the Armed LED goes out briefly as that portion of the circuit is "shorted out" to enable full current to the 12V bulb (which is simulating the ignitor).
Step 7: Construct Launch Cable


Solder two micro clips to one end of a 30 foot length of speaker wire and two banana plugs to the opposite ends.
That's it you're finished. Just charge up the power tool battery and head to the launch site


