

Introduction: My Very First 3D Printing Project


Want to learn how to do 3D projects? Me, too! I have been fascinated by the prospect of doing 3D printing. I also have absolutely no project for which I need a 3D printer. But, I WANT to do a 3D project. I feel like the world is moving along without me being a part of it. Since I do not have an entrepreneur business that desperately needs a 3D prototype printed, I have no justification for spending money on this project. I feel that these 3D printers are the first generation of technology which will lead to the promised (yes, promised!) replicators featured on Star Trek Next Generation. I want to be a part of this!
But…how can I do 3D printing when I have little or no money to devote to this hobby? First, a note for those of you yelling at my computer about all those lovely computer “clubs”, which give you free or low cost access to 3D printers. They are not here. Maybe they exist in large urban areas, but they do not exist anywhere near my little farm deep in the southern United States. If a 3D printer exists within fifty miles of my house, it is hiding quietly in somebody’s personal basement. I have never even seen a 3D printer, except on YouTube. Read along. This is going to be quite a challenging project.
Step 1: Download 3D Software

I am going to start my trek by searching for free 3D CAD software to download. I googled for free 3D CAD software, and had many selections to pop up on my screen. I know that the free version will be very simplistic, and the upgraded paid version will have many more “bells and whistles”. Since I do not know anything about 3D drafting, the free version will suffice.
I chose AutoDesk1234D, from the website http://www.123dapp.com/ I had no greatly researched, educated reason for choosing it. There seemed to be much chatter about this one, which means there might be more videos and free help. If you would like to travel with me on this trek, download a free copy, and continue reading.
Since I am a borderline wannabe geek, I did the sensible thing, and asked a young person to punch the scary download button. Nothing particularly exciting happened. My computer gave immense consideration to the download request, and I sat for nearly an hour watching a partially filled progress bar move with microscopic precision across my screen. I am told by geeks, that have seen an actual 3D printer, that 3D printing is nearly this exciting, after the first couple of printings.
Ok, now what do I do? I opened the software, and there is a beautiful grid gliding upon my screen. It is empty, taunting me. Make something!
There are thousands and thousands of free downloads for 3D printing online. http://www.thingiverse.com claims to have over 100,000 3D printing files waiting for you to download, free. Do a search, and find even more websites with free 3D printing files. After taking a peek at Thingiverse, I am seriously discouraged. How could a borderline wannabe geek ever create anything that looks this good? And why would I want to make my own files, if someone else has already done it? Because I want to design files too, that’s why! If you don’t agree with this reasoning, grab a free download, and skip a few steps in my blog trek.
I decide that my first 3D design attempt will be for a coffee K-cup holder. It will be a simple cube with a couple of slots. It will not have curves. It will not have an unsupported roof line. It might not even have a screw hole!
Step 2: Visualize Your Design.

I am a classically trained sculptor, and my favorite medium is clay, which may explain my interest in 3D design. In beginning ceramic classes, it is common for an instructor to tell students to roll long threads of clay, and make a pot by using the clay thread to spiral around and around, slowly building the cylindrical pot up from the ground. As long as each new layer of clay ribbon is put directly on top of the previous layer, your pot is doing well. You might even be able to cheat a little, and make the next layer just a little smaller or larger. If you try to make, let’s say, a pedestal table, it will collapse. You build the pedestal, layer by layer. When you try to add that big round table top, the wet clay collapses.
My research indicates that 3D printers build designs much like wet clay or glue from a hot glue gun. Later, it will dry hard, but when being printed, the plastic medium is limp and almost liquid. A project, like a pedestal table, would be designed as two pieces, and assembled after printing. My geek adviser informs me that high end 3D printers can print a whole pedestal table with supports added, but I am going to assume that we are using a less expensive printer for this project, since I am still hunting for a 3D printer to use.
I decide that the best design for a beginner is to start at the base level, then build the design straight upwards, without holes, windows, or funky twists. I will save that new sci-fi figurine design for a future project. I pick a
project that will be very small, only a couple of inches tall. It will print faster, and fit into the smaller 3D printers.
I begin by making a rough physical prototype. I grab a piece of cardboard, and fold it around a K-cup (a standard size sealed plastic cup, which contains coffee to use in a certain type of coffee makers). When drawing my design in the software, I will put the broken rectangular shape on my table (or grid base) and build upwards. If I put the solid rectangular side on the table, an overhanging ledge would be the last few lines to be printed. Without support, the two ledges would collapse.
Step 3: Draw Your Design.


There are lots of instructions and Youtube videos that can be used for learning this software. I preferred to learn by moving my mouse around, and clicking on various features. I will mention that unlike some newbies, I already use 2D drafting software (Inkscape, Silhouette, etc.) with ease. There is much overlap in the features, which seem to be fairly intuitive.
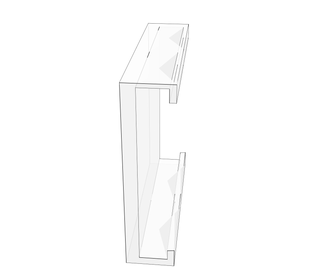
I measured my physical model very carefully, using metric measurements, since this was the default system of measurement in the software. I clicked the “sketch” button to draw several straight lines on the gird. Notice that the base of my “wall” is made using two parallel lines. I originally drew my design as a single line, but could not get the line to project upwards. I finally learned that I had to create a wall, by making two parallel lines, since one line will not project.
Projecting a pair of lines upwards is called “extrude”, so I selected my double lined figure, and punched the “extrude” button to add height. My drawing really came to life with the punch of that last button!
My drawing is somewhat crude, and not entirely symmetrical. I am still trying to learn more about the finer editing and erasing options of the software. It took me about two days of spare time moments to learn the basics of this software, and to finish my first drawing. When the figure was finished, I clicked “export” to a .stl file, and saved the file in my computer.
My largest difficulty was with my hardware, not my software. I am attempting to do this design using a three inch touch pad on a laptop computer. The small touch pad, and lack of adequate mouse control, makes designing any project to be quite challenging. This is a problem that have encountered while using 2D software. Some freehand drawing features on Inkscape are nearly impossible with my tiny touch pad. I really need a better drafting surface, perhaps a larger work surface and a light pen. I have browsed at computer stores, but no product has piqued my interest enough to open my wallet. I am still looking. Since I do so much computer graphic design, I may splurge with a $100 to buy the right accessory. Suggestions placed in the comment section are solicited.
Step 4: Send Your Design to a 3D Printer.


I now have completed my first 3D design project, and saved it as a .stl file. How can I print it? Ideally, the print location would be conveniently located, cheap, and allow me to watch the file being printed. If something goes wrong, I would tweak the file on a computer, and immediately print the second version. I start to research my options.
Option 1: Buy my own 3D printer. I am still doing research, but the least expensive 3D printers that I have found are about $600. The Kossel Mini (http://www.think3dprint3d.com/Kossel-Mini-3dPrinter-Kit), and the Kiwi (http://www.sharebot.it/index.php/3d-printers/sharebot-kiwi-3d-kit/?lang=en) are options in this category. Both require some assembly, but would include all the parts and detailed instructions. Perhaps, I could set it up to print my K-cup holder in a public location for visitors to watch in awe. I would love to have my own 3D printer, but $600 is beyond my hobby budget, so I must reluctantly move on to other options.
Option 2: Build my own 3D printer. There are many posts about making a 3D printer using spare parts, such as old inkjet printers. The cost would be much less (perhaps $300?), but I think that my geek skills are not up to this challenging task. Let’s move on to other options.
Option 3: Search the local community for 3D printers that can be used by the public. About thirty miles from me is a mid-sized town with several 3D printers. One is located at a college, and its use is limited to their students. I thought about taking a class at the college, but it would probably be cheaper to buy my own printer! A “club” or “workshop” does exist in this town. I inquired, and was told that the facility membership was by invitation only. A membership costs $40-$80 per month, plus a requirement to do community service. Members were expected to consider this a long-term commitment, and are strongly discouraged from joining for just a month or two. They do offer free workshops once a month, on a week night, which are open to non-members. I could not print my own designs, but would have an opportunity to see a 3D printer operating. The facility is a forty-five minute drive, and located in a reclaimed building in an inner city neighborhood, which is known for limited parking and high crime statistics.
Option 4: I could mail order a 3D print. I would make a file, beam it to a company, and a few days or weeks later, receive my plastic 3D print in the mail. I would not get to see the 3D printer making my little project, and each tiny revision would take another week to order.
Option 5: Take my file to a print shop. There are stores which I can pay to print my file. Some of them might let me stay and watch the printer making my design. A company called 3D Hubs (https://www.3dhubs.com) is an online resource for finding, and hiring, local 3D print shops. I entered my address on their website, and was told that the nearest local shop in their network was 150 miles from my location.
Option 6: Go on a trip. A two hour drive will take me to a large urban city. They have, among many other options, a public college which opens its well stocked computer lab to the public as a community service. It has lots of cool geeky toys, including several 3D printers, and a laser cutter.
Option 7: Enter a contest and win a 3D printer. I might win a random drawing, but a skill based contest would be difficult to win. Without easy access to a 3D printer, I would not have the opportunity to learn, practice, tweak, and reprint until I created something truly spectacular. It would be very difficult for me to compete with a student or researcher with unlimited access to a school or office 3D printer, big touch screens, and premium software.
I have decided to beam my design to someone willing to print my file at a big public college, which is several hundred miles from my house. Next month, I will recruit a large friend or family member to accompany me to the next open house in the scary urban neighborhood thirty miles from my home, so that I can see a random file being printed. (Sigh.This is so much trouble just to print a two inch piece of plastic.)
After a few days, I was beamed the photo above with the comment that “It smells.” Eventually, I will get to see my creation in person. I can’t wait!
Attachments
Step 5: Critique Your Finished Design.

It has been about a week since I started this project, and my K-cup holder has finally arrived. My design will hold one K-cup underneath a cabinet or shelf, conveniently located above my coffee pot, and will free my counter from large containers of K-cups. I can print more of these to hold multiple K-cups, and attached them behind or beside the first one. The holders are attached underneath the shelf or cabinet with double sided tape.
I was reasonably pleased with the outcome. When I first saw the holder, it seemed too large, but the K-cup fit well. There are some things that I would like to change. It would be nice if all the walls were the same thickness, and I may alter the opening slightly for a tighter K-cup fit. Even though this is a first attempt, it is still functional.
My geek adviser tells me that this little project took about one hour to print, and the thickest wall is hollow inside, but it was finished to look solid. In the photo of my design being printed, I see some extra plastic on the base, which must have been trimmed before I received my finished item. The plastic was surprisingly stiff, much stiffer than a similar thickness of wood. The surface was lightly textured and not smooth or slick. While mail ordering finished prints from a beamed file may be possible, I believe that I still need to find a 3D printer to see something being printed to understand more about 3D design.
As I continue to search for easier access to a 3D printer, I hope to make more designs. I would like to make an upgraded version of my K-cup design, and maybe print a few free downloads, too. I want to explore the potential for jewelry making. I am also looking forward to doing something straight out of a Star Trek show. If a tiny piece of plastic breaks on a small appliance, such as my coffee grinder, I would like to design and print a replacement part instead of buying another $50 appliance.

Participated in the
3D Printing Contest

Participated in the
Mind for Design


