

Introduction: Pool Cue


For some, billiards is a sport defined by perfection, the skill of one's accuracy, patience, and technique. Amongst others, pool is a game played for enjoyment, competition, or simply a social event. Being an instructable is only a part of this simple but yet complex art, as it was learned, designed, created, and delivered with all of the aspects stated as not just thoughts/ideas, but as requirements.
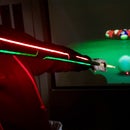
One of the first pool cues I made was a several years ago and an instructable titled "Saber Cue" records the sitcom. Shortly after I decided to redesign everything about the idea. Over the years I've been consistently designing, building, discarding, designing, discarding, and creating what is finally ready to be shared "Nexue". Nexue is a billiards stick, a.k.a. pool cue, I designed to "lighten" the game up a bit. Constructed of only the highest quality Canadian "hardrock" maple, "futuristic" design inlayed with colored LEDs, and built in usb rechargeable battery, it is of its own kind. I'm happy to share with all of you, have fun and enjoy.
If interested in the product and prefer to skip the build, it is available here: https://www.etsy.com/shop/NeXue?ref=search_shop_re...
For the rest of ya lovely crazies.. Let's get to it eh!
Supplies
- Hard Maple
- Table saw
- Dado blade
- Square
- Dremel
- Saburr tooth rotosaw bit
- Pencil
- Wood glue
- Clamps
- Drill
- 3/4 drill bit
- Lathe spindle
- Lathe
- Hammer
- Live center
- Gouge
- Skew chisel
- Micrometer
- Sandpaper(60, 120, 220 grit)
- Steady rest
- Lathe drill chuck
- 1/8'' drill bit
- 5/16'' 18 drill bit and tap
- Pool cue pin
- Epoxy
- Mixing stick
- Laser machine with rotary and attachments (optional)
- Soldering iron
- Solder
- LEDs
- Wire
- Lithium ion battery
- Packing tape
- Disposable cups
- Corn starch
- Rubber bumper
- Food coloring or wood dye (optional)
- Acrylic sealer
- Masking tape
- Scrap wood
Step 1: Cut Lumber

The first step is to cut the appropriate dimensions of our hard maple wood. We will want two boards equal to the length of 28", width 1.5" and height .75".
Step 2: Dado Grooves


With a 3/4'' wide dado blade installed on your table saw, set the blade to cut 1/2'' deep, and your fence at 3/4''. Make a groove down each board about 7/8 the entire length of the boards. Be sure to stop before you reach the end otherwise we'll have a hole too big for the pin. Now we have some square grooves that we want to make round. For this I use a dremel with a saburr tooth bit called rotosaw. Make a few passes untill you have a somewhat round groove in each board.
Step 3: Joining Halves


Measure 3/4'' on the end of each board and draw a line. This will help find the center after they are glued together. Now that we have two boards with a half moon groove spanning almost the entire length of each board, it's time to glue them together. Spread a fair amount of wood glue on one of the boards. Set the other board on top and line up the grooves on one end and the lines we just drew on the other end. Clamp the boards together and let it sit over night. Remember there is no such thing as too many clamps.
Step 4: Battery Compartment


Now that our two boards are one board, we can make a larger hole in the opening we have for a compartment to store the battery. This will be the butt end of the cue. Use a 3/4'' drill bit to drill 3-4'' deep into the end of our existing hole. Now our somewhat round opening is nice and round and will fit an 18650 battery nicely.
Step 5: Turning Prep


Center your lathe spindle around the round opening and strike with a hammer several times so that we have solid marks for the spindle to grab. Same goes for the other end except use the live center to mark the center.
Step 6: Turning


Install the board onto your lathe. Using a roughing gouge, turn the entire block down to a somewhat round shape. Now that it's slightly round, start back at the butt end and turn down till you reach roughly 1.25'' checking preiodically with a micrometer. Now jump to the middle and turn it down to about 1.1''. Turn the other end down to .75''. This is the end in which the pin will be installed. Once each section is marked to the appropriate thickness, turn down the rest of the stick so there is an even taper from end to end. Now that we have the general shape of our cue, lets sand it smooth. Start with 60 grit paper and work your way up to 220 until satisfied or there are no more scratches than can be seen.
Step 7: Drilling and Installing Pin


A steady rest should be used for drilling out the hole to set the pin. As close to the end as possible while still supporting the cue is where we want to set the steady rest. Fasten it so there no play around the cue. Use a lathe drill chuck starting with a 1/8'' drill bit. Turn on lathe with the slowest setting and use the tailstock to drill the hole. Now that we have our hole started we can remove and square off the end of the cue. Using a skew chisel or parting chisel, turn 1/4'' off so the end is square with the cue. Once the the end is squared up, finish drilling with a standard 5/16'' 18 bit and tap. Once the cue has reached the threaded part of the bit, turn the lathe off and proceed to drill and thread turning only by hand 2-3'' deep. Remove the bit from the lathe chuck and insert the pin. Mix up some epoxy and spread it on the pin and hole and then slowly, turning only by hand, screw the pin into the cue.At the butt end use the skew to put a slight bevel on the stick.
Step 8: Engraving the Design


The designs were originally drawn on each cue and engraved with a dremel. I was fortunate to come across a laser machine and used AI to create my 3 designs. If you have a laser machine, my design "Halo," available below, or you can design your own. A dremel works great as well, try and be creative. Installed in the laser is a rotary attachment the cue mounts to using a rubber bumper and bearing. Insert bumber into butt of the cue and use two clamps to secure to the table in the machine. The pin is threaded into the rotary gear at the other end. With the engraving speed of the laser set at 12 m/s and power at 85%, proceed to engrave the design. With a 100w laser it takes 2 passes. Once finished engraving, remove any pieces of wood that may be stuck inside the cue.

Step 9: Wiring LEDs and Battery


Measure the distance that you want to be lit in your cue and double it. Remove sticky backing from LEDs and fold them in half. Solder one wire to the positive end of the LED strip and one to the negative color of your choice. Solder a wire to the positive of battery terminal and one to the negative. I use a 18650 lithium ion that previously had nickel welded to the terminals. Essentially we're soldering onto the remaining nickel, otherwise you may have trouble getting solder to stick to the battery. Insert LEDs into the cue leaving the two wires sticking out of the end.
Step 10: Fill With Epoxy


In order to restore the integrity of the cue we need to fill the voids created while remaining clear for light to shine through. Use packing tape to cover all cutouts in the cue. Do this neatly, gently, and uniform ensuring the structure of the cue stays the same.You'll want to be sure the entire cue is sealed as epoxy isn't fun to clean up. Add two teaspoons of corn starch which is used to help dispurse the light. Pour epoxy into the cue until its 3" from being full. Insert battery till its flush with the butt and then push it down another inch leaving the wires exposed out the end. Let cure at least 24 hours. Remove tape and sand with 240 grit any excess epoxy that made its way to the outside of the cue.
Step 11: Clear Coat


Now we need a simple jig to hold the cue in the upright position while we pour on the clear coat. Use a scrap piece of wood and use your 5/16 18 drill bit to drill a hole for the cue to screw into. Tuck the wires inside the compartment and use some masking tape to cover the opening at the butt end so epoxy doesn't fill the remaining space of the compartment. Mix up 4 oz. of epoxy. With the cue standing pin end on the ground, pour epoxy onto the cue. Be sure to cover the whole cue as this is can be our final coat. Wait 24 hours to cure and add another coat if necessary.
Step 12: Final Sanding, Coloring, and Coating


Mount the cue back up the the lathe. Use the skew chisel the round off the cue to the original shape. Once round, do a final sanding of 240 grit. Now is the best time to add any stain or dye to your cue. Hard maple doesn't take stain or dye well without it getting blotchy so coloring after its epoxied works well. Add whichever colors you prefer, food coloring or wood dyes both are good options, or leave it with the natural look. Allow an hour or so for the dye to fully dry and then use some acylic spray for the final protection. Do 2-3 coats and let sit 2-3 hours before handling.
Step 13: Wiring Electronics


Remove the masking tape from the butt end of the cue allowing access to the wires we had tucked in earlier. In order for the cue to turn the lights on, I use a tilt sensor. The charging module is a step up converter with a usb charging port. Solder the battery negative wire to the battery negative of the charging module. Solder the battery positive wire to one end of the tilt switch. Solder the LED negative wire to the voltage out of the charging module. Solder the LED positive wire to the other end of the tilt sensor. Insert the charging module, tilt sensor, and wires back into the butt end of the cue.
Step 14: Install Bumber


Make a slit in the rubber bumber so the charging port is able to fit inside the bumber and the bumber can then be pushed into the butt end of the cue
Step 15: Go Have Some Fun


Attach your favorite shaft, be sure to make sure your battery is charged up and go out and have yourself a good time playing pool.

Participated in the
Make it Glow Contest


