

Introduction: Prota OS for Raspberry Pi(Prota Pi)


This post is about using Prota (Prota Agatha in particular) on Raspberry Pi and the basics of its automation engine - Stories.
What is Prota?
For those of you who haven’t heard of it, Prota is an operating system for personal server computers. It means Prota runs apps and doesn’t require any direct input/output peripherals like monitor, keyboard, mouse, etc. to operate.
Prota is originally designed for home automation, connecting devices and Internet services together for optimizing everyday workflows seamlessly, but its potential is limitless.
Prota OS currently supports our custom ARMv7-based smart hub, Prota Box, and Raspberry Pi B, B+ and 2 B (not tested on Zero)
Step 1: Install Prota Pi


You can now go ahead and download the Prota Pi image , and try it on your raspberry pi. After booting up your pi for the first time, use your smartphone or PC to find a SSID starting with “prota-” in the WiFi settings and connect to it. Once connected, visit “http://prota.local”, and everything afterwards should be self-explanatory. Please refer to Prota Pi 101.
Access Link
At the end of the first time configuration, you would recieve a permanent link to your Prota. No matter where it is, you can always access your Prota from anywhere as long as it’s connected to the Internet.
Cloud Access
Cloud Access is the one that enables Prota’s universal accessibility. No extra configuration is needed to use this feature. It will be automatically set up for you. Although the bandwidth and thoroughput may be limited, it should be enough as most Prota apps are Stories-oriented. We are preparing a special tier for heavy users, but it won’t be released anytime soon. So if you require a lot of bandwidth and low latency, you can always use the IP address to access your Prota (you may need to configure your network router).
Step 2: Stories - the Automation Engine

The core automation engine of Prota OS is named Stories. Users can create an automation rule (or write a story in Stories-speak) for their connected things using natural language. Currently, it only recognizes predefined sentence structures, but in the future, we will make it extremely flexible.
Here are some stories you can immediately use (or cite in Stories-speak). Note that the device you’re using must have access to the Prota that you’re going to cite stories.
Please click or copy/paste the following URLs of stories you want to cite.
"When the presence sensor detects any motion in a room, post a message “Someone's in the room!” to a Slack channel."
http://stories.market/_/stories-market/imp/?ident=...
"When RPi cam detects any motion, trigger GPIO pins."
http://stories.market/_/stories-market/imp/?ident=...
Step 3: GPIO


GPIO has never been easier with Prota Pi. With the Stories support, you can directly make use of GPIO pins in your automation stories (i.e. you can use your arduino sensors!).
The current support includes digital read/write pwm interrupts UART (partially supported) I2C and SPI are not supported at the moment.
"When PIR sensor is on rising interrupt, write 1 to pin 23."
http://stories.market/_/stories-market/imp/?ident=...
"When PIR sensor is on falling interrupt, write 0 to pin 23."
Step 4: Webhook


Do you want to integrate web services? If they offer web APIs, they can be used in Stories. Both incoming and outgoing hooks are supported, so it’s possible to connect with IFTTT using their Maker channel, for example.
"When I'm nearby my house, turn on LED."
http://stories.market/_/stories-market/imp/?ident=...
"When I'm nearby my house, turn on lights at the front door."
http://stories.market/_/stories-market/imp/?ident=...
"When I'm nearby my house, switch on the power outlet."
Step 5: OSS

As a bonus, some useful OSS apps are available, pre-packaged, and can be installed with a single click. Some of them offer events and actions for Stories, so they’re better than just being pre-packaged.
Step 6: Your Mission - Free DIY Smart Power Socket

If you missed our popular DIY smart power socket post, please read here.
It’s time for you to get your hands on it. If you make your own DIY power socket based on the new version of Prota, we will give you one socket for free (shipping cost to recipient, which is normally less than $10 world-wide). If you can come up with creative automation stories, please share with us in advance. We will send this with your free power socket.
How to receive wireless power socket (and an aluminum stand for Pi)
1. Install Prota Pi .
2. Take a photo of your Pi and its Homescreen and share with us here.
3. Write and share an automation story that makes use of power sockets.
4. Share a screenshot of automation Stories you created.
5. Make DIY smart power socket using Prota and a RF315 module (without the socket hardware).
(Please refer to "Made it" for examples)
If you accomplish up to #4, we will send you the cool-looking, aluminum stand for Raspberry pi. If you do all, we will also send you one socket :)
In a meanwhile, we will be back soon with more instructables posts on Prota Agatha!
You like our projects? Make your own!
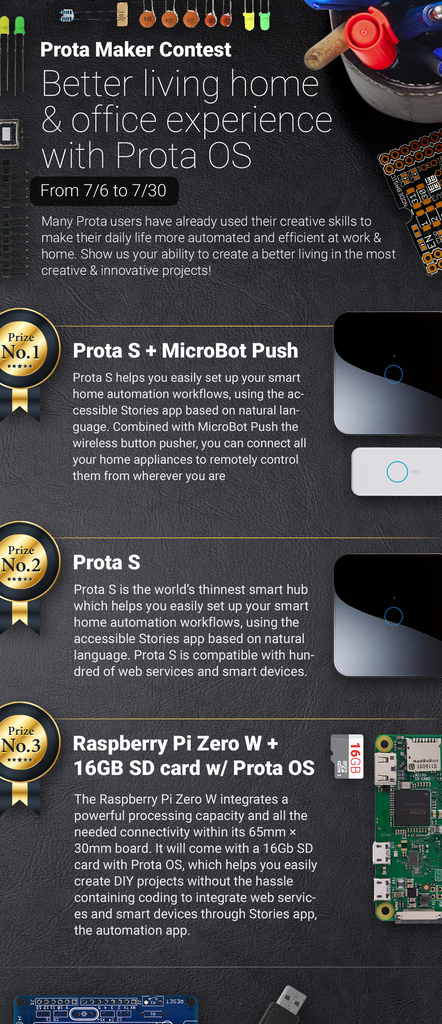
We are currently (and until July 30) running a maker contest. Show us the creative projects you can do with Prota OS and win awesome prizes!
More info here - https://support.prota.info/hc/en-us/community/top...

![Tim's Mechanical Spider Leg [LU9685-20CU]](https://content.instructables.com/FFB/5R4I/LVKZ6G6R/FFB5R4ILVKZ6G6R.png?auto=webp&crop=1.2%3A1&frame=1&width=306)


