

Introduction: SPLat EC1 Based AA and AAA Battery Tester With Bar Graph


A simple and easy to program AA battery tester that can test all 1.5V batteries and can be re-programmed to test up to 3.3V batteries!
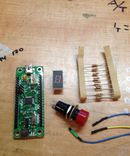
Parts:
1 LED common cathode bar graph or equivalent 1.8V forward voltage and 10mA per LED (I use multiple rectangular leds glued together and negatives soldered together)
8 33 ohm resistors
Female header connectors
Multimeter
Solder
Soldering iron
Solid speaker wire
A computer running SPLat/PC, the free SPLat programming environment (IDE)
Step 1: Schematic

Step 2: Solder Some Wires


There isn't much wiring to do so we will do all of this at once
Lets solder one resistor to each LED
Now we need to solder one female header to each resistor and on our cathode
Now lets use some solid wire to make some testing probes by simply soldering a loop to a female header like so.
Step 3: Plug It In


Now lets plug in our LEDs to the EC1 in order red to green pins 6-13 (outputs 2-9) these will be programmed to turn on at different voltage levels, also plug the common cathode into the 0v pin
We can also plug one test lead into the 0v pin and the other to pin 3 (analog input 0)
Now lets plug in our EC1 to a PC and connect to it while running SPLat/PC
Step 4: Gather Information

Using a multimeter measure the voltage on the 3.3V pin of the EC1, This will be used for programming so write it down.
Now measure the voltage of a fully charged battery, It should be around 1.6V, We can assume that we can use the battery all the way to 0.8V so we will step each led by 0.1V.
Lets plug in out EC1 to a PC and connect to it running SPLat/PC
Step 5: The Program

We will start by launching 9 tasks. The first will read the value of the analog input and convert it to a real voltage, the remaining 8 tasks will correspond to when an LED will light. Each will turn on only if the input at ANIN 0 is above the specified voltage. In each task we will put the Voltage at witch that LED will turn on. Starting at 0.8V, 0.9V, 1.0V, 1.1V, 1.2V, 1.3V, 1.4V, and 1.5V
Each individual task will consist of comparing the value stored in memory 1 with the value stated and determining if the LED should be on or off
The program is shown above:
The voltage we measured earlier is put in place of the 3.20 in the second line. This is the actual voltage that the EC1 will see as 100% or as a "1" in the floating point register. My measurement was 3.2V so that is what I have put in.
Each section is duplicated but the numbers are changed, such as the output address, voltage level, and task addresses, i.e. , "on 2" or "on 3", "floadq 0.8" or "floadq 0.9", and "LED1" or "LED2" as well as "LED1on" or "LED2on"
The only part not duplicated is on LED1 were it flashes the output on and off to indicate the battery is "dead" or below 0.8V
Step 6: You're Done!
Plug it into a USB and start testing some batteries!! You can adjust the values as you see fit. And the SPLat EC1 will accept up to 3.3V. This tester will work with button cell, AA, AAA, D, C, B, and other 1.5V batteries!
*The program is attached*


