

Introduction: Simple PVC Birdhouse


I have 33 trees on my property and tons of wild birds. Most of them live in the very tops of the trees where I can't see them come and go very well. I like to keep birdhouses in the trees closest to the house so I can watch and enjoy the birds.
If you have the tools already living in your workshop/garage one birdhouse will cost a little under $7.
Step 1: Tools & Materials to Make a Birdhouse
If you are new to working with PVC and want more in-depth information I highly recommend enrolling in the PVC Class taught by audreyobscura!
You will need the following tools and materials to make a PVC birdhouse. (If you have access to a CNC machine this would be SO much easier. You could cut precise wooden circles with cutouts for the front and back of the birdhouse. A different saw would also make this much faster, however, I am a gal with limited access to tools!!)
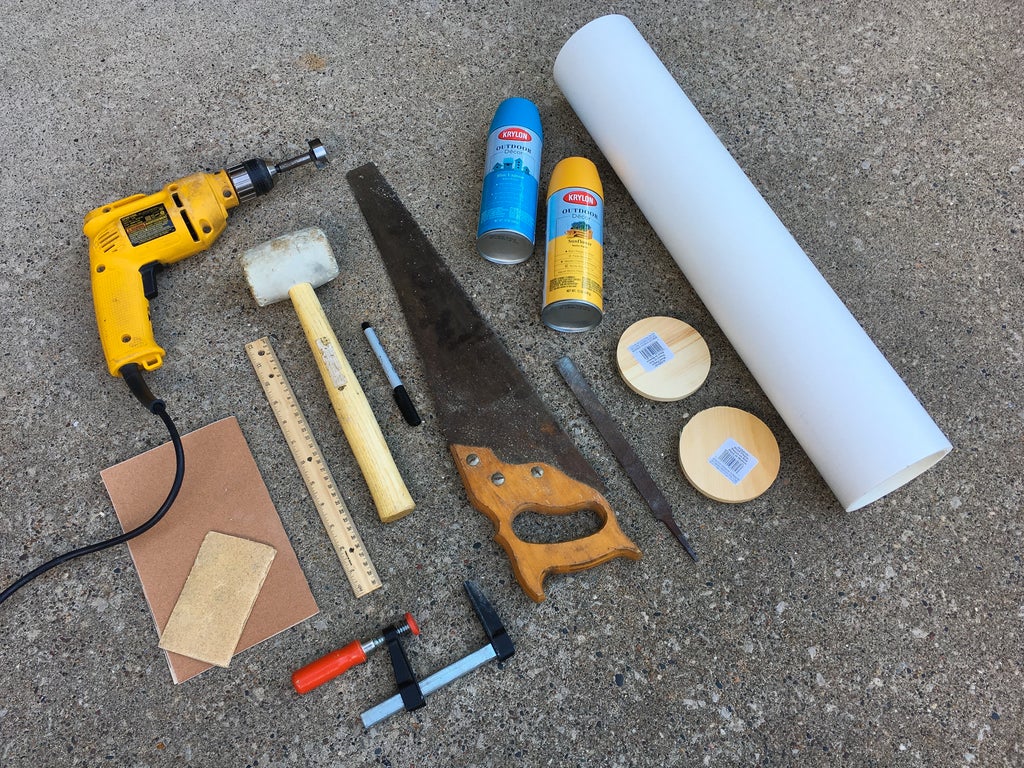
Tools & Materials
- Handsaw
- Electric Drill
- 1 1/4 inch drill bit (depending on the bird you are looking to attract. Check here for hole sizes.)
- 1/8 inch drill bit
- 1/4 inch drill bit
- 5/64 inch drill bit (or a size slightly smaller than your eye screws)
- Clamp
- Pencil
- Rubber Mallet
- Quick Square
- 4 inch PVC pipe - at least 8 inches in length
- 2 - 4-inch wooden rounds
- 2 - 1-inch eye screws
- 24 inches thin paracord
- Glue (I used Weldbond but the PVC Class or the Glue Class might recommend that something else would work better.)
- 220 grit sandpaper
- 100 grit sandpaper
- Metal File
- Outdoor Spray Paint (check that it works on plastic) - 2 colors of your choice
- Wooden Dowel - 1/4 inch
Step 2: Cut & Sand PVC for Birdhouse
1. Measure and mark an 8 inch long section of PVC. Mine came in two foot lengths so I ended up making three birdhouses (they make great gifts!). Draw a diagonal line at an angle of your choice starting at the 8 inch mark. Mine was approximately 60 degrees.

2. Clamp the PVC to a work table and using a handsaw cut along the angle. As always, tools can be dangerous. Please use caution.


3. Using a metal file, smooth down the cut edge removing any bits.

4. Sand the entire surface with the 100 grit sandpaper. This will remove the words/lettering on the PVC and prepare it for painting. Be sure to rough up the entire surface including the inside of the cut angle.

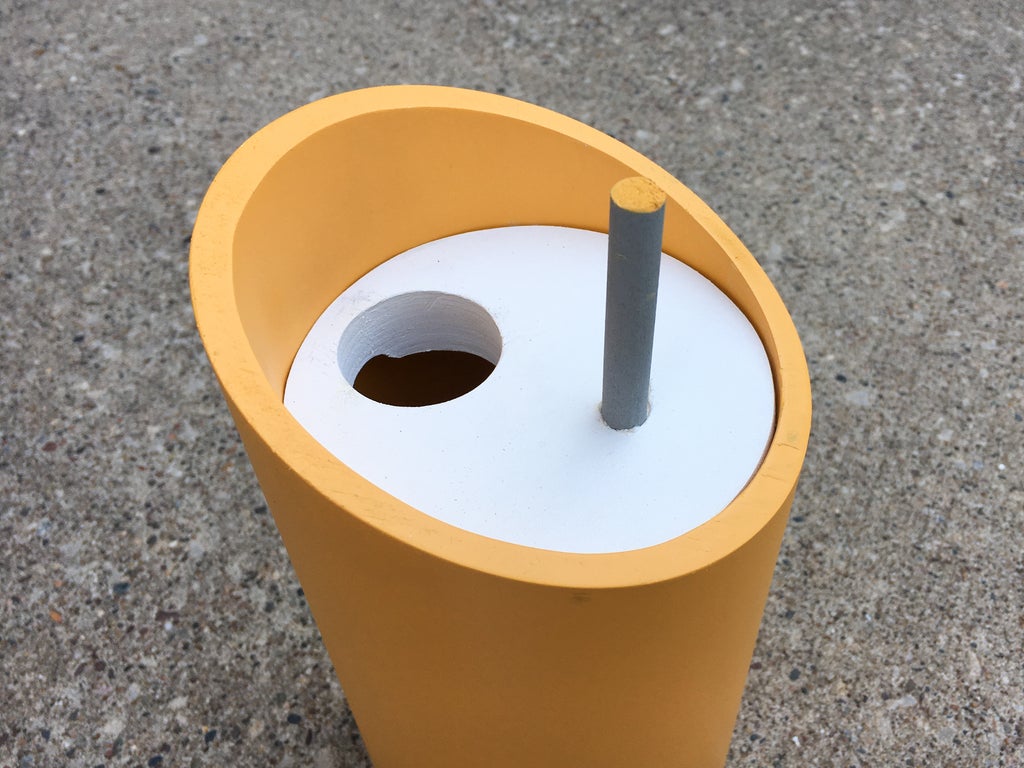
Step 3: Drill Wooden Rounds for Birdhouse Hole
Each of the wooden rounds will need holes drilled. The front piece will need the main hole for the bird to fit through and the back piece will need a few vent holes.
I purchased these wooden rounds at Michael's for $.99 each. They are beveled and about 3/4 inch thick. I wish they weren't that thick but they worked for this application. If you can find thinner ones use those! This was overkill.
1. Using an electric drill fitted with a 1 1/4 inch drill bit, drill a hole in one of the rounds positioning it toward one side (not in the middle).

2. Change the drill bit to 1/4 inch and drill a hole half way through the wood. Position it right under the larger hole This will be for the perch later. (You can see in the image that I failed to drill this before painting...big mistake! don't forget this step before painting! The paint just chips off around the hole and will have to be repainted.)

3. On the other wooden round, mark where three vent holes should go, I lined them up along the top edge in a row. Change the drill bit to 1/8 inch and drill the holes.


***To avoid chipping the wood you can place a piece of tape on the wood before drilling and drill through the tape. The wood I used was really soft, but if you used something harder it probably wouldn't require taping and wouldn't chip so bad. I did one each way and the one I didn't tape chipped really bad (I had to fill it with wood putty). Boo.

Step 4: Paint Birdhouse Pieces & Cut Dowel for Perch
Choose two paint colors that you like. One for the PVC and one for the front and back pieces.
1. In a well ventilated area on a covered work surface, or spray booth, spray paint the PVC. Don't forget the back edge! Let dry according to paint can directions.


2. Spray the wooden rounds. Let dry thoroughly.


3. Cut a 2 1/2 inch piece of dowel and paint desired color(s).

Step 5: Sand, Fit, & Glue Birdhouse Pieces
If you have a CNC machine the sanding part of this step won't be necessary. The wooden rounds I purchased weren't actually 4 inches so they had to be sanded to fit inside the PVC.
1. Using 220 grit sandpaper sand down the edges until the rounds fit in either side of the body of the birdhouse. Dry fit them to assure a good fit.


2. Run a bead of glue (I used Weldbond) around the flat edge of the birdhouse.


3. Inset the back side piece of wood to secure in place.

4. Using a quick square measure to find where the front of the wooden round will sit and mark with a pencil. This will tell you where to run the bead of glue.


5. Run a bead of glue. My pieces fit really tight so I used a mallet to gently pound the wooden face into place.


6. Squeeze a dab of glue into the hole on the face and secure the dowel for the perch.
Step 6: Drill, Hang, & Enjoy Your New Birdhouse!
More drilling coming up!
1. Fit your drill with a 5/64 inch drill bit (or what matches your eye screws) and drill two holes on the top of the birdhouse. One toward the front and one toward the back. It might be tempting to just put one hole in the center, however, the birdhouse won't hang evenly once a bird decided to nest in it.

2. Twist in the eye screws until they are secure. I matched up the front eye screw with the wood to secure it further.

3. If your paracord isn't already cut, cut a 24 inch piece and burn the edge with a lighter to prevent fraying.

4. Thread it through the eye screws and tie a knot to join the ends.

5. Hang in a tree and enjoy!


Participated in the
Outside Contest 2017

Participated in the
Box Contest 2017


