

Introduction: The Lost Art of the Conic Section Compass


If you are reading this then the title was catching enough :)
So what's this instructable about? It will show you how to 3D print a Conic Section Compass at home. In mathematics, a conic section (or simply conic) is a curve obtained as the intersection of the surface of a cone with a plane. The three types of conic section are the hyperbola, the parabola, and the ellipse; the circle is a special case of the ellipse. No continuous arc of a conic can be constructed with straightedge and regular compass.
The Conic Section Compass (also known as Perfect Compass) is not a novelty: in the second half of the 10th century, the Arabic scholar al-Sijzi wrote a treatise on this new instrument. At the end of the Middle-Age, this instrument disappears and comes back at the Renaissance as a drawing tool. A very nice version by Leonardo Da Vinci can be seen in the Codex Atlanticus.
This device can give a good entry point for an activity that helps the students to understand the way a mathematical theory is elaborated. In secondary school, the conics are often studied only from a cartesian point of view. For students, and for teachers too, the work on the perfect compass restores the link between real world and mathematics models.


Supplies
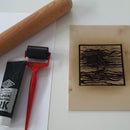
The bill of material is quite short:
- 3D model. Both STL and STEP files are included should you need to make any modification.
- soft pencil (does mine look familiar? :)
- M5x25 screw, washer and nut
Step 1: Build It


Building this device will require not more than 5 minutes (excluding the 3D printing of course):
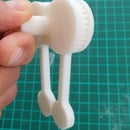
- assemble shaft and base, align them and tighten the M5 screw. To avoid damaging the 3D printed parts do not apply too much torque, but just enough to block the joint.
- mount the pencil holder. it's a press-fit connection and it should be able to rotate easily around the shaft.
- glue the base on a flat surface.
- insert the pencil. It should slide easily guided by its own weight.
- position a piece of paper in front of the compass and fix it with scotch tape. I cut a slot in mine to gain some more drawing surface.
You are ready to go!
Step 2: Use It!


A Conic Section Compass can continuosly trace conic sections exploiting the very definition of it. In this particular build the pencil lays on the surface of a 30 degrees cone (but it could be any other angle) and can freely slide in the pencil holder: in this way it will always be in contact with the intersection surface (the paper sheet). Rotating the pencil holder around the cone axis and being careful to maintain the contact between pencil and paper we will be able to trace different conic sections:
- circle: where the cone axis is perpendicular to the intersecting surface
- ellipse: where the cone axis is between the perpendicular position and the position where the generatrix is parallel to the intersecting surface
- parabola: when the cone generatrix is parallel to the intersecting surface
- hyperbola: where the cone axis is between the position where the generatrix is parallel to the intersecting surface and the position where the cone axis is parallel to the intersecting surface
The trace left by the pencil is very light but you can easily retrace it by hand to make it clearer.
This is it, a very short instructable on a very important topic: I anyway hope this is enough to shed some light on the fascinating world of the conics.
If you enjoyed it please vote for me in the contest! :)

Second Prize in the
Made with Math Contest


