

Introduction: The Poor Man's Otamatone


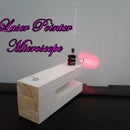
I accompanied some of the kids from my robotics team to a local high school this week to help the new technology teacher sort through the debris left by the previous teacher and get her room ready for the new term. My young protege Vishal handed me a tennis ball with a slit cut in it and I started playing around with it like a puppet. I tossed it in my bag and forgot about it.
Today I was looking for a pencil and found the tennis ball in my bag. I played with it for a while and the idea of creating a DIY Otamatone was born. The Otamatone produces sound by pressing ribbon controller to make notes and manipulating a flexible rubber 'mouth' to modulate the sound produced. I'll use a tennis ball to reproduce the mouth cavity and I'll replace the ribbon controller of the original with a potentiometer and a push button controlling a simple 555 based square wave oscillator. I'll shove it all into a PVC handle and make some budget racket..
Step 1: Preparing the Head


I wanted to mount the tennis ball on a handle with a speaker inside. The handle would have a pot to control pitch and a push button to control the notes. I found a scrap of PVC that was the perfect size to contain a battery and all the components. I also wanted something more fun than a boring tennis ball, so I decided to cover the ball with fuzzy material to create a character face.
I traced the circumference of the pipe onto the ball and cut it out with a hobby knife, aligned with the mouth slit about where a neck would be. I also punched a hole through the ball above the top lip. I screwed a sheet metal screw into it from the inside and then screwed a small wire nut over the screw. This will form the nose after the ball is covered.
Step 2: Covering the Head


I hate spending money on supplies. The challenge of a no cost project forces me to get creative. I dug through my rag box and found a cool old fuzzy striped sock. I tied it off right above the heel and cut the lower part of the sock off. I pulled it over the ball and tucked the loose ends into the neck hole to insure that it would cover completely. I removed the cover and sprayed the whole tennis ball with 3M 77 adhesive. I carefully rolled the sock cover down over the tennis ball, forming it around the nose. I tucked the loose ends into the neck hole and opened the mouth to put a bamboo skewer in it. This pulled the cover into the mouth to insure good coverage. This will be trimmed later when the glue dries. I set the head aside to dry while I worked on the eyes.
The eyes were painted onto blue thumb tacks with white and black paint pens. I held the tacks with needle nosed pliers while I painted them and I set the tacks in a scrap of circuit board to hold them upright while they dried. I came back later and pushed the eye tacks through the tennis ball, folding the point over to secure them. I also trimmed the sock cover around the inside of the lips so the mouth could open.
Step 3: Building the Circuit


I built a basic 555 audio oscillator circuit with a pot to control the pitch and a push button to control the notes length. This is a super easy circuit and all the parts are available from your local Radio Shack (but honestly, they stink- be patient and order parts online for a huge savings). I had all these part in my component cabinet. Here's what I used-
NE555 timer chip
.1 uf capacitor
10 uf capacitor
!k resistor
2.2k resistor
500k pot
1" speaker
9v battery connector
a small bit of perfboard
soldering iron and solder
I placed the 555 on the strip of perfboard. I installed the .1 uf cap between pins 1 & 2 and the 1k resistor between pins 7 & 8. I used the excess capacitor lead on pin 2 to connect it to pin 6 under the board. I added a short piece of heat shrink tubing to the excess resistor lead on pin 8 and connected it to pin 4 over top of the previous connection.I flipped the board back over and added the 2.2k resistor from pin 6 to the center pin of the trim pot. I used the excess resistor lead on pin 7 to connect it to the left pin of the trim pot. I added the 10uf cap to pin 3 and connected the other side to the speaker lead. I connected the speaker ground to pin 1. I added a v+ lead to pin 8 and a ground lead to pin 1. I created a second board with a push button and connected this between pin 8 of the 555 and the positive battery terminal. I connected battery ground to pin 1 of the 555. See the above diagrams.
Step 4: Installing the Electronics


I measured and marked the component locations of the PVC and then drilled the holes to size. I drilled mounting holes in the perfboard and used recycled hardware to mount the two boards with the pot and the push button into the PVC. I used some recycled curroplast cut to fit the inside of the PVC as sound insulation between the speaker and the handle. I want the sound to come out of the mouth, not the holes for the pot and push button. I taped the speaker in place and I put the head on the handle.
I installed a battery and added a black end cap to hold it in. I also added some lips made from red duct tape to give the mouth more definition..
Step 5: Making a Racket

Here ya go-
20150801 024943 from chuck stephens on Vimeo.
I like it. I might not use it on a track, but I can't wait to let my nephews play with it. They'll drive everyone else nuts. Now I want to get one of those giant tennis balls from the pet store and build a larger one. I think the next one will be a couple of octaves lower and I may add another 555 to make it frequency modulated or even build an Atari Punk Console. I could mount a photoresistor inside the mouth to modulate the FM or the step size of the APC. I'd also like to play around with the tennis ball head as a puppet. Wow- that's a lot of ideas from a broken tennis ball!
I don't think I even remember the word 'bored'.


