Introduction: Horse Bike
Giddy-up, pilgrim!
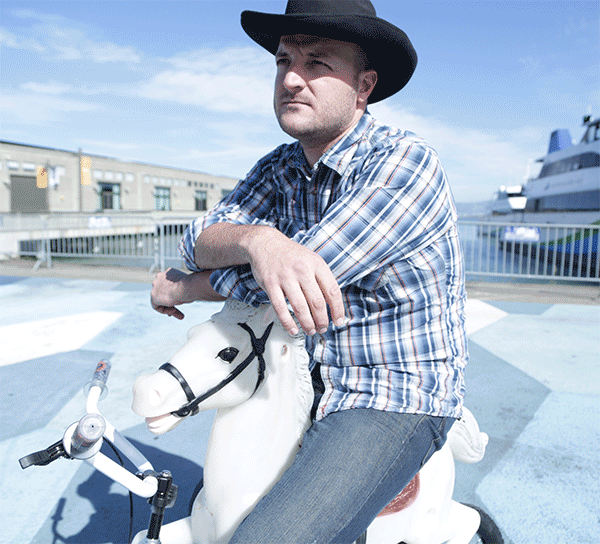
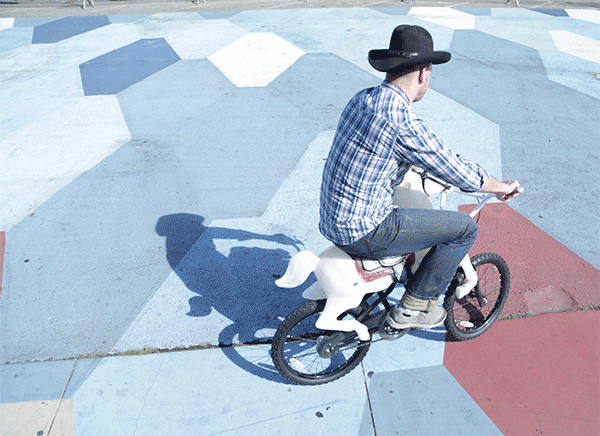
Whether you're wrangling cattle or just cruising along a country road, everything is better with a horse. Combine your favourite things about riding horses with the convenience of a bicycle, with the horse bike!
Maybe you need a horse to go with your knight or Zorro costume, or maybe you're an equestrian aficionado. Whatever the reason, this is the horse you're looking for. I decided to paint my horse and bike contrasting colours to really make the horse shape pop when I ride, but that's completely optional.
Sure to turn heads wherever you ride, making your own horse bike is easy and super fun to ride.

Whinny, whinny, neigh means let's make!
Step 1: Source a Horse (of Course!)
You'll need a kids' riding horse toy, the hollow plastic kind that are suspended by springs are a good choice. I found this used one for sale on a web listing (Craigslist) and paid $30. I did some searching online for a store that sells one similar to mine, but couldn't find anything. Maybe they are a discontinued item only available second hand.
I've seen them at garage sales and flea markets, they are fairly common; so keep your eyes open for one, and snag it when you see it!
I was able to dismantle the horse body from the springs and frame, then stow the entire toy in the truck of my car.
Step 2: Remove Horse Hardware
This model horse came with plastic stirrups mounted on steel pipe that ran though the width of the toy. There were small retaining screws in either side of the steel pipe that were removed, allowing the pipe to slide out.
The cover on the handle on the neck was removed, then the handle slid out.
Step 3: Strip Horse (OPTIONAL)
I wanted a white horse, but the horse I got was brown. To remove the paint I used acetone.
Wearing gloves and working in a well ventilated area I soaked a rag in acetone and began stripping off the paint. For the tighter areas I used cotton swabs and worked the paint out. Stripping the horse of paint took about 2 hours.
Step 4: Paint (OPTIONAL)
After the old paint was removed, I roughed the surfaces to be painted with a plastic scouring pad so paint would have better adhesion.
Next, I carefully masked off the areas I didn't want to paint. Since painting to this type of plastic can be tricky I applied thin coats of paint in order to build up a solid base. I applied about 4 coats of black paint for the bridle.
Step 5: More Painting (OPTIONAL)
When the bridle was completely dry I peeled off the masking tape and reapplied a mask around the eyes, then around the mouth, nose, and ears.
The eyes were painted black, and the mouth, nose, and ears were painted pink.
Step 6: Clean Up Paint Job (OPTIONAL)
Once the paint was dry and the mask was peel away, any small paint runs were cleaned using acetone and cotton swabs.
That's a good looking horse!
Step 7: Source Bike
Because I'm using a children's riding horse I needed a suitable frame to accommodate. I chose a large 20" wheel diameter kid's BMX style bike. This bike is a perfect choice as it has a simple design, can easily be modified, and has a coaster brake (pedal backwards to stop). These bikes are inexpensive and available everywhere, in store and second-hand.
I wanted to have a black bike to allow the white horse to really stand out. My bike was orange and white, so I needed to paint it.
I partially dismantled the bike, removing the tires and chain guard.
Step 8: Sand Bike Frame (OPTIONAL)
Before painting I sanded the frame by hand with 150 grit sandpaper. This removed the protective coating on the bike and prepared the surface to accept paint.
After sanding I cleaned the frame with a damp rag to remove any dust and debris.
Step 9: Prime and Paint Frame (OPTIONAL)
Hanging the bike frame by the handlebars I masked off the steering joint, and any other area I didn't want to paint (like around the pedal housing and any chrome bolts). I started with a layer of grey primer, then applied 2 coats of matte black paint.
Step 10: Reassemble Bike
After painting the bike was reassembled, the chain was tension tested and the bike was examined to ensure it functioned properly.
That's a good looking bike!
Step 11: Make Opening in Horse
To mount the horse on the bike we'll be aiming to line up the saddle location where the bike seat is. I started by making an opening in the underside of the horse with a cutting wheel on a rotary tool.
Step 12: Fabricate New Bike Seat
The existing bike seat wasn't the right shape to make enough contact with the saddle, and didn't provide the right kind of support. I made my own seat that would match the interior contours on the saddle with a scrap block of wood.
I started by drilling a 1" diameter opening partway through the block, and at a slight angle, to fit over the seat post.
Step 13: Seat Block Design
I sketched out the rough shape I wanted on the seat block with pencil. I chose a taped shape, thin near the bottom of the seat post and flaring upwards to have maximum surface contact with the underside of the horse saddle.
Step 14: Seat Block Shaping
Using the bandsaw I trimmed up the seat block to match the sketched design. I also decided to round over the corners and along all the edges.
Step 15: Saddle Matching
With the basic shape of the seat block cut out I could focus on matching the saddle profile to ensure good contact between the block and the saddle.
I eyeballed the rough shape of the saddle profile, noting that it had an upwards portion at the front and back, and dipped downwards along the side. I refined the shape of my seat block to match this with a combination of bandsaw and sanding.
Step 16: Seat Block Foam
To soften any imperfections in the seat block shape I covered the top surface with thin foam. Most BMX style bikes come with foam protection on the handlebars and on the top tube. i used this protective foam to cover my seat.
I cut the foam to size, then affixed it to the seat block with strong epoxy.
Step 17: Velcro Attachment
After the epoxy had dried I covered the foam with the loop side of a velcro strip. The corresponding hook side of the velcro was attached inside the horse, under the saddle. I applied more hook side velcro in side the horse to allow the seat to be repositioned to find the optimal location of the horse.
The velcro will help keep things in position, but is not meant to be a permanent solution. When we find the correct position of the horse on the bike we'll mechanically fasten the horse to the bike.
Step 18: Attach Seat Block to Bike
With the seat block velcro attached we can mount the seat block to the bike seat post.
The seat block was positioned on the seat post, then a small opening was drilled through the base of the seat block completely through the seat post and out the other side. A long machine screw was threaded through the opening and fastened with washers and nuts to secure hold the seat block to the bike.
Step 19: Place Horse and Fix to Seat
Lower the horse onto the bike seat block through the opening in the on the underside. Take the time to line up the horse saddle on the seat block, reposition if necessary to ensure a straight and level saddle, and enough clearance around the pedals.
When the horse is aligned to the seat block long wood screws were screwed through the saddle and into the wood seat block. Securely joining the horse to the bike.
Step 20: Ride Off Into the Sunset
Your horse bike is now ready to be the perfect prop for your Halloween costume, or maybe just to leisurely ride around the neighbourhood.
Ride off into the sunset!


