

Introduction: Beginner 3D Printing Class: Fusion 360 Orientation


This lesson is intended to provide a brief orientation of Fusion 360 and serve as a reference for later lessons. All of the following lessons have extensive instruction in text, image, and video form.
Forget downloading the Stanford Bunny and printing it because you can. Design your own stuff! In this lesson, we'll get acquainted with the Fusion 360 interface.
Click here to sign up for Fusion 360 for free as a Hobbyist / Enthusiast / Startup or as a Student or Educator.
FULL DISCLOSURE: Fusion 360 is an Autodesk product, and Instructables is an Autodesk company, so this might seem like a biased choice. That's not exactly the case, and here's why:
There are lots of good 3D modeling software options available. We decided on Fusion 360 for a number of reasons.
- It's easy to learn. The UI has been carefully designed from the ground up to be clean, minimal, and simple. You can go from zero knowledge about 3D modeling to making simple objects in an afternoon.
- It's powerful. Once you get through the basics, there's really no limit to the complexity of the things you can design with it. It's easy to create simple models with it, but there's nothing holding you back from modeling a fully articulated gas engine if you want to.
- It's cross-platform. It's available on Mac and PC, and it's proven to be very stable on both platforms in my experience.
- It's great for 3D printing. The models I've designed in the program tend to go straight to the slicing software without any hiccups.
- It's free. If you make less than $100K per year using it, you just renew with a startup license every year and keep using it free of charge.
- It's not a web app. Though all your files are backed up on the cloud and rendering is taken care of there, you don't have to rely on a high-speed internet connection to use the program.
I've been 3D modeling for over 13 years, and I can tell you honestly that this program is perfect for the kind of work I do: furniture, toys, machines, household products, etc. It makes digital fabrication a breeze, especially 3D printing. It's a solid modeling program which means (without getting into unnecessary detail) that things you design are almost immune to 3D printing errors.
There are a number of other programs out there that could be used to produce the same results, and if you're comfortable with something else (especially if you've already paid for it), there's no reason you shouldn't stick with it. But if you haven't spent any money or invested time in another program, believe me when I say you won't be sorry you went with Fusion 360.
Step 1: You Got This!
3D modeling can seem intimidating if you've never done it before. Like anything else, though, if you start slow with a simple project and keep practicing, you'll be creating complex designs before you know it.
Here are a few pointers to help you along:
- Be patient: 3D modeling can be frustrating in the beginning because the process is foreign. If you can get in the habit of asking yourself why the program isn't doing what you want instead of getting mad at it, you'll learn faster and enjoy it more.
- Learn the vocabulary: Like anything else, a quick Youtube search will likely answer your questions quickly when you're stuck. Do they call it a "line" or a "curve"? Is it a "surface" or a "face"? The tricky part is knowing what to search for! Pay attention to the terminology, and you'll learn much faster.
- Think in steps: Everything you create can be broken down into a series of steps. The lessons in this class will lay these out for you with all the example projects, but when you move on to your own work, continuing to think this way will be very useful. How do you eat an elephant? One piece at a time!
- Solve one problem at a time: The most difficult part of 3D modeling is translating what's in your head to what's on the screen. If you think of your project as a series of connected parts and tackle one of them at a time, you'll save yourself from being overwhelmed.
If you practice regularly and challenge yourself, you'll be designing your own work in a matter of weeks. I promise.
Step 2: Fusion Interface


Fusion 360 has a great Youtube channel with lots of helpful videos. If you're the type of person who likes to learn software by going through every function it can perform, this channel is a good place to start. The overview here should get you pretty well oriented to the interface and give you an idea of how the program works.
The best method for me has always been to start with a project in mind and learn as I go. In this class, we'll learn through three projects that increase in complexity.
But before we dive into a full-fledged 3D model, I'll quickly run through the interface.
PRO TIP: Use a 3-button mouse! It's so much easier than using a trackpad.
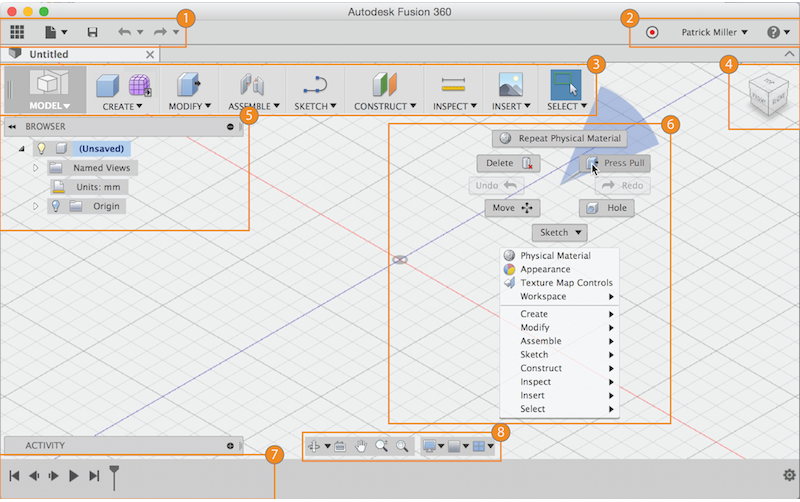
- Application bar: Access the Data Panel, file operations, save, undo and redo.
- Profile and help: In profile you can control your profile and account settings, or use the help menu to continue your learning or get help in troubleshooting.
- Toolbar: Use the Toolbar to select the workspace you want to work in, and the tool you want to use in the workspace selected.
- ViewCube: Use the ViewCube to orbit your design or view the design from standard view positions.
- Browser: The browser lists objects in your design. Use the browser to make changes to objects and control visibility of objects.
- Canvas and marking menu: Left click to select objects in the canvas (the space where you make your models). Right-click to access the marking menu. The marking menu contains frequently used commands in the wheel and all commands in the overflow menu.
- Timeline: The timeline lists operations performed on your design. Right-click operations in the timeline to make changes. Drag operations to change the order they are calculated.
- Navigation bar and display settings: The navigation bar contains commands used to zoom, pan, and orbit your design. The display settings control the appearance of the interface and how designs are displayed in canvas.
Step 3: Canvas Navigation
There are three ways to manipulate the view of your design:
- Navigation Bar
- ViewCube
- Wheel button on a mouse
Navigation Bar

The navigation bar is positioned at the bottom of the canvas. It provides access to navigation commands. The menus on the right end control Display Settings and Layout Grid options.
To start a navigation command, click a button on the navigation bar.
Navigation Commands
- Orbit: A set of commands that rotate the current view.
- Look At: Views faces of a model from a selected plane.
- Pan: Moves the view parallel to the screen.
- Zoom: Increases or decreases the magnification of the current view.
- Fit: Positions the entire model on the screen.
Display Settings
Set of commands that enables you to specify desired visual style, visibility of objects, or camera settings, for example.
Grid and Snaps
Commands that allow you to specify increments, grid settings, and show / hide the layout grid.
Viewports
Viewports are windows that display your design. You can show up to four viewports in the canvas at once. Displaying multiple viewports allows you to work in one view and see the changes from other camera positions.
ViewCube

Use the ViewCube to rotate the camera. Drag the ViewCube to perform a free orbit. Click faces and corners of the cube to access standard orthographic and isometric views.
Mouse: Use mouse shortcuts to zoom in/out, pan the view and orbit the view.
- Scroll middle mouse button to zoom in or zoom out.
- Click and hold the middle mouse button to pan the view.
- Shift Key + middle mouse button to orbit the view.
Trackpad: If you have a Mac with a touchpad or an Apple Magic Mouse, you can use multi-touch gestures to navigate the view.
- Pinch to zoom in.
- Spread to zoom out.
- Two finger drag to pan.
- SHIFT + two finger drag to rotate.
{
    "id": "quiz-1",
    "question": "How do you change the view of your model?",
    "answers": [
        {
            "title": "Use a mouse / trackpad and keyboard shortcuts.",
            "correct": true
        },
        {
            "title": "Use the ViewCube",
            "correct": true
        }
    ],
    "correctNotice": "You got it! You can use the ViewCube or a mouse / trackpad with keyboard shortcuts to change the view.",
    "incorrectNotice": "Nope!"
}
Step 4: Toolbar Menus
Model: This menu changes the interface for different functionality. We'll be spending most of our time in the Model environment.
Create: This menu allows us to create new geometry. We can create primitives (spheres, boxes, tubes, etc.) or we can create new geometry from sketches using extrude, sweep, etc.

Modify: This menu lets us (you guessed it) modify existing geometry. We can fillet (round) edges, combine objects, split them, and perform many other useful operations on geometry that's already been created.

Assemble: This is where we find all the tools we need to create assemblies. Assemblies let us create connections between parts that can move using constraints like Rotate and Slider. We can make hinges, bolted connections, and many other mechanical assemblies that let us design complex objects. We won't be creating complex assemblies in this class, but we'll go over the basics of what assemblies can do.

Sketch: In this menu, all the commands needed to create line drawings, or "sketches", are listed. We'll be spending a lot of time in this menu because it's the best way to make precise, controlled geometry that we can edit for our purposes.

Construct: This menu lets us create planes, axes, and points to aid us in creating and editing geometry.

Inspect: This menu has a lot of useful tools that help us understand the 2D and 3D geometry we create. We'll mostly be using the Measure tool to check our work, but this menu also has some very sophisticated analysis tools that will be useful to engineers and professional fabricators.

Make: This menu lets us export parts for 3D printing. It also has buttons that connect directly to service bureaus so you can instantly get price quotes on your models.

Add-Ins: This menu allows you to add and access plug-in scripts. "Spur Gear" is one of the scripts included with the software that I use often.

Select: This menu allows you to choose the selection style for geometry. The default is Window, but you can also do lasso selections or freeform (paint) selections. This menu also has the Selection Filters list, which is very useful when your model starts to get complex.

Step 5: Homework
Before the next lesson, spend some time playing around! Make some shapes, see what the different tools do, watch some of the video links and see what other people are doing with Fusion.
Easier


The model in the screenshots above is a glass flask. You could make it using Primitives and the Shell tool, or sketching the profile and revolving it. I used Inspect > Section Analysis to get the section view.
Harder


The model above is an idea for an outdoor fireplace made with 1/8" steel plate. This one is going to require some Sketching and Combining to achieve. Based on what you've learned in this lesson, how would you go about making something like this?
In the next lesson, we'll learn some basic modeling techniques and design our own wax stamp.


