

Introduction: LED Strips


LED strips are thin conductive circuit ribbons which have tiny surface-mount LEDs (and other components) soldered to them. On account of this, LED strips are flexible in more ways than one. They can provide lighting in hard to reach spaces, be attached to things which bend, follow contours of non-linear shapes, and glow in any color you can imagine. On account of their compact size, brightness, and variability, there is a world of possibility illuminated by LED strips.
Step 1: Analog LED Strip

The most common type of LED strip you will encounter are analog strips. These can be either single or multi-color. These types of LED strips typically use 12V power, but you will want to double check. Sometimes they can also be 5V.

Single color LED strips are quite simple to power up. They have two wire attachments, one for 12V power and one for ground. When they are connected to a power source, they glow a single color.

You can find single color LED strips in a variety of colors.

Multi-color LED strips are a little bit trickier to use. These consist of surface mount multi-color LEDs, which can produce colors across the visible spectrum. This makes them very versatile and fun to play with.

By varying the amount of electricity being applied to the red, green or blue pins, you can mix the three light sources and create a wide range of different colors.
Step 2: LED Strip Controllers

The easiest way to control analog LED strips is with a out-of-the-box LED strip controller. These plug-and-play controllers are typically suitable for most LED strip projects. Before I try to build custom circuitry, I always check to see if there is a controller that suits my needs.

These controllers are simply connected in series between the LED strip and the power.
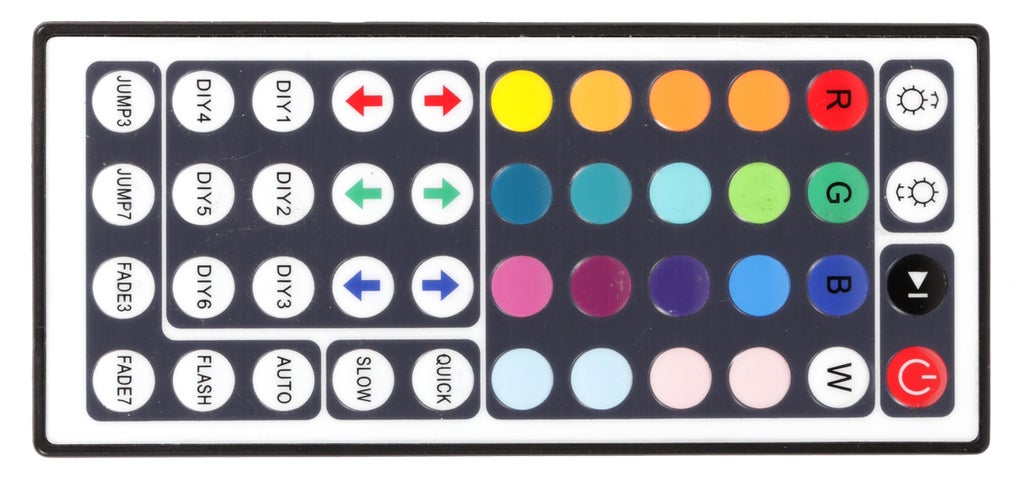
They are then controlled wirelessly via remote. Different controllers have different functionalities which you can tell by looking at the remote. At that, they are dead simple to use.

One thing to keep in mind about wireless control, is that there are two types of ways these comes. Some are radio, which works even if the receiver is hidden. Others are IR (infrared) and require the remote to have "line of sight" to the receiver (like your TV). These receivers have a cable connected to a little plastic box.
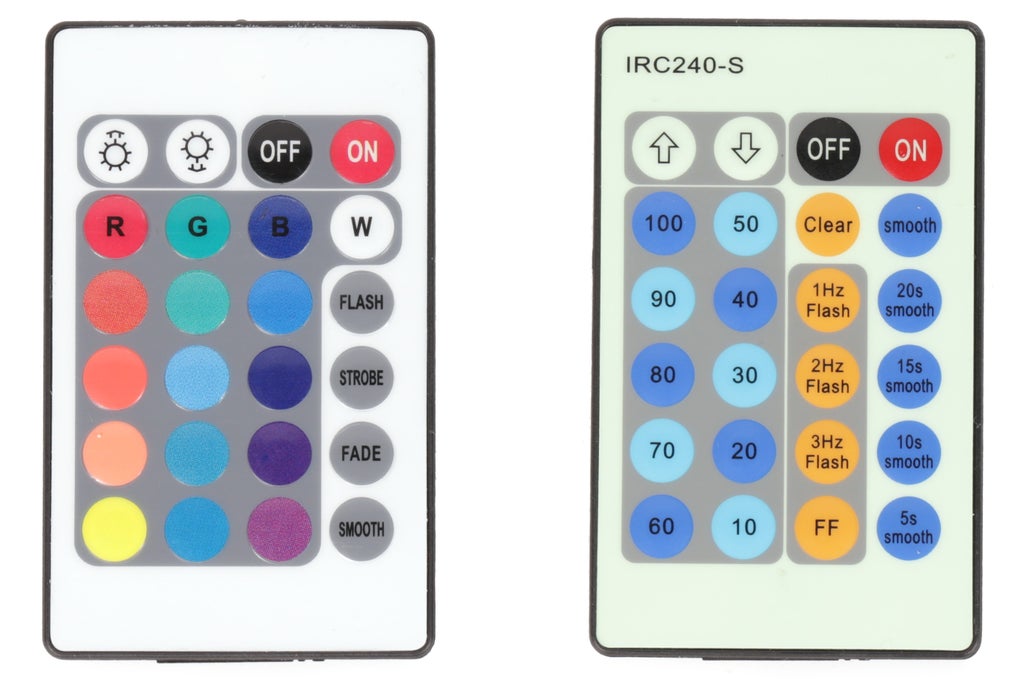
The only thing to be mindful of is whether you are getting a controller for single color LED strip or multi-color LED strip. The quickest way to tell the two apart is that multi-color controllers have color settings on their remotes and single color controllers don't.
Step 3: Arduino Control (advanced)
To control an analog LED strip using an Arduino, you need to use a TIP120 power transistor. If you are not familiar, you can learn all about transistors in the Electronics Class.
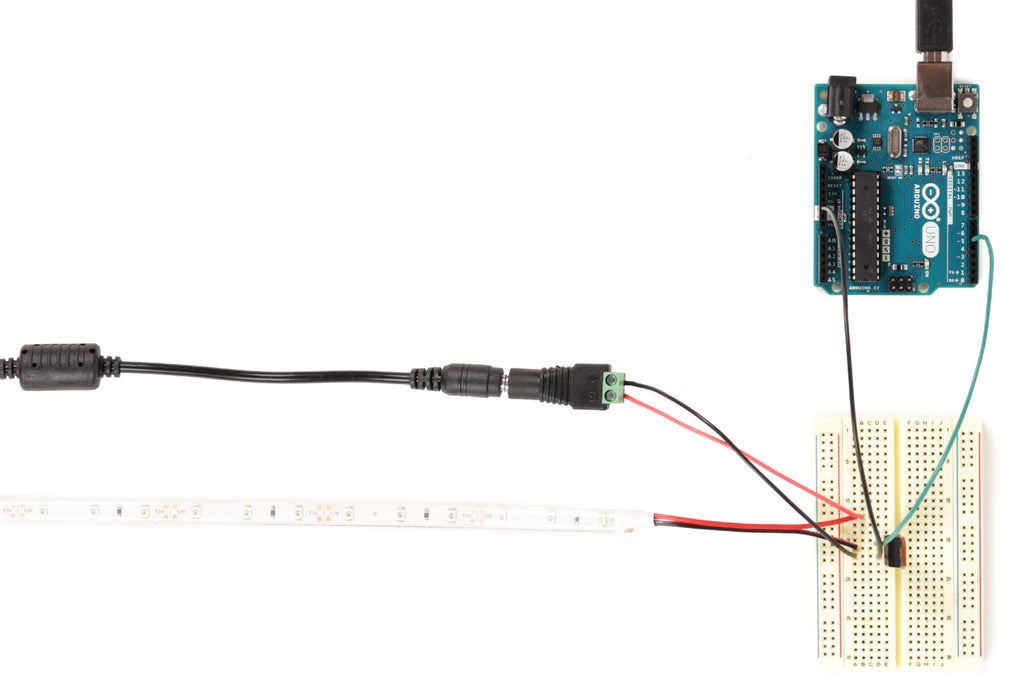
To put it simply, the transistor allows you to use the small 5V current being output by the Arduino pin to control the large 12V current required for the LED strip to function. Note that the 12V ground gets connected to the 5V power supply ground. When wiring together different DC electricity circuits, ground always gets connected even if the voltage is different.
Wire the circuit as follows:
- Arduino Pin 5 to transistor base (pin 1)
- LED strip power to 12V power
- LED strip ground to transistor collector (pin 2)
- 12V and Arduino ground to transistor emitter (pin 3)
The base of a TIP120 transistor is wired to the I/O pin on the Arduino. By applying voltage to this pin, a proportional voltage is sent through the LED strip.

The LED strip is turned on and off in relation to the amount of current applied to the transistor pin.
void setup() {
  // initialize digital pin 5 as an output.
  pinMode(5, OUTPUT);
}

// the loop function runs over and over again forever
void loop() {
  digitalWrite(5, HIGH);   // turn the LED strip on (HIGH is the voltage level)
  delay(1000);              // wait for a second
  digitalWrite(5, LOW);    // turn the LED strip off by making the voltage LOW
  delay(1000);              // wait for a second
}
Should you want to try it out, here is code which blinks the LED strip. Albeit this code does not fade the LED strip, it can be easily modified to do so. With this setup you simply control the LED strip that same you control a single LED.

To control a multi-color LED strip, you just need to add a new transistor for each new color wire.
int ledStripPin1 = 3;    // Wire connected to blue channel transistor
int ledStripPin2 = 5;    // Wire connected to red channel transistor
int ledStripPin3 = 6;    // Wire connected to green channel transistor


void setup() {
  // nothing happens in setup
}

void loop() {

    // Pick a random brightness for each color channel between 0 and 1023
    analogWrite(ledStripPin1, random(1024));
    analogWrite(ledStripPin2, random(1024));
    analogWrite(ledStripPin3, random(1024));

    //wait 1 second
    delay(1000);

}
The above code cycles through different colors at random. It demonstrates how varying the amount of power applied to each RGB wire, changes the color being displayed.
Step 4: Addressable LED Strip (advanced)

Aside from analog strip, there is also addressable LED strips. This type of LED strip uses a digital communication protocol to control each LED or "pixel" individually. While all of these strips operate roughly the same, there are a number of
different communication protocols for controlling LED strips. It is important to understand which protocol to use. This can be determined by checking the documentation provided by the distributor of the LED strip.
For our example we are going to use Adafruit's 60 LED neopixel LED strip. This LED strip uses a single-wire protocol, and by varying the length the signal is high (5V) or low (ground), determines the type of data being sent. It is very confusing.

Fortunately, Adafruit has created a library to do all the complicated timing and single-wire communication for you. It just requires downloading, and copying their Neopixel library into your Arduino software's library folder. Once it's copied, just reset the Arduino software and it should be installed.
To make use of the Neopixel library, load the following file:
File --> Examples --> Adafruit Neopixel --> RGBWstrandtest

The LED strip should now run through a series of test routines to demonstrate their use. Notice how each LED is capable of being a different color. This is what sets addressable LED strips apart from analog.
To learn much more about addressable LED strips (and Arduino), check out the Arduino class.


