

Introduction: Bolt-Nut - Vario Cup - 3D Printed


For a change something less complicated: No screws, no glue and no electrical wiring ... simply choose a colour combination from the available filaments and print out the desired parts!
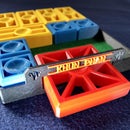
The set consists of a total of 7 individual parts. These parts can be combined and screwed together individually:
- Bolt - Cup
- Nut
- Nut - Bottom
- Nut - Top (closed lid)
- Nut - Handle
- Nut - Utensilo (open end without thread)
- Nut - Money Box
Regarding this project as a drinking utensil, it doesn't really want to be taken seriously … it's more something for the section curiosity or funny things.


Supplies
The following files for 3D printing are available:
BN_cup.stl
BN_nut_moneybox.stl
BN_nut_topbottom.stl
BN_nut_utensilo.stl
BN_nut.stl
BN_nuthandle.stl
After you have printed your parts ...
Remark: As all parts are designed to fit very precisely, it may happen that you have to rework one or the other part a bit with sandpaper and/or cutter due to different dimensional accuracy of the printers and the different behavior of the filaments.
Step 1: Starter Set


Starter set consisting of "CT_cup.stl" and "CT_nut_topbottom.stl". As an additional "decoration" you can add "CT_nut.stl" - as for all other variations.
Step 2: Container With Closed Lid


As container to close, consisting of "CT_cup.stl" and 2x "CT_nut_topbottom.stl".
Step 3: Cup With Handle


As a cup (for drinking, if the filament is waterproof, heat resistant and harmless to health) or just as a gag, consisting of "CT_cup.stl", "CT_nut_topbottom.stl" and "CT_nuthandle.stl". You can also close the cup with another "CT_nut_topbottom.stl".
Step 4: Money Box


As money box, consisting of "CT_cup.stl", "CT_nut_topbottom.stl" and "CT_nut_moneybox.stl".
Step 5: Desk Organizer


As desk organizer, consisting of "CT_cup.stl", "CT_nut_topbottom.stl" and "CT_nut_utensilo.stl".
Have fun printing and screwing!


