

Introduction: Cookware Lid Organizer - 3D Printed


Many people experience frustration with cookware lid storage. There is often a lack of space to sufficiently organize the lids for easy access. The aim of this project is to solve this problem. The design must meet the following criteria:
- Improve accessibility to individual lids.
- Accommodate an assortment of lid sizes.
- Accommodate and assortment of lid brands/types, which have different designs for handles and edges.
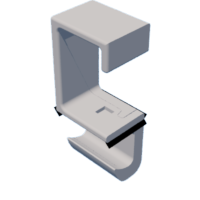
I found a gap in the market for cookware lid organizers when I was looking for a solution. The existing systems either took up too much surface area, such as organizers that use the cabinet doors for storage, or were too wide for accessing through my narrow cabinet door. I decided to use a hook system. The hooks store the lids vertically, and the lids can rest on the base of a shelf at an angle or simply hang.
My hook design was made in Solidworks and 3D printed. It is specific to the existing geometry in my cabinet, but the geometry can be replicated by any DIY-er who wishes to use this design. The steps to DIY this project are below.
Supplies

- 3D Printer (I used Elegoo Neptune 2).
- 3D Printer Filament or Resin (I used 1.75mm PLA filament.)
- Design File, attached. Hook and Block files are provided in .stl and .sldprt format.
- Support Bar - 1 x 3/4" plank of wood - 1 qty. Length must be long enough to span the storage location (cabinet) width.
- Woodblocks 2 x 2 x 1/2" - 2 qty. OR Offset Brackets, 1/2" offset minimum - 2 qty.
- Brackets (example from McMaster-Carr located here)
- Hardware (screws to install woodblocks, brackets, and support bar)


Step 1: Build Support Structure

- Install the 1/2" thick woodblocks OR offset brackets using screws. They should be attached to the cabinet ceiling, tangent to the cabinet sides.
- Install the support bar, offset from the cabinet ceiling by the woodblocks or offset brackets.
Step 2: 3D Print the Design Files


- If needed, redesign the hook and block .sldprt files to fit your cabinet geometry.
- Open the provided .stl file or create your own, using your adjusted design file.
- Multiple hooks and/or blocks can be printed at the same time, if desired.
- Using Cura or similar software, set the print settings. The settings I used on my Elegoo Neptune 2 printer and PLA filament are below. The print orientation is as shown in the above photos.
- Profile: Normal - 0.2 mm
- Infill: 100%
- Printing temperature: 200C
- Bed Temperature: 60C
- Print Speed: 60 mm/s
- Enable Retraction & Cooling
- Generate Supports:
- Overhang Angle: 25 degrees
- Support Density: 15%. (Using this value, it is easy to snap off the supports after printing.)
- Build Plate Adhesion: Brim (This helped to create a smooth base. Without it, the build plate texture showed on the hook.)
- Slice the file with the above settings to create the gcode.
- Print!
- Repeat as many times as necessary to get the desired number of hooks.
Step 3: Install the Hooks and Blocks

- Slide hook onto support bar.
- Drop into place.
- Install the block, snap side down, on the base of the hook as pictured. There is flex in the hook that allows for this, but please remember you are working with brittle plastic and be gentle. The snap will click into place on the hook when the orientation is correct. The snap prevents the block from falling out.
- Carefully slide hook along the support bar to the desired final location.
- Repeat x N, the number of hooks.
Step 4: Step Back and Admire Your Organized Cabinet!


Thanks for your interest in this project. Good luck organizing!


