Introduction: Elephant (or Anything Else) Planter


In this Instructable, I will be creating a planter for artificial succulents out of a jumbo plastic toy animal.
The toy I happened to pick for this Instructable is an Elephant, however you can pick any other animal youd like. The key is that the toy has to have some hollowness to it.
You can spray paint it any color you would like or leave it as it comes.
this instructable requires use of a hot knife and a hot glue gun. These steps are to be done by a capable and responsible adult with all necessary precautions as stated with the hot knife/glue gun. I cut my finger really badly on my hot knife while working on another project. I am pretty sure I cut my bone and its been a few weeks and it still hurts so be careful please if you are said adult.
This planter will definitively be a conversation starter!
Hope you enjoy it! if you do its entered into a few contests feel free to vote!
-Elana
Step 1: Gather Your Materials


-jumbo plastic animal (has to be hallow enough for a small jar to fit in it)
-small jar (dont need the lid. will be used to put the succulents in it)
-small piece of floral foam that fits in the bottom of the jar you have (I used 2 scrap slivers. They are getting glued into the bottom of the jar)
-hot glue gun & hot glue stick (probably dont need more than one per planter if youre running low on the sticks)
-spray paint (any color youd like. make sure it sticks to plastic)
-hot knife (if you have a wood burning tool it probably has a hot knife attachment)
-scissors (to cut tag off animal if its new)
-paper towel/water/soap (to wash animal if it is not new)
-artificial succulents. I used 3 succulents per one planter but picked the arrangement based on each of the sizes. ie don't put 3 of the largest succulents together because they would probably all be too big for the jar/planter. I got my succulents for really cheap from a website called consumer crafts.
-wire cutters (to shorten the succulents)
-Krylon crystal clear (or any clear spray varnish. optional but recommended. Pictured in a later step)
-newspaper (to spray paint animal on. I didnt care about getting spray paint on the ground, it just keeps grass from sticking to the painted animal)
Step 2: Set Up and Prep Your Animal


-plug in hot knife
-cut off tag on animal toy (or clean and dry it if it is not new)
Step 3: (CAREFULLY) Cut Hole in Animal


-place jar on animal's back just to see about the size you will be cutting
-use hot knife to cut a hole in animal. make this hole smaller than you think youll need
-check size of hole by placing the jar into the opening
-if needed remove the jar and make the hole slightly larger. its easier to keep checking and making the hole larger than it is to make it smaller (id imagine that could be done by gluing the scraps back onto the animal but that wouldnt look too good)
-my animal had a little knob thing in the bottom of it that was preventing me from putting the jar in all the way. carefully cut this off if that is the case for you as well. I didnt cut it all off and it was good enough
Step 4: Spray Paint Animal


-place animal on newspaper (if you desire)
-follow instructions on spray paint bottle to coat the entire animal with an even coat of paint. depending on the spray paint you may need to let this dry then do another coat in order to get an even color.
-let dry completely
-spray with a coat of krylon crystal clear (optional but I like using it) and let dry completely
Step 5: Create Succulent Arrangement


-use hot glue to glue foam into the bottom of the jar
-place jar into the planter
-use wire cutters to cut succulents down to the height you want for the arrangement. place a little bit of hot glue onto the end of the first succulent and place into the foam. Repeat for the final 2 succulents. I like to plan out the placement of the different succulents first, then cut and glue them into the foam.
Step 6: TAAAADAHHHHHH!!!!

YOU'RE DONE! CONGRATS!
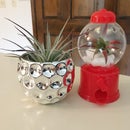
Step 7: Other Examples


here are some other planters I made
Step 8: Pick a Place in Your House for Your Planter!


Figure out where you want to put your planter!
On a bookcase shelf, mantle or a table/counter by a window are some ideas!
Step 9: ...ORRRR Give the Planter As a Gift!
you can tie a ribbon around the planter for easy gifting or wrap it all up and let it be a complete surprise to the recipient!

Third Prize in the
Indoor Gardening Contest 2015

Participated in the
Homemade Gifts Contest 2015


