

Introduction: External LED Blinking


In this tutorial, we will learn how to set up and use the STM32 Black Pill Blinking an External LED using HAL Programming.
Supplies
Following are the supplies required for this task-:
- STM32 Black Pill development board (STM32F103C8T6)
- External LED
- Resistor (optional, depending on the LED)
- Jumper wires
- STM32CubeIDE installed on your computer
- USB cable
Step 1: Setting Up Project in STM32 CubeIDE


- Enter a project name and choose a location to save your project.
- Select the appropriate toolchain (e.g., Ac6 STM32 MCU GCC) and click "Next."
- Configure the project settings such as HAL, CMSIS, and middleware. For this tutorial, we will leave the default settings.
- Click "Finish" to create the project.
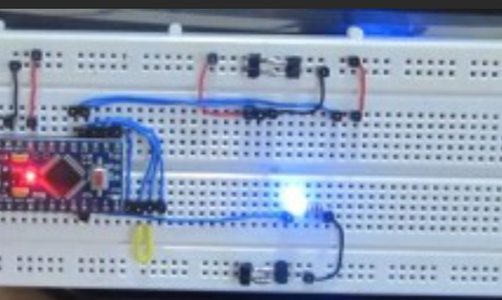
Step 2: Wiring the External LED
- Connect the anode (+) of the external LED to the configured GPIO pin on the Black Pill board.
- Connect the cathode (-) of the LED to ground (GND) on the Black Pill board.
- Optionally, insert a resistor between the GPIO pin and the LED to limit the current if necessary.
Step 3: Code
Include the necessary HAL Libraries at the top of the file
following is the code-:
int main(void)
{
HAL_Init();
SystemClock_Config();
// Initialize GPIO pin for external LED
GPIO_InitTypeDef GPIO_InitStruct;
__HAL_RCC_GPIOA_CLK_ENABLE(); // Change GPIOA to appropriate port
GPIO_InitStruct.Pin = GPIO_PIN_5; // Change GPIO_PIN_5 to appropriate pin
GPIO_InitStruct.Mode = GPIO_MODE_OUTPUT_PP;
GPIO_InitStruct.Speed = GPIO_SPEED_FREQ_LOW;
HAL_GPIO_Init(GPIOA, &GPIO_InitStruct); // Change GPIOA to appropriate port
// Main loop
while (1)
{
// Toggle LED state
HAL_GPIO_TogglePin(GPIOA, GPIO_PIN_5); // Change GPIOA and GPIO_PIN_5 to appropriate port and pin
// Delay
HAL_Delay(1000);
}
}
Step 4: Testing
- Power on the STM32 Black Pill board.
- The LED should start blinking at a 1-second interval.
Conclusion:- The STM32 Black Pill is successfully set up and programmed to blink the external LED using HAL Programming.


![Tim's Mechanical Spider Leg [LU9685-20CU]](https://content.instructables.com/FFB/5R4I/LVKZ6G6R/FFB5R4ILVKZ6G6R.png?auto=webp&crop=1.2%3A1&frame=1&width=306)


