

Introduction: How to Connect an Ultrasonic Sensor to Arduino to Measure Distance?


Welcome to this step-by-step guide where we'll explore how to create a distance measurement system using an ultrasonic sensor and Arduino board, with the added functionality of displaying measurements on an LCD screen.
Supplies
Materials Needed:
- Arduino board (e.g., Arduino Uno)
- HC-SR04 Ultrasonic Sensor
- I2C LCD Display (e.g., 16x2 characters)
- Jumper wires
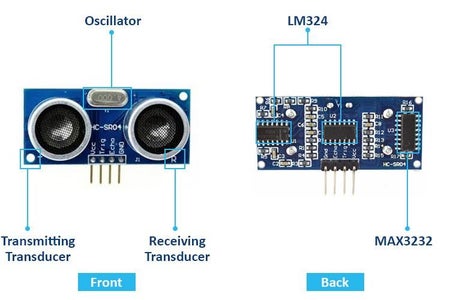
Step 1: Understanding the Ultrasonic Sensor

The HC-SR04 ultrasonic sensor features four pins:
VCC: Supplies power
GND: Connects to ground
Trig: Sends trigger signals
Echo: Receives echo signals
Step 2: Exploring Previous Projects
The HC-SR04 has been employed in various projects, including distance measurement with Arduino, interfacing with PIC microcontroller, building Raspberry Pi-based obstacle-avoiding robots, and implementing IoT-based dumpster monitoring with Arduino & ESP8266.
Step 3: Working Principle
The ultrasonic sensor emits sound waves and measures the time taken for the waves to return after hitting an object. This duration is used to calculate the distance between the sensor and the object.
Step 4: Circuit Connection

Connect the ultrasonic sensor's trig and echo pins to Arduino pins 4 and 5, respectively. This setup allows the Arduino to send trigger signals and receive echo signals for distance calculation.
Step 5: Arduino Code for Ultrasonic Sensor
The Arduino code initializes serial communication, configures trigger and echo pins, triggers the sensor, measures echo pulse duration, calculates distance based on sound speed, and displays the result on the Serial Monitor.
Step 6: Adding an LCD Display
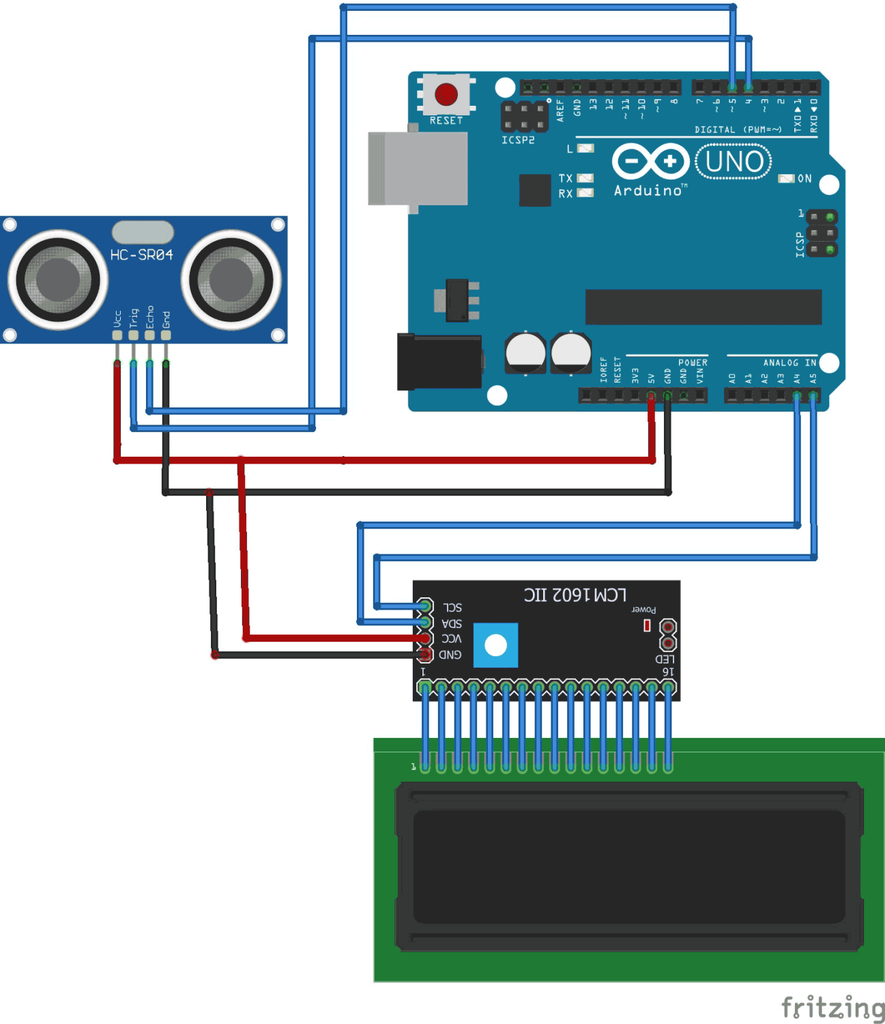
Enhance the project by connecting an I2C LCD display to the Arduino. Utilize the SDA and SCL pins (A4 and A5 for Arduino Uno) for communication, along with VCC and GND. The LCD will provide real-time distance measurements alongside the serial output.
Practical Applications:
Explore potential projects such as interfacing with Raspberry Pi Pico for distance measurement, building a smart blind stick for visually impaired individuals, and implementing IoT-based smart dustbin management systems using NodeMCU.
Step 7: Conclusion
This detailed guide has provided you with all the necessary information to create an ultrasonic sensor distance measurement system with Arduino and LCD display. By following these instructions, you'll gain a deeper understanding of how ultrasonic sensors work and how to utilize them in practical projects.
For a detailed tutorial, refer to our step-by-step guide! - https://youtu.be/bOZ5QdASm30


