Introduction: Mini Edge Sander - Belt Sander Stand


I wanted to make a stand, which allowed me to use my belt sander as a mini edge sander. I guess the advantage to these machines is, because the belt is going across the bed, it's a little harder to get your finger nail pulled in.
00:05 I began by working out the profile of the sander with paper and then transferred the measurement to ply. I cut two of these pieces out by hand with a jigsaw, which wasn't particularly great.
01:09 Using the cross cut sledge on the tablesaw to square off some of the edges which I would use to align the belt sander and the bed.
01:30 I cut the bed and two rectangular pieces which would be use to join the profiles together.
01:58 I cut trenches using the table saw the same thickness as the edge of the profiles. This allowed the bed to sit a little lower on the profile and maximised the sanding surface as well as strengthening the jig.
03:01 I glued and screwed the profiles.
03:55 Checking the sander sits square, I worked out by eye how much I would roughly need to cut off from the rear rest and hand sanded until I was happy with the fit.
04:39 I glued the bed down leaving an additional 2.5 to 3mm gap from the sander.
04:54 I cut 2mm Neoprene rubber to fit the edge of the ply profile, which was glued using two part epoxy. This will help grip and cushion the rear of the machine and prevent vibrations transferring into the bed.
05:43 I planned a chamfer so the top of the bed would clear the bottom of the sanding belt.
05:50 I want to add a t slot to the bed and use the tables saw to cut two sets of rectangles which I glue onto the bed allowing room from a square nut. I took several measurements to keep this parallel to the face of the sander.
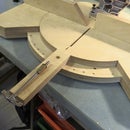
07: 24 Using a coping saw to rough cut the mitre fence and then sanding it to shape.
08:28 Testing the mitre fence while sanding.
08:33 If I do free hand sanding I take the mitre fence away.
08:44 I noticed that the sander moved horizontally toward the left while sanding and decided to add two insert nuts and bolts, which I adjusted to keep the machine centred. A g clamp is used to hold the jig to a workbench.
00:05 I began by working out the profile of the sander with paper and then transferred the measurement to ply. I cut two of these pieces out by hand with a jigsaw, which wasn't particularly great.
01:09 Using the cross cut sledge on the tablesaw to square off some of the edges which I would use to align the belt sander and the bed.
01:30 I cut the bed and two rectangular pieces which would be use to join the profiles together.
01:58 I cut trenches using the table saw the same thickness as the edge of the profiles. This allowed the bed to sit a little lower on the profile and maximised the sanding surface as well as strengthening the jig.
03:01 I glued and screwed the profiles.
03:55 Checking the sander sits square, I worked out by eye how much I would roughly need to cut off from the rear rest and hand sanded until I was happy with the fit.
04:39 I glued the bed down leaving an additional 2.5 to 3mm gap from the sander.
04:54 I cut 2mm Neoprene rubber to fit the edge of the ply profile, which was glued using two part epoxy. This will help grip and cushion the rear of the machine and prevent vibrations transferring into the bed.
05:43 I planned a chamfer so the top of the bed would clear the bottom of the sanding belt.
05:50 I want to add a t slot to the bed and use the tables saw to cut two sets of rectangles which I glue onto the bed allowing room from a square nut. I took several measurements to keep this parallel to the face of the sander.
07: 24 Using a coping saw to rough cut the mitre fence and then sanding it to shape.
08:28 Testing the mitre fence while sanding.
08:33 If I do free hand sanding I take the mitre fence away.
08:44 I noticed that the sander moved horizontally toward the left while sanding and decided to add two insert nuts and bolts, which I adjusted to keep the machine centred. A g clamp is used to hold the jig to a workbench.


