

Introduction: Python Coding for Minecraft


This Instructable shows how to install and use a mod I wrote that lets you control Minecraft with python scripts. I'll focus on Windows, though OS X and Linux should work just as well. (If you want something simpler than python, here is a Scratch version of this project.)
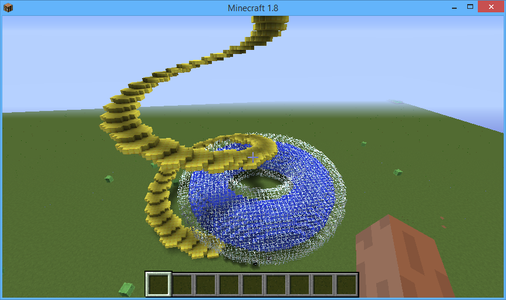
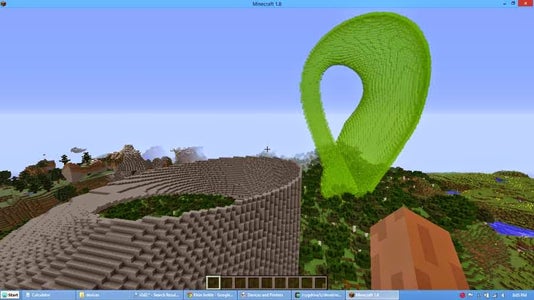
Python scripts can generate neat in-world things, and there are many examples on the web. With a few lines you can draw a giant glass sphere, and with a bit more work make a giant Sierpinski triangle in the sky and even import obj files like a space shuttle. I myself made fun scripts to draw a water-filled glass donut and a gigantic Klein bottle, to turn everything around into TNT and to control Minecraft with your brain using a MindFlex EEG toy. There is a whole book introducing programming using python scripts for Minecraft, and you can even make simple Minecraft-based games. I will also show how to do simple (and sometimes more elaborate) turtle-based drawings in Minecraft, while you can ride along with the drawing as the turtle.
For a while now you could write python scripts for Minecraft on the Raspberry Pi. I wanted my kids to be able to do that, but we don't have a Pi, plus it would be nice to do this with the full desktop Minecraft. You could run your own server with the Raspberry Juice plugin which enables most of the python scripts to work. But not everyone wants to install and configure a server.
So I wrote the Raspberry Jam Mod for Minecraft 1.8 (now ported to 1.8.8, 1.8.9 and 1.9 as well) that emulates most of the Raspberry Pi Minecraft protocol (about the same as the Raspberry Juice plugin provides) and lets Raspberry Pi python scripts run with full desktop Minecraft. (I later found out that someone wrote the mcpiapi mod for Minecraft 1.7.10 a couple of weeks earlier.) I wrote this Instructable initially for Python 2.7, but I think most of my samples will work for 3.x.
I assume that you have basic facility with creating folders and downloading, unzipping, and copying files on Windows (or your operating system of choice).
You can create Python scripts for Minecraft with a text editor, the IDLE environment which comes with Python, or with Visual Studio Python Tools on Windows. The last is actually the nicest in some ways, so I'll have some optional steps on how to do that.
This summer I plan to teach coding and basic 3D geometry to gifted middle- and high-schoolers using Minecraft, Raspberry Jam Mod, Python and Visual Studio.
If you want to do this with Minecraft Pocket Edition on Android instead, I have an Instructable for that, too.
Step 1: Install Forge for Minecraft
The Forge manages Minecraft mods, and is needed for the Raspberry Jam Mod.
I assume you have Minecraft installed.
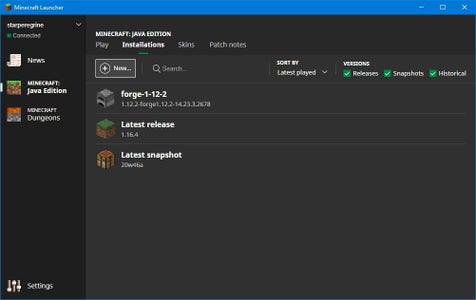
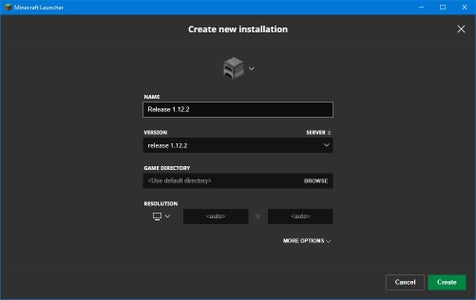
- You need to run Minecraft 1.12.2 (the version is very important) once. To do that, start the Minecraft Launcher, and after logging in, click on Installations, and press the "New" button to create a profile. Choose "Release 1.12.2" from the dropdown, save the profile (you can give it a name like "1.12.2"), start a world and make sure it works.
- Exit Minecraft and Minecraft Launcher.
- Download Forge installer for 1.12.2.
- Run the Forge installer. Default settings should work.
- Start Minecraft. You will now have a new Forge 1.12.2 profile.
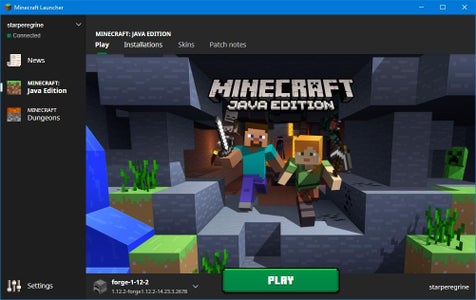
Step 2: Windows Installer [automatic Install]
![Windows Installer [automatic Install]](https://content.instructables.com/F4K/2LXL/IRKFJXVN/F4K2LXLIRKFJXVN.png?auto=webp&fit=bounds&frame=1auto=webp&frame=1&height=300)
If you have Windows, once you have Forge, you can install everything using a Windows installer. This will install RaspberryJamMod, a Python interpreter, IDLE for Python and sample scripts. If you don't have Windows, or want more control, look at the next two steps (but you'll have to adapt them if you don't have Windows).
Step 3: Install Python [manual Installation]
![Install Python [manual Installation]](https://content.instructables.com/F2E/U1X3/I7RGG0J0/F2EU1X3I7RGG0J0.jpg?auto=webp&fit=bounds&frame=1auto=webp&frame=1&height=300)
You need to decide if you want Python 2.7 or Python 3.x. The Adventures in Minecraft book uses 2.7, and most of the scripts floating around the web are for 2.7, but I have converted a lot of scripts for 3.x.
1. Download your choice of Python installed from here.
2. Run the installer.
3. Click through to the Customize Python dialog, and make sure to scroll down to "Add python.exe to path", click on it and select "Will be installed on local hard drive." If you don't add Python to the path, you won't be able to launch scripts with /python from within Minecraft.
Step 4: Install Mod and Scripts
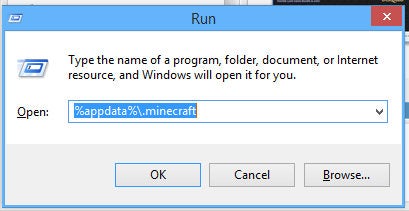
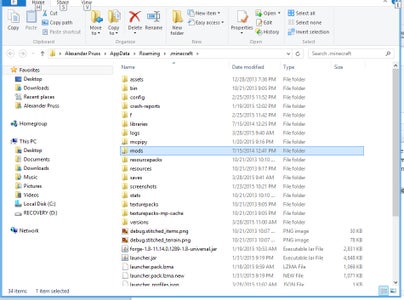
1. Create a mods folder in your Minecraft folder. (To do that, press Windows-R, type %appdata%\.minecraft, press enter. You will see everything in your Minecraft folder. If you already have a mods subfolder, you don't need to do anything. Otherwise, make one. On Windows 8, click on New folder, and then type in the name mods and press enter.)
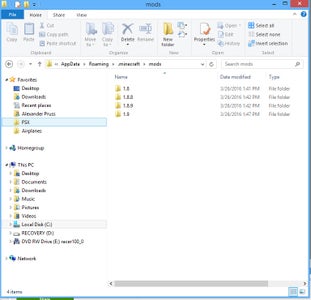
2. Download the mods.zipfile from the latest version of the Raspberry Jam Mod. Put the contents of the zip file (currently consisting of a number of folders with names like 1.8 and 1.10.2) inside the mods folder you had just made.
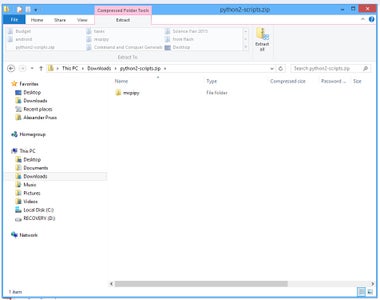
3. Download the latest zip file containing sample Python scripts and the mcpi library from my Raspberry Jam Mod github release. (The scripts are supposed to work on both Python 2.7 and 3.x.)
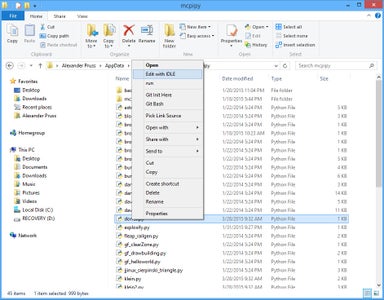
4. Open the downloaded zip file (in Chrome, by clicking on it at the bottom of the window). It has a mcpipy folder. Copy the mcpipy folder into your Minecraft folder. (To do that, click once on the mcpipy folder in the zip file, and press ctrl-c, then navigate to the %appdata%\.minecraft folder as in step 1, and press ctrl-v).
Step 5: Testing Mod
Start Minecraft, making sure that you use the Forge profile.
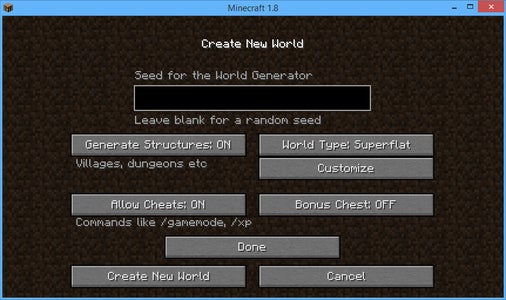
Create a new world (it's too easy to mess things up with the python scripts). My daughter suggested I use Creative and Superflat.
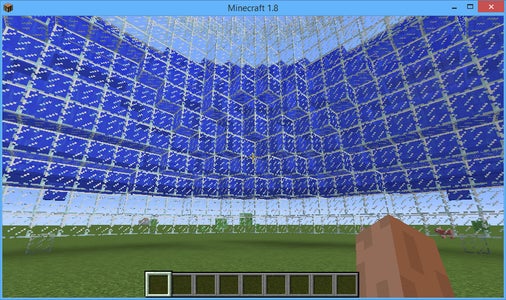
In Minecraft, type /py donut and press enter.
If all goes well, a giant glass donut will be drawn around you, and then it will be filled with water.
If you get something like a Script not found error, this probably means that you don't have the sample scripts installed in the %appdata%\.minecraft\mcpipy folder.
If you get a 'Cannot run program "python"' error, you don't have your python directory in your system path. You may want to add it manually to the path, or just reinstall python, following the directions in Step 3 of my python install step.
Running a new script with /py stops any earlier scripts running (if you don't like that, use /apy instead of /py). You can stop a script that's running by just typing /py without any arguments.
Step 6: Getting Started Programming Minecraft in Python


The easiest way to get started programming Minecraft in python is to start with one of the simpler sample scripts. I recommend making a shortcut on your desktop to the scripts folder (%appdata%\.minecraft\mcpipy).
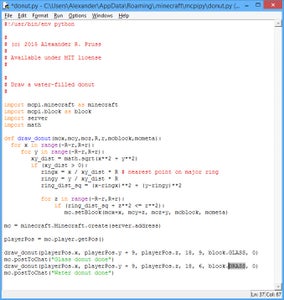
You can load the scripts into IDLE. A fun script to modify is my water-filled donut script (donut.py). For instance, change WATER to GRASS in the second last line to make a silly grass-filled donut. You can run this with /py donut from Minecraft, or just by pressing F5 in IDLE.
Or to make a simple new script, create a helloworld.py file with your favorite text editor (even Notepad) in the scripts directory. Put at the top:
from mine import *
This imports the needed library code. It also conveniently imports all the functions from the math library as well as names for all the blocks. Connect to Minecraft with:
mc = Minecraft()
You can then send a "Hello world!" message to the user with:
mc.postToChat("Hello world!")If you want to create a diamond block right under the player, you can also do:
playerPos = mc.player.getPos()
mc.setBlock(playerPos.x,playerPos.y-1,playerPos.z,block.DIAMOND_ORE)
The coordinates for setBlock() and getPos() are measured from the player's spawn point (which is thus (0,0,0)).
(For a list of all the block names other than DIAMOND_ORE, see mcpi\block.py in the scripts folder. You can also directly use Minecraft block numbers.)
To run your script, save it and type /py helloworld in your Minecraft world and press enter.
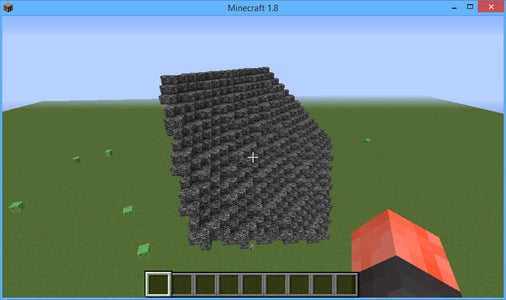
It's sometimes useful to set a whole rectangular prism of blocks at one time: use mc.setBlocks(). For instance, this excerpt from my mengersponge.py script draws an 81x81 cube at the player position (the script then recursively deletes--i.e., replaces with AIR--subblocks to form the fractal image in the screenshot):
length = 3*3*3*3
mc.setBlocks(playerPos.x,playerPos.y,playerPos.z,
             playerPos.x+length-1,playerPos.y+length-1,playerPos.z+length-1,block.WOOL_PURPLE)
Technical note: Starting with from mine import * imports a lot of stuff (Minecraft, block definitions, entity definitions, math) into our namespace. This is handy for focusing on the essentials for beginners (remember that I am going to be using this to teach coding to beginners). More advanced users may prefer being more pythonic by keeping the namespaces separate and putting in the header:
import mcpi.minecraft as minecraft
import mcpi.block as block
import mcpi.entity as entity
import math
and then starting with mc = minecraft.Minecraft() or even mc = minecraft.Minecraft.create().
Step 7: Simple Turtle-based Drawing
A particularly simple way to draw in Minecraft is to use a turtle-based system. I made a very simple Turtle class (inspired by Martin O'Hanlon's MinecraftTurtle class) that I use to introduce middle- and high-schoolers to Minecraft python scripting.
Start up a Minecraft world in creative mode, and make your player fly (double-tap spacebar). Initialize the script with:
from mineturtle import *
t = Turtle()
(I wrapped all the Minecraft connection code inside the Turtle class and it also brings math into the namespace for convenience.) You can now do things like t.go(15) to draw a line while moving 15 blocks forward, t.right(45) to rotate 45 degrees to the right, t.down(30) to rotate 30 degrees down, and thus draw simple pictures.
You move along with the turtle as it draws, which is fun, and the turtle starts off where the player is, pointing horizontally.
For instance you can draw a horizontal square with:
t.go(50)
t.right(90)
t.go(50)
t.right(90)
t.go(50)
t.right(90)
t.go(50)
You do a 7-sided star by doing:
t.go(50)
t.right(180.-180./7)
seven times. Or just once in a loop:
for i in range(7):
t.go(50)
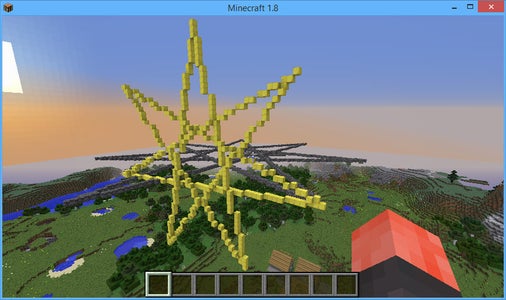
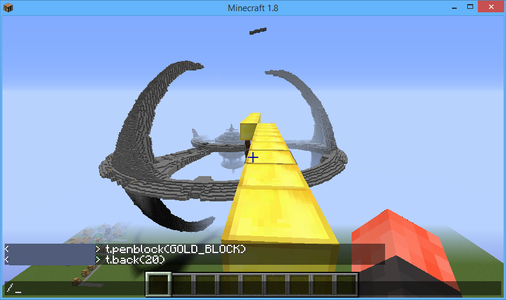
t.right(180.-180./7)You can change materials with penblock(). For instance, a golden vertical star:
t.penblock(block.GOLD_BLOCK)
for i in range(7):
t.go(50)
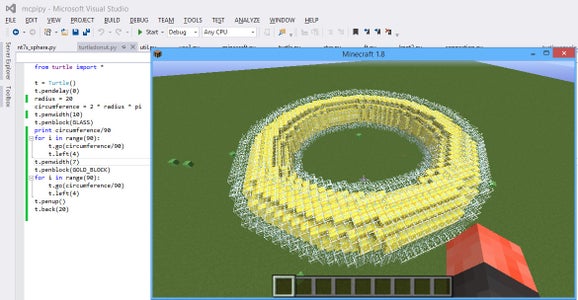
t.right(180.-180./7)And you can change the pen width with penwidth(x). For instance, this draws a very simple glass donut (actually, a thickened 90-gon, but who can tell the difference?):
t.penblock(block.GLASS)
radius = 20
circumference = 2 * radius * pi
t.penwidth(10)
for i in range(90):
    t.go(circumference/90)
    t.left(360/90)
Here are all the methods available:
- go(x): move x blocks forward (drawing if pen is down)
- back(x): move x blocks backward (drawing if pen is down)
- penup(): pause drawing resume drawing
- left(angle): rotate left by angle (in degrees)
- right(angle): rotate right by angle (in degrees)
- up(angle): rotate up by angle (in degrees); beginners should not mix the left/right and up/down rotations or they may get unexpected results (technical note: the same as pitch(angle))
- down(angle): rotate down by angle (in degrees) (technical note: the same as pitch(-angle))
- pendelay(x): each movement or rotation of the turtle is delayed by x seconds; default is 0.05; set to zero for much faster drawing (the player will still move with each line drawn, but instantaneously from beginning to end)
- angle(x): set horizontal angle to x (clockwise in degrees; 0 = South, 90 = West, 180 = North, 270 = East); resets roll angle
- verticalangle(x): set vertical angle to x (in degrees; upward is positive; 90 = vertically up; -90 = vertically down); resets roll angle
- angles(compass,vertical,roll): set compass, vertical and roll angles; omitted arguments are taken to be zero
- penblock(x): set material for drawing to block x; for a list of the predefined blocks, see mcpi/block.py
- goto(x,y,z): set pen position to (x,y,z); you can also access the position as t.position.x, t.position.y and t.position.z
- follow(): the player follows the turtle
- nofollow(): the player doesn't follow the turtle
- turtle(x): if x is PLAYER, this is the same as follow(), and if x is None, this is the same as nofollow(). If you are using Raspberry Jam Mod you can also use other entities than yourself as the turtle. For instance, turtle(HORSE) spawns a horse to use as a turtle (all the entities available are listed in mcpi/entity.py, but the living ones are best as others are unable to levitate; and the Ender Dragon cannot be controlled). The entity remains once the script is finished. To make it disappear, call turtle(None) or turtle(PLAYER).
- penwidth(x): set stroke width to x (default is 1; wider strokes slow down drawing, and if follow mode is on, you may end up trapped inside the stroke, so at the end you should call penup() and back out of the drawing)
- pitch(x), yaw(x) and roll(x): rotate turtle via pitch/yaw/roll angles (see next step of Instructable)
- startface() and endface(): start and finish drawing a filled convex polygon
- push() and pop(): save and restore drawing state (heading, material, face status, thickness; but not speed or turtle type); useful for L-systems
- gridalign(): align the current position and turtle direction to the grid (the best approximation to the turtle's current direction is chosen)
The mcpiapi mod, unlike my Raspberry Jam Mod, doesn't support setting the player's direction. This means that the player won't face the same direction as the turtle. (And there is some chance of other problems with turtle scripts.)
Technical note: If you already have a Minecraft object mc, initialize with t = Turtle(mc). If you omit the Minecraft object when initializing the turtle, it's created for you, and in either case, you can access the Minecraft object via t.mc.
You can also play with python code for controlling the turtle right from the Minecraft chat window.
In Minecraft, run the turtleconsole.py script by typing: /py turtleconsole [enter].
Then every python line you enter into chat will get executed by the python interpreter. To enter a line into chat, press T, type the line and press [enter]. To exit turtleconsole, just type /py [enter] or enter quit() [enter] into chat.
The context includes a local variable t initialized to a Turtle() object, so you don't need to run any initialization code, just things like:
t.penblock(block.GOLD_BLOCK)
t.back(10)
There is also a console for the full non-Turtle API: console.py (which includes a pre-initialized mc local variable). (Just don't put in any postToChat() calls, or they will confuse the interpreter.)
Step 8: Advanced Turtle-based Drawing
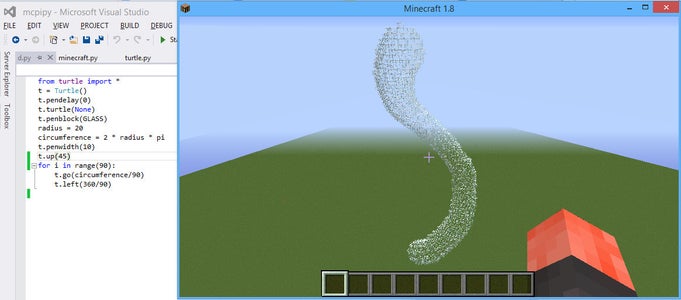

Using the left(), right(), up() and down() methods for the turtle is easy. But for some drawings we need more sophisticated 3D control. For instance, you might want to draw a donut tilted 45 degrees up. It's tempting to take the glass donut script from the previous step, and add before the loop:
t.up(45)
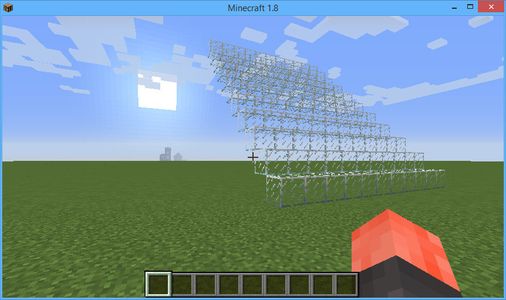
But that produces an unexpected result--see the picture. The reason for this is that the turtle will be climbing up all the time, while the d.left() method rotates it around the vertical axis, and so you get a spiral.
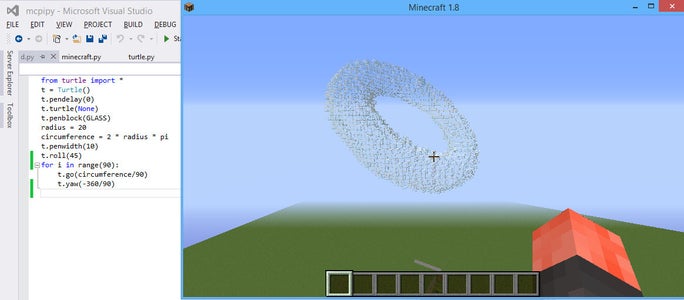
Instead, what we need to do is yaw/pitch/roll rotatins of the turtle. See the picture from NASA (US government works are public domain) explaining how the three angles go, and just imagine that the airplane is your turtle. (Unfortunately, because of Minecraft limitations, the roll angle doesn't affect how the turtle looks or the point of view from which you're viewing.) What we need to do to draw our sideways donut is first roll our turtle by 45 degrees with t.roll(45), and then when drawing the donut use t.yaw(-angle) instead of t.left(angle). The revised code is in the screenshot.
What's nice about the yaw/pitch/roll rotations is that they are always relative to where the turtle is pointing, while left() and right() are relative to the Minecraft world.
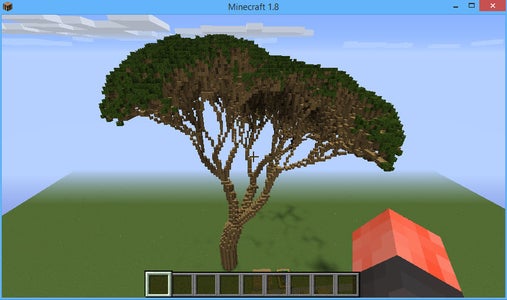
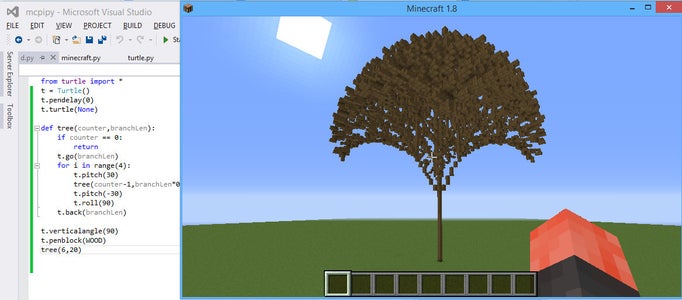
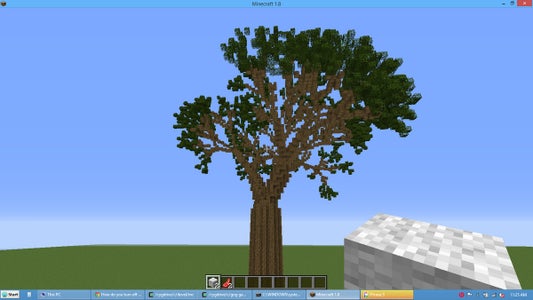
Finally, here is a much more advanced example. Let's draw a tree. This involves making a recursive function. Start with this to ensure that the drawing is done as fast as possible
from mineturtle import *
t = Turtle()
t.pendelay(0)
t.turtle(None)
Now we do our recursive tree function. The basic idea behind this is that a branch is just a smaller tree. So we make a function that takes a counter and a branch length. The counter specifies how many iterations the tree will go. For instance, counter=1 means just the trunk will be drawn, and counter=1 means the trunk and one set of branches will be drawn.
def tree(counter,branchLen):
  if counter == 0:
    return
  t.go(branchLen)
  for i in range(4):
    t.pitch(30)
    tree(counter-1,branchLen*0.75)
    t.pitch(-30)
    t.roll(90)
  t.back(branchLen)
First, the code checks if our counter has run down to zero. If so, we don't have anything to draw. Then we draw a trunk. Then we draw four branches sticking out of it with a simple loop. To design this bit of code, I just imagine myself as the turtle, having just moved up along the trunk. To draw a branch, I tilt my self up by 30 degrees (i.e., t.pitch(30)) and draw a new tree of smaller size: its counter is less by one, and its trunk will be 3/4 of the length of my current trunk. I think tilt myself back down by 30 degrees. I rotate myself by 90 degrees and repeat the exercise. Finally, once I'm done with the branches, I go back down the trunk.
Finally, I just need to invoke this code. I will make a tree with a counter of 6 and an initial branch length of 20. And for good measure, I'l make it out of wood, and of course vertically upward:
t.penblock(block.WOOD)
t.verticalangle(90)
tree(6,20)
This fractal tree doesn't look very realistic. We should make the trunk thick and the branches get thinner and thinner as they go outward (say, get half as thick, until they reach a single block), and we should switch from WOOD to LEAVES blocks as we go out. But most of all, real trees aren't that regular. We need some randomness. The simplest form of randomness is just to give each branch a chance of failing to grow, say a 20% chance. I implemented all of these in my fancytree.py script. The resulting tree looks surprisingly realistic for something produced by such a relatively simple piece of code. A funny side-effect of how I implemented it is that there is a 20% chance that nothing will be drawn--i.e., the tree has a chance of failing to grow, which is also realistic. And each time you run the script, you get something different.
Another useful feature of the turtle drawing class is being able to draw not just lines but polygonal surfaces. To do this, just do t.startface(), draw your surface, and then do t.endface(). Once you're in face mode, each time you draw a line, the code actually draws a triangle: one vertex is the point the turtle was when t.startface() was called and the line is the opposite edge. This draws a pentagon tilted on its side by 45 degrees:
t.roll(45)
t.startface()
for i in range(5):
  t.go(20)
  t.yaw(360/5)
t.endface()
Step 9: L-system Fractals With Turtle Graphics


Draw a triangle. Now take each line of the triangle and replace it by a line with a triangular bump on it. Repeat. Like on the animated image (public domain, based on Wikipedia), you get a Koch snowflake.
This can be modeled by a super-simple turtle-graphics program. Imagine that F means "draw forward", and "+" and "-" turn by 60 degrees, counterclockwise and clockwise, respectively. Then the initial triangle can be drawn by:
F++F++F
I.e., go forward, turn right by 120 degrees, then go forward, turn right by 120 degrees, go forward.
The triangular bump line can be drawn by:
F-F++F-F
So here's how we can generate a snowflake. We take the initial turtle program F++F++F to draw a triangle. Each F in it represents a line. So replace each F by F-F++F-F. If we keep on going, we generate the Koch snowflake.
This is a simple example of an L-system. The idea behind an L-system is that we start with a string of characters (in this case F++F++F), and then a bunch of rules how to change the characters (in this case, the one rule to replace F with F-F++F-F) in each iteration. We apply this a bunch of times and we get a rather complicated string. For instance, after two iterations in the snowflake case, we get:
F-F++F-F-F-F++F-F++F-F++F-F-F-F++F-F++F-F++F-F-F-F++F-F++F-F++F-F-F-F++F-F++F-F++F-F-F-F++F-F++F-F++F-F-F-F++F-F
After four, we get the image above. (To really get a fractal, the lines should shrink with each iteration, but that won't work in Minecraft.)
There is a lot of really good information in this free PDF book.
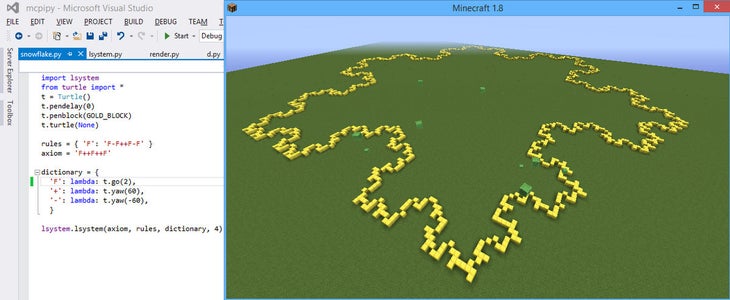
I wrote a very simple lsystem.py module. To implement the snowflake, start with boilerplate:
import lsystem
from turtle import *
t = Turtle()
t.pendelay(0)
t.penblock(block.GOLD_BLOCK)
Now we need to define the rules. I define the rules by a python dictionary:
rules = { 'F': 'F-F++F-F' }Next we define the axiom, or starting point:
axiom = 'F++F++F'
Finally we need to tell the system what each of the symbols in the strings mean. For different L-systems, we will assign different meanings to them (rotations by different angles, for instance). So we need a second python dictionary specifying what is done for each symbol. If you don't specify an action for a symbol, the symbol is ignored when it is time for the turtle to draw the output (but it might be important for the generation). The meanings are given by a dictionary that specifies a function to call for each symbol. One-line functions can be specified with the lambda operator. In this case, all the functions are one-liners:
dictionary = {
  'F': lambda: t.go(2),
  '+': lambda: t.yaw(60),
  '-': lambda: t.yaw(-60)
}
Finally we invoke the L-system, specifying how many iterations (in this case 4):
lsystem.lsystem(axiom, rules, dictionary, 4)
There is one special trick for some L-systems. These L-systems are grid-aligned, with all the rotations being 90 degrees. The square curve (squarecurve.py) and dragon curve (dragoncurve.py) are nice examples. The trick is to call, somewhere near the beginning of your code:
t.gridalign()
This moves your turtle to an integer grid location, and aligns its heading to a grid direction. After this, the turtle will remain exactly grid aligned provided that you move it only by integer amounts (e.g., 7, not 7.1, and not even 7. or 7.0 as these are floating point in Python), and you rotate only by integer amounts that are multiples of 90 degrees (e.g., -180, or 90, but not 90.0 or 45). The dragon curve code also gives an example of a forward function that is a bit more complicated--instead of just a line, it draws a wall with an opening in it.
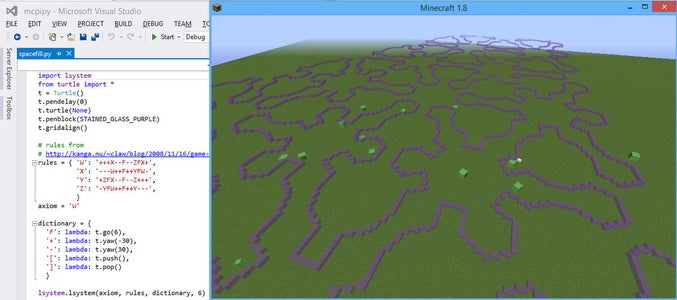
Actually, calling gridalign() can sometimes be a good idea even if not all of your angles are right angles. You will probably get some round-off problems in a large image, but it can still look better. See the spacefilling curve example (rendered in purple stained glass!).
L-systems don't have to be two-dimensional. You can include symbols that do yaw, pitch and roll rotations. For designing trees, a useful trick is to have stack commands: '[' to save the current drawing state to a stack and ']' to restore it. This will use the turtle module's push() and pop() methods. For instance, here's a snippet of code for drawing a simple tree (ltree.py):
t.pitch(90)
rules = { 'L':'[^FL]>[^FL]>[^FL]' }
axiom = 'FL'
dictionary = {
  'F': lambda: t.go(10),
  '^': lambda: t.pitch(20),
  '>': lambda: t.roll(120),
  '[': lambda: t.push(),
  ']': lambda: t.pop()
}
lsystem.lsystem(axiom,rules,dictionary,5)
Think of the L as a leaf (though this simple code doesn't actually draw the leaf--that would need to be added to the dictionary). We start with FL, which is a trunk plus a leaf. Then we replace each leaf by [^FL]>[^FL]>[^FL]. This is a set of three branches, each tilted by 20 degrees from the trunk, 120 degrees apart. The brackets ensure that after each new ^FL is drawn, we're back where we were before it. This repeats, so that the leaves on the branches are replaced by triples of branches, and so on.
A more realistic tree could have more complex code for '['. It could make the succeeding branches shorter and thinner, and change their material as we get closer to the leaves (and then restore on ']'). I include such a tree as the demo code in lsystem.py, based on rules (with some tweaks) from the Geeky Blogger.
You can also do grid-aligned 3D things. For instance, hilbert.py has a 3D Hilbert curve.
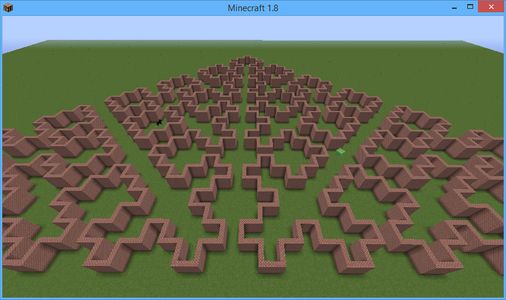
Finally, you might want to introduce some randomization into the L-system rules. So far our rules were deterministic: a single string was given that replaces a symbol, e.g., 'F': 'F-F++F-F'. But instead of a simple replacement string, one can give a Python list of pairs (p,string), where p is a probability (from 0 to 1) and string is the string to use with that probability. The probabilities for a given source symbol had better not add up to more than 1, but they can add up to less than one--in that case, there is a chance that there will be no replacement. For instance, here's a slightly randomized version of geeky.blogger's tree:
rules = {'A': [(0.55,'^f[^^f>>>>>>A]>>>[^^f>>>>>>A]>>>>>[^^f>>>>>>A]'),
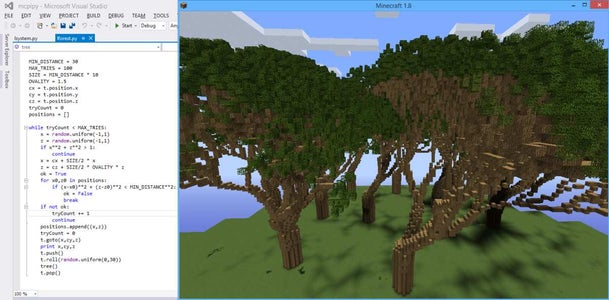
(0.25,'^f>>[^^f>>>>>>A]>>>[^^f>>>>>>A]')]}This rule has a 55% chance of replacing an A with a three-branch structure, and a 25% chance of replacing it with a two-branch structure. This isn't very random--more randomness would make things even more lifelike. I attach a screenshot of a fairly sparse forest randomly generated using this rule (and random placement of trees, subject to a minimum distance).
Step 10: Cartesian Drawing
I also made a simple class for drawing with Cartesian coordinates. You can initialize with:
from drawing import *
d = Drawing()
(This initializes the Minecraft connection and brings math and block names into the namespace.) Then you have several convenience methods:
- d.penwidth(x): sets thickness of points/lines/faces
- d.line(x1,x2,x3,y1,y2,y3,block): draws line from (x1,x2,x3) to (y1,y2,y3) made from the block material
- d.face(vertexlist,block): draws a face with the vertices in the vertexlist made from the block material
For instance, you can do a rectangle sloped at 45 degrees made of glass at level 0 at the spawn point with:
d.face([(0,0,0),(0,10,10),(10,10,10),(10,0,0)])
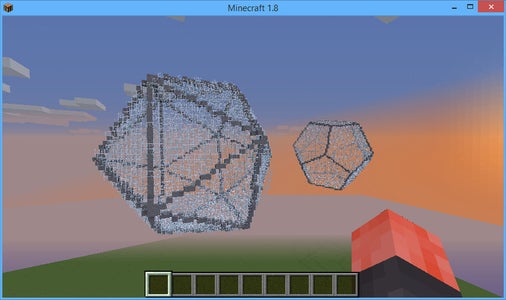
For fun, I adapted Simon Tatham's really neat polyhedron generation code to use the Minecraft drawing class. His code starts with a number of random points on a sphere, and then simulates them repelling themselves until they stabilize into a configuration that is often regular. Then he has two neat methods of making a polyhedron out of these points, a face method and a vertex method. I put this in polyhedron.py. This script takes commandline arguments. For instance, to draw an icosahedron use 12 points and the vertex construction. Directly from Minecraft:
/py polyhedron 12 vertex
For an dodecahedron, change vertex to face. You can also add one more argument for size. The polyhedron will be made of glass with stone edges and will be centered around the player.
Technical note: If you already have a Minecraft object mc, initialize with d = Drawing(mc). In either case, you can access the Minecraft object via d.mc.
Step 11: Optional: Disable Pause on Loss of Focus

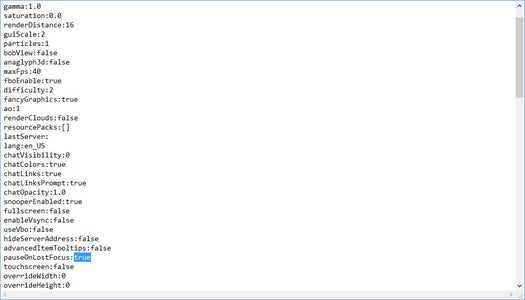
Minecraft normally pauses the game and goes to the Game menu when you alt-tab out of it or otherwise lose focus. This makes it harder to see what your python scripts are doing if you're launching them from outside of Minecraft. To do that, you can edit the options.txt file in your Minecraft directory (%appdata%\.minecraft on Windows), change the
pauseOnLostFocus:true
line to
pauseOnLostFocus:false
and then save, and restart Minecraft.
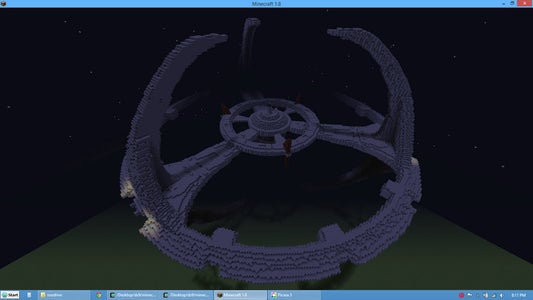
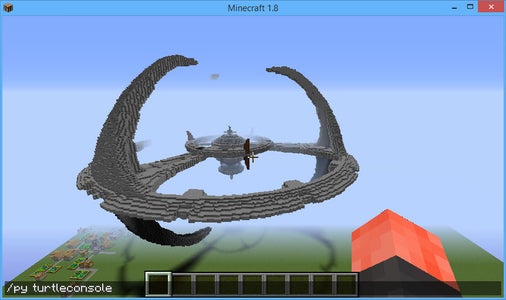
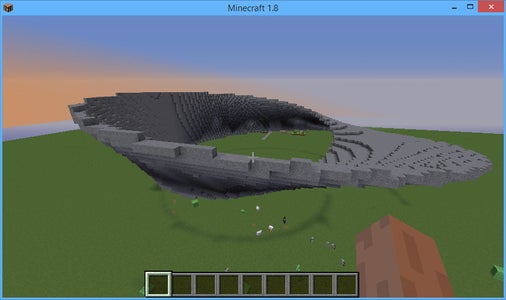
This is particularly nice for running python scripts interactively. In the screenshot, I am playing with Michael O'Hanlon's 3D turtle drawing (and, yes, that's Deep Space Nine in the background).
Step 12: Advanced Notes 1: Drawing Objects Defined by an Inequality
There are basically two different techniques for drawing mathematically defined objects with a python script in Minecraft.
One way is to define a solid object by an inequality. For instance, a sphere centered on (x0,y0,z0) with radius r can be defined by the inequality:
(x-x0)**2 + (y-y0)**2 + (z-z0)**2 <= r**2
(I.e., the distance to (x0,y0,z0) is at most r.) So to draw a sphere, just loop through all points (x,y,z) in a cube of side-length 2*r+1 surrounding (x0,y0,z0), and draw a block if the above inequality holds.
I learned this technique from the sample nt7s_sphere.py script. Start with the standard header and init Minecraft connection code:
from mine import *
mc = Minecraft()
Then just do:
radius = 8
playerPos = mc.player.getPos()
for x in range(radius*-1,radius):
  for y in range(radius*-1, radius):
    for z in range(radius*-1,radius):
      if x**2 + y**2 + z**2 < radius**2:
        mc.setBlock(playerPos.x + x, playerPos.y + y + radius, playerPos.z - z - 10, block.GLASS)
This draws a sphere of the specified radius above the player, and a little offset in the z-direction.
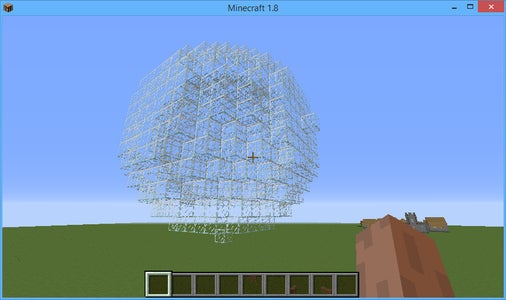
I use the same technique, but with a more complicated formula, in my donut.py script (yes, this is more complicated than the turtle-based method):
for x in range(-R-r,R+r):
     for y in range(-R-r,R+r):
        xy_dist = math.sqrt(x**2 + y**2)
        if (xy_dist > 0):
           ringx = x / xy_dist * R # nearest point on major ring
           ringy = y / xy_dist * R
           ring_dist_sq = (x-ringx)**2 + (y-ringy)**2
           for z in range(-R-r,R+r):
               if (ring_dist_sq + z**2 <= r**2):
                  mc.setBlock(mcx+x, mcy+z, mcz+y, mcblock, mcmeta)
While the inequality technique works best for solid shapes, you can use it for hollow shapes in two ways. One way is to use two inequalities, for instance in the case of the sphere one to make sure that we're within the outer radius of the center and another to make sure we're not closer than the inner radius. The other way is just to draw another object with smaller dimensions made out of air inside the larger solid object, much as in my donut.py script, I initially draw a glass donut, and then replace the inside of it with water.
Step 13: Advanced Notes 2: Drawing an Object Defined by a Parametric Surface
One can also draw a surface by parametrizing it with two parameters, say a and b, and then looping over a range of these parameters, setting blocks where needed. In my Klein bottle and Mobius strip scripts, I have a general draw_surface() method that lets one do this. For instance, the Mobius strip (see my mobius.py script) is defined by the three formulae:
x = (3 + a * cos(b/2)) * cos(b)
y = a * sin(b/2)
z = (3 + a * cos(b/2)) * sin(b)
with a ranging from -1 to 1 and b ranging from 0 to 2*pi (yet another reason why this can be in the pi/e contest?). You can think of b as defining the angle around the circuit, and a moving one from one edge to the other.
Using scripts like this, you need to ensure that in your loops over a and b, the steps are sufficiently small that there are no gaps in the surface. Unless that's the effect you're after.
For details and examples see mobius.py, klein.py and klein2.py.
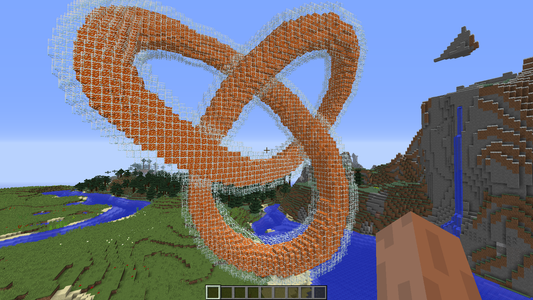
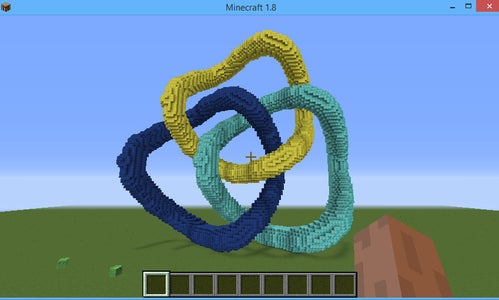
Step 14: Advanced Notes 3: Knots
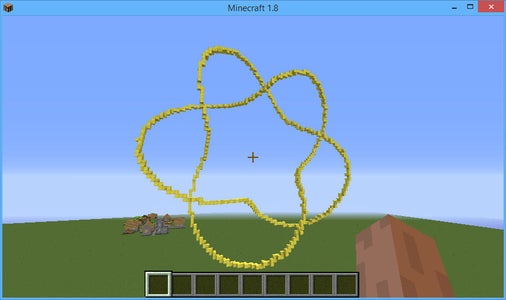
You can find parametric equation for knots on the net. This time, we're going to do things slightly different from before. Before, we had loops driving calls to mc.setBlock() directly. But in our surface plots, such as the Klein bottle, often the same block would get drawn multiple times, which is slow and inefficient. A better way is to keep track of the set of exact blocks that were already drawn to avoid redoing the same thing.
Let me go through an example like that (in knot.py) to draw a knot. Start with a standard header like:
from mine import *
We now need to generate our knot. I used the cinquefoil formulas from here. This requires looping a parameter t from 0 to 2*pi, with small enough steps to ensure we don't have gaps. I used 10000 steps. Since this is done in-memory, and computers are fast, and overlapping blocks are only sent once to Minecraft, it's easier to easier to do more steps than to think how many is enough. It's important for the coordinates that go in the dictionary to be integers so we can tell that the same block is being drawing (a block at (1.1,1.2,1.4) and a block at (1,1,1) are the same thing in Minecraft).
We first initialize and set the position of the knot relative to the player. Note that the player position need not be an integer (you might not be standing exactly aligned with a block) and should be turned into an integer.
mc = Minecraft()
playerPos = mc.player.getPos()
scale = 12
x0 = int(playerPos.x)
y0 = int(playerPos.y + 5*scale)
z0 = int(playerPos.z)
Now we make an empty set named done to store the coordinates we've already drawn:
done = set()
And we draw the set:
t = 0
while t < 2*pi:
  x = x0+int( scale * cos(2*t) * (3 + cos(5*t)) )
  y = y0+int( scale * sin(2*t) * (3 + cos(5*t)) )
  z = z0+int( scale * sin(5*t) )
  if (x,y,z) not in done:
     mc.setBlock(x,y,z,block.GOLD_BLOCK)
     done.add((x,y,z))
  t += 2*pi / 10000
This only draws data that isn't already drawn. Note that we need to round off the x, y and z coordinates with the int() function. That's the magic behind the overlap removal: when the rounded coordinates are the same, only one block is drawn. (Note: the double parenthesis in the done.add((x,y,z)) line are due to the fact that what we're adding to the set is the coordinate triple (x,y,z).)
The above code is in knot.py.
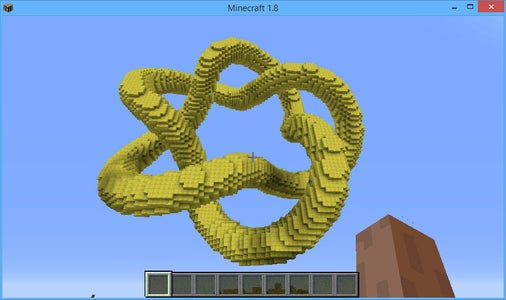
The knot would look better if the rope were thicker. There are many ways one can do that. An inefficient way, but easy since computers are fast these days, is just to draw a little ball instead of a point at each pixel. To do that, first I make a little utility function to draw a ball while checking in the done set to ensure there are no duplicate blocks:
def ball(x0,y0,z0,r,block,done):
  for x in range(-r,r):
    for y in range(-r,r):
      for z in range(-r,r):
         if (x**2 + y**2 + z**2 <= r**2):
            if not (x0+x,y0+y,z0+z) in done:
               mc.setBlock(x0+x,y0+y,z0+z, block)
               done.add((x0+x,y0+y,z0+z))
This uses the inequality method to fill in a ball at (x0,y0,z0), of radius r.
Then just modify our knot-making while loop to make a ball instead of just a point:
scale = 10
x0 = int(playerPos.x)
y0 = int(playerPos.y + 5*scale)
z0 = int(playerPos.z)
done = set()
t = 0
while t < 2*pi:
  x = x0+int( scale * cos(2*t) * (3 + cos(5*t)) )
  y = y0+int( scale * sin(2*t) * (3 + cos(5*t)) )
  z = z0+int( scale * sin(5*t) )
  ball(x,y,z,4,block.GOLD_BLOCK,done)
  t += 2*pi / 10000
The result is in knot2.py in the sample scripts.
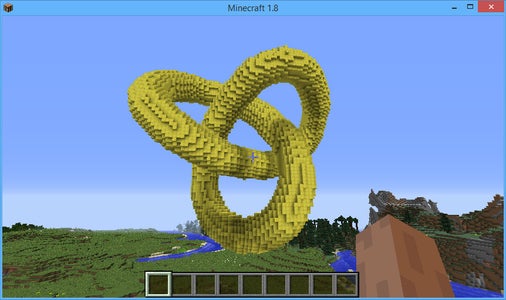
Other sample knots are in trefoil.py, trefoil2.py and borromean.py. If you draw with multiple materials, you can use a dictionary in place of a set, or just go sequentially through the different materials and clear the set before each (that's what I do in trefoil2.py and borromean.py).
Step 15: Advanced Note 4: Flying With Your Brain

In another Instructable, I describe how to hack a Mindflex EEG toy to work over Bluetooth. Using python and a modified version of the NeuroPy package, you can now control Minecraft with your brain. Here's how to do it, either with the Mindflex or with a full Mindwave Mobile set. In my example scripts, I do this in the neurosky.py script.
Start by importing relevant packages and initializing Minecraft:
from mine import *
from NeuroPy.NeuroPy import NeuroPy
mc = Minecraft()
Then connect to the EEG headset. My hacked Mindflex EEG toy connects to my Windows laptop as COM11 and works over 57600 baud. It also needs a special initialization string to be sent to it to switch it to 57600 baud (and raw mode). This was done with:
eeg = NeuroPy("COM11",57600,True)If you have an official Mindwave Mobile (or are using Mindflex but left it at 9600 baud), then you can omit the ",True" part.
Now we set up a simple callback routine that will move you upward (this needs Creative mode) when the "meditation" value from the eeg (which ranges from 0 to 100) goes above 60, and to move downward when it goes below 40:
up = 60
down = 40
def callback(a):
    mc.postToChat(a)
    if a > up:
       pos = mc.player.getPos()
       pos.y = pos.y + 1
       if mc.getBlock(pos.x,pos.y,pos.z) == block.AIR.id:
          mc.player.setPos(pos)
    elif a < down:
       pos = mc.player.getPos()
       pos.y = pos.y - 1
       if mc.getBlock(pos.x,pos.y,pos.z) == block.AIR.id:
          mc.player.setPos(pos)
eeg.setCallBack("meditation", callback)
For good measure, I posted the meditation value to chat. Now, all we need to do is start up the EEG and inform the user:
mc.postToChat("Connecting to EEG")
eeg.start()
mc.postToChat("To fly up, be meditative")
Finally, we need to keep the script from exiting, by starting an endless loop of sleeping: while True:
time.sleep(10)(My neurosky.py script is slightly fancier by letting you select whether to work with the "meditation" or the "attention" value from the headset. By default it does attention, but /py neurosky m will start it in meditation mode.)
Then turn on the headset, and start the script with /py scriptname. To stop the script, do /py again.
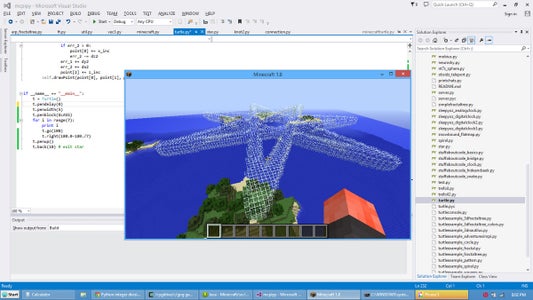
Step 16: Optional: Visual Studio With Python and Minecraft: Getting Started
If you're running on Windows, Visual Studio (I recommend free Visual Studio Express for Desktop 2015) together with the Python Tools is a nice way to develop python code for Minecraft. (But if you used my Windows installer for the mod, you'll need a full official Python installation instead of what I bundled, or else you'll need to use PTVS to set up a custom environment pointed to %appdata%\.minecraft\pythonX.)
A really useful thing is that Visual Studio's code completion will help you with the Minecraft python api. For instance, when you type "block." it will pop up a list of all the block types (AIR, BED, etc.).
Make sure you have installed Python, the mod, and the sample scripts.
1. Download and install Visual Studio Community Edition 2013.
2. Download and install Python Tools for Visual Studio (PTVS 2.1 VS 2013.msi).
3. Start Visual Studio.
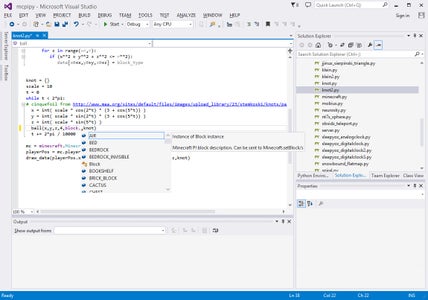
4. Click on "Open Project", search for your sample scripts folder (%appdata%\.minecraft\mcpipy with Raspberry Jam Mod) and load the mcpipy.sln solution.
5. In the Solution Explorer window on the right, you can choose an existing script to modify, for instance knot2.py (or you can create a new one by clicking on the bold mcpipy in the Solution Explorer and choosing from the main menu "Project", "Add new item", and then choosing "Python" and "Empty module").
Now you can edit the script to your heart's content.
Step 17: Optional: Visual Studio With Python and Minecraft: Running and Debugging
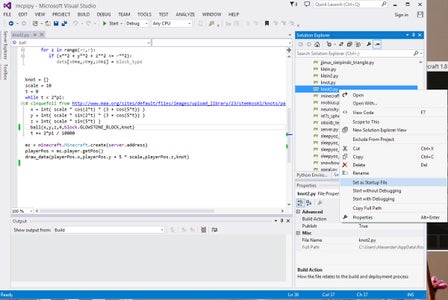

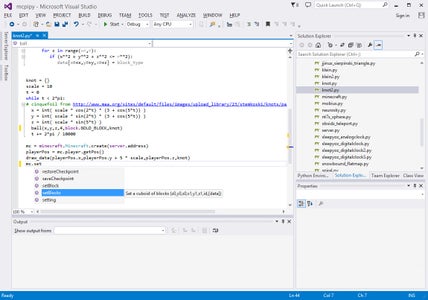
Because we set up all the scripts to be part of one project, to run or debug a script, you need to tell Visual Studio which script is the one you want to run. Right click on the script in the Solution Explorer window (if you lose the Solution Explorer, go to the "Windows" menu and choose "Reset Window Layout") and "Set as Startup File".
You will also want to have Minecraft running with a world opened, or otherwise your script won't be able to connect to Minecraft.
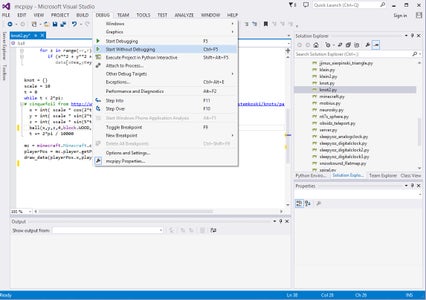
After setting the startup file, you can run by pulling down "Debug", and choosing "Start debugging" (or just press F5) or "Start without debugging" (ctrl-F5). If you choose "Start debugging", the script will run much more slowly, but you will have useful debug features, like the ability to pause the script at any time, step through it step-by-step (there are useful buttons on the toolbar), and examine the variables while running (see the "Autos" and "Locals" boxes).
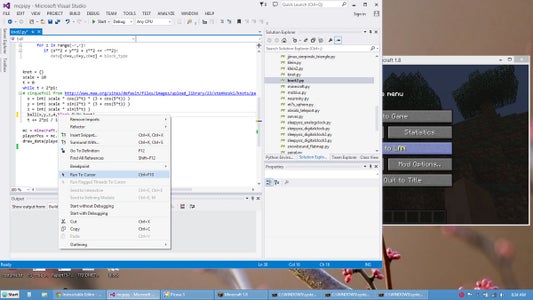
You can also run in debug mode up to a particular line in the script by right-clicking on the line and choosing "Run to cursor". This is handy if you know that something is wrong in your script around that line, and you want to have a look at the variables at that point. For instance, if you run the knot2.py script up to around the line that invokes draw_data(), you can see the contents of the knot dictionary that stores the list of blocks to be drawn.
Step 18: Additional Resources

The best resource for programming Minecraft in python is the Adventures in Minecraft book by Martin O'Hanlon.
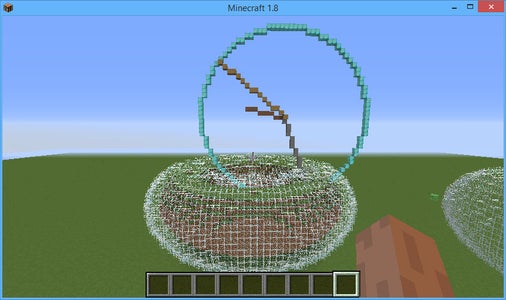
O'Hanlon also has a lot of good information on the stuffaboutcode.com site. In particular, he has an API reference here. The Raspberry Jam Mod (and mcpiapi mod) supports just about everything that the Raspberry Juice server plugin does.
The real-time working analog clock in the picture above is from one of the stuffaboutcode scripts (sitting above one of my donuts): /py stuffaboutcode_clock
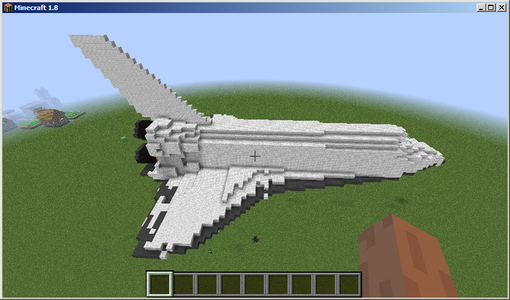
A rather cool thing that O'Hanlon did was to write a python script to convert Wavefront mesh.obj files to Minecraft. I've adapted this to convert 3DS, PLY and binary STL files as well. For instance, you can draw a space shuttle with /py render shuttle (there are .txt files describing the block choices in the mcpipy/models directory; the meshes will automatically be downloaded).
