Introduction: Sculpting a Shrunken Head


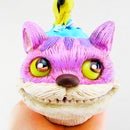


Shrunken heads would make cool props or decorations for Halloween. You can sculpt them to be realistic, caricature-like or base them from your imagination.
I based my own shrunken head from my sketches and references online. Just google shrunken head and a plethora of images would show up.
This project would make a great sculpting practice for making realistic heads if you've always wanted to try sculpting. Their heads are usually deformed so there is no pressure in making them perfect. There is also a tutorial on making realistic chicken bones and needle-felted hair.
Step 1: Materials


- Polymer Clay - PVC based oven baked modelling clay.
- Aluminum foil
- Aluminum wire gauge 18
- Tools: pasta machine / acrylic roller, knife, needle-tool, paddle-shaped tool, tooth brush, paint brushes, pliers, wire cutter
- Wax tape
- Genesis heat set paints - burnt umber, black, yellow
- Leather cord
- Shell beads
- Crimp beads
- Clasp
- Jump rings
- Needle-felting needle
- Needle-felting wool
- Felting mat or sponge
- Tacky Glue
Step 2: Armature and Conditioning the Clay


To save clay and ensure that it is baked thoroughly we need to make an armature for the head using aluminum foil. The armature that I made is around 2 inches by 1 inch oval shape and I wrapped it with wax tape. You don't necessarily need to wrap the armature with tape but it does make the surface smoother and neater.
For the flesh color, I mixed Super Sculpey beige and Premo burnt umber. I then passed it through the pasta machine until the color is even. Make sure that the tools that you use for polymer clay is not used to prepare your food for safety reasons.
Wrap the clay on your armature about 1/4 of an inch thick and smooth the clay using your thumbs. Check for air bubbles and pop them using a needle tool then smoothing over it with your thumb.
Step 3: Sculpting the Face


Sculpting the face can be a bit daunting when you're still a beginner, but just keep practicing and have a reference on hand with a front and side view to help you with the profile.
Begin with marking a vertical midline then a horizontal line for the eyes. Add a strip of clay to the forehead (2nd picture) and blend that with a paddle shaped tool.
Mark the eyes (3rd pic) with a needle tool and add oval shapes to the eyes.
Take a long strip of clay that is larger on the bottom end and place that on the midline of the face (4th pic). Mark the clay with a needle tool for the bottom of the nose and the parting of the lips (5th pic).
To separate the nose from the mouth, use a paddle tool and move the clay downwards to the mouth from the end of the nose. Then push the nose tip upwards (6th pic). I then added 2 oval shapes of clay to each side of the face for the cheeks and blended the seams to the surrounding clay (7th pic).
To create the lips, push the clay upwards from the parting of the mouth for the upper lip and downwards for the lower lip (8th pic).
Remove excess clay from the nose bridge in between the the eyes either by blending the clay upwards to the forehead or by removing it with a knife to achieve the curve that separates the nose from the forehead when the head is viewed to the side (9th pic).
I added an elongated curved shape below the mouth to add more chin to the face (10th pic). I then added bits of clay to the sides of the brow and lips and made holes for the nostrils using a ball stylus (11th pic).
Take your paddle shaped tool and detail the eyes,nose and sides of the face, making some curved lines (12th & 13th pic). I also shaped the eyebrows, using the same tool (14th pic). I then added 2 flat shapes of clay on both sides of the chin and blended the seams (15th pic).
Step 4: Sculpting the Ears, Neck & Detailing


I curved a piece of aluminum wire and attached it to the top of the head and added more clay to make an attachment for the cord later on.
Attach 2 fairly equal sized flat oval shapes to the sides of the face for the ears blending the seams. With a ball stylus, sculpt the ears using an ear reference (4th & 5th pics).
For the neck skin flap, I just attached a coil of clay and pinched it to flatten the sides then blended the seams to the head (6th & 7th pic).
I like to smooth out the clay using a clean paint brush going over the features (8th pic). This also help remove the fingerprints.
I added holes on the mouth with a ball stylus that goes through the upper and lower lips (9th pic).
To detail the face, I used a needle tool to create the lines of the face and eyebrows. I also used a toothbrush to texture the skin. (10th pic)
I then bake the head in a pre-heated convection oven for 130 degrees celsius for 45 minutes.
Step 5: Sculpting the Bones


My reference for these bones are chicken bones. I just googled voodoo necklace and apparently the bones that they string through the necklaces are chicken bones. Adding these bones just makes an even more creepier piece.
I mixed translucent and white Premo clay and divide it into 4 pieces. I then rolled the clay with my fingers to elongate it until it resembles a bone shape (2nd pic). To reinforce the clay, I inserted an aluminum wire through each bone, twisting the wire carefully until it's concealed with the clay (4th pic).
To make it realistic, I used a rod shaped tool and indented both ends, then smoothing it out with my fingers. Then I textured it with lines and spots with a needle tool. (5th & 6th pics)
Lastly, I create holes in one end of each bone then I baked them in a convection oven for 130 degrees celsius for 30 minutes.
Step 6: Painting the Head & Bones


For this project, I used Genesis heat set paints. I prefer using these for realistic figurines or dolls because I don't need to varnish them and they're matte. But you can definitely use acrylic paints and chalk pastels, just varnish them with a matte sealant.
For the head, I mixed burnt umber and black and painted the whole head. I added in darker shades to some areas such as the eyebrow, around the eyes, in the nostrils, between the lips, chin and lines or crevices on the face and ears.
For the bones, I mixed yellow and a small amount of burnt umber and lightly painted the middle of the bones. I still want the whites of the bones peaking through. Then with burnt umber, I painted the ends of the bones making sure it's in the crevices. I just remove the excess paint with a cotton ball with some rubbing alcohol.
Heat set the pieces by baking them in a 130 degrees celsius pre-heated oven for 20 minutes.
Step 7: Making the Hair


I made the hair using black felting wool. I made 12 wefts of hair but ended up only using 8. It's better to have extra just in case. You can also use synthetic hair for this part.
To make each weft, I take a piece of wool, separate hair a bit then folded it in half. I placed it on a sponge and start poking it with a needle-felting needle. After a while, you would notice it would start becoming compact and matted.
I start layering the wefts on the back of the head using tacky glue. You just go around the head until you covered and reach the top of the head. Let the glue dry completely before going to the next step.
Step 8: Finishing Touches


Before styling the hair, cut the excess wire on top of the head and use a needle-nose pliers, make loops for the cord. Then thread a 27 inches leather cord through the loops.
Tie the hair up with a piece of string and thread 3 pieces of string to the holes on the mouth as well and make a knot. To stain the string on the mouth, I used a yellow orange color alcohol marker.
I add a knot before placing in 3 shell beads and 2 bones on each side of the head.
To secure the ends of the leather cord, I used a crimp bead to each end of the cord and used pliers to crimp it in place. I then add 2 pieces of jump rings for each crimp bead and placed a clasp on one end.
You can now wear him around your neck or hang him on your door knob. ^_^

Participated in the
Halloween Props Contest 2015

Participated in the
Epilog Contest VII

Participated in the
Halloween Decor Contest 2015


