

Introduction: SiRo - a Simple 3D Printed Robot for Micro:bit


SiRo stands for Simple Robot and is the smallest and simplest robot I could make for 3D printing. It is relative fast to print and easy to build. The parts are cheap and the robot can be disassembled so that the parts can be reused for other projects, making it a great robot for education.
Supplies

Materials:
Micro:bit
Motorbit
4 x M3 30mm screws
6 x M3 6mm screws
8 x M3 Spacers - I use 4x6 mm and 4x8mm
10 x M3 nuts
1 x Caster wheel
2 x TT130 motor
2 x Wheels for the TT130 motor
1 x 9 volt battery + baterry holder
A bit of wire. In two different colours if possible
A small piece of double sided tape
Filament for the 3D-printer
Tools:
3d-printer
Soldering Iron
Screwdriver
Wirecutter
Attachments
Step 1: Print the Chassis
First step is to slice the stl file in your favorit slicer and print out the chassis.
Attachments

Step 2: Solder Wires on to the Motor


While waiting on the 3d printer you can start by soldering wires on to the motors. Take 4 pieces of wire, each should be 12 cm, strip them and solder them on to the motors. If you can, then I would advice you to use two different colours of wires. It just makes it easier to keep track of them.
Step 3: Start Screwing It Together


We first take 2 of the spacers(8mm) and 2 of the 6 mm screws. Use the screws to install the spacers in the holes in the middle of the chassis.
Step 4: Add Coaster Wheel


For this step we need 4 spacers (6mm), 4 screws and 4 nuts.
Coaster wheels tend to be a bit short, so they need the spacers so the Robot is more straight. So first use the 4 nuts to install the spacers on to the chassis. Then use the screws to install the coaster wheel on to the spacers.
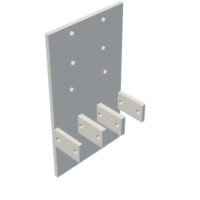
Step 5: Install Motors


For next step we need 4 x 30 mm screws, 4 nuts and the motors.
Install the motors as shown on the picture.
Step 6: Motorbit


We now take the last 2 spacers(8 mm), the last 4 nuts and the motorbit. First install the two spacers on to the motorbit, using the holes closest to were the microbit gets installed with 2 of the nuts.
Then install it on the chassis using the last 2 nuts.
Step 7: Wheels

Now add wheels to the motors. You should be able to just press them on.
Step 8: Wiring

Cut the wires so that they are as short as possible. Then screw the two wires from the right motor into M1 + and M1 - and the two wires from the left motor into M2 + and M2 -.
Step 9: Battery


Screw the battery holder into the motorbit. Black wire to GND and red wire to VIN. Then take your small piece of double sided tape and place it at the rear of the smar car and put the battery on top of it.
Step 10: Microbit and Programming


Now program the micro:bit. Remember to use the motorbit extension. Put the micro:bit into the motorbit and you are ready to go.


![Tim's Mechanical Spider Leg [LU9685-20CU]](https://content.instructables.com/FFB/5R4I/LVKZ6G6R/FFB5R4ILVKZ6G6R.png?auto=webp&crop=1.2%3A1&frame=1&width=306)


