

Introduction: 9 Unusual Uses for Tissues


Here is a list of 9 unusual uses for tissues that I've collected over the past couple months (Since December to be exact)
This is my second "Unusual Uses" compilation, If you missed my first one, Make sure to see it: 8 Unusual Uses for Tweezers
Let's get started!
Step 1: Diffuser // Softbox Light (For SpectrumLED)


I used a tissue to cover the LED's on SpectrumLED- My Homemade 200W Variable Spectrum LED Panel.
I peeled a tissue in half (because I used "2-Ply" tissue), And attached it to the fins of the heatsink using binder clips. Now this serves as a softbox which makes the light a bit more diffused (aka soft to the eye)
Didn't understand? Learn how a softbox works
Warning: Use this only for LED Lights only! Tissues might ignite (Catch fire...) when used with Incandescent & Fluorescent lamps
Step 2: Blister-Proof Your Feet!


If you tuck a tissue into the insoles of your shoes (Where your heels are) you can stop getting your feet blistered after buying new shoes. The tissue acts as a cushion for your feet while they move in the shoe
Another option is to stick to good running shoes, If you know what I mean...
Step 3: Padding for Jewelry Boxes

Who told you that tissues can't be used as padding for small gift boxes?
Next time you need to cushion a gift box, Use Tissues! They're easy to use and cheap! (Not to mention that scented tissues can be pretty nice)
Next up: "ESD Safe Tissues" (refer to picture...)
Step 4: Tissue Dust Mask! (Respirator)

You're in a hurry because you need to finish a project before an Instructables contest ends. You reach for your safety gear cabinet and what do you see? Nothing! You ran out of your disposable dust masks! What do you do?
Take a tissue, Cover your nose and mouth with it, Then wrap a rubberband around your face to hold the tissue in place. Tadaa! Improvised Tissue Dust Mask!
I'm not sure of the filtration properties of tissues, But they're definitely way more comfortable than cheap dust masks. If you by any chance know something that I don't know about tissues, Please leave a message in the comments
Step 5: Pick Up Broken Glass Safely


You can use a tissue to pick up broken glass! The "I'm not going to get cut" sentence doesn't usually work... Hold it in your hand the way that I've shown in the picture, Similar to a mitten
Step 6: Headphone Cushion Using Tissues!


I don't know about you, But I use headphones a lot! After some time, The top of my head starts to hurt from the plastic (even though they do have some cushioning)
To solve this problem, I wrapped two tissues around the top part of my headphones, And secured them in place with a couple small rubber-bands. Now this serves as an extremely comfortable cushion, Until it wears out
Step 7: Improvised Earplugs W/ Tissues

If you're in a survival situation* (Such as an extremely loud dance party) you can crumple a small piece of tissue, And stick it in your ears. It works pretty well as improvised earplugs
*I guess... Technically...
Step 8: Move Heavy Furniture

If you need to move heavy furniture by yourself, Put a tissue under each leg of your furniture (aka sofa), This will make it slide easily on the floor!
You can also use this for squeaky chairs, Or chairs that scratch wooden floors: Attach small pieces of tissues to the chairs' feet with Double-Sided Tape.
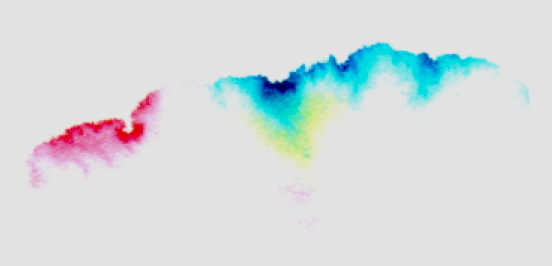
Step 9: Chromatography (Science Experiment W/ Colors)


"Chromatography", In this experiment, Is the science of separating a color mixture by dipping it in water, To see which colors the color was originally made from.
For this experiment you need:
1. A Tissue
2. Scissors
3. A Cup of Water (Or a Beaker)
4. A Marker (Permanent Markers & Primary Colors (RYB) don't work. Green is my preferred option)
How to make it:
Step #1. First, Start by cutting a tissue into a small strip (As shown in Picture #2)
Step #2. Next, Color the tissue as shown in Picture #3. I chose green.
Step #3. After that, Dip the tissue in the water. You should see the colors starting to separate
Not all markers work, For example: This green marker doesn't get separated very well (Could this be an indicator of a high quality marker?) From my experiments, Green gets split into two colors: Blue & Yellow. The blue usually floats to the top of the tissue, And the yellow sinks to the bottom part of the tissue, Such as this picture or this one.
---------------------------------------------------------------------------------------
Don't forget to Follow me on Instructables, I have over 60 Instructables that I'm sure you'd like!
If you have any other unusual uses for tissues, Post them in the comments below!

Participated in the
Hack Your Day Contest

Participated in the
Full Spectrum Laser Contest 2016


