

Introduction: 3D Printed Bubble Wands


I was blowing bubbles with my daughter the other day (well, she hasn't gotten the blowing part yet so it's mostly me blowing them for her) and thought it would be fun to design and 3D print some of my own, particularly ones she would enjoy such as a little car. I ended up designing a couple that just incorporates simple circles, Mickey Mouse, a car, a crown, and a Pokeball. These are just fun for general use but they could also be great personalized kid's birthday party favors. (I also, later, came up with designs for a little bear, apple, and sun).
Don't have any bubble solution? Make your own! Here is my recipe, the secret ingredient is xanthan gum :)
This isn't a new thing. Many people have designed and print bubble wands before including Paige Russell and Autodesk Gallery Workshop, but I wasn't going to let that stop me. To set myself apart, I decided to add the little ticks on the design that you see on traditional storebought bubble wands. These ticks are there, from my understanding, to hold more bubble solution on the wand allowing you to blow more bubbles before you have to dip it in the solution again. I hope you enjoy these designs and are inspired to make your own. If there is any other files or information I can provide to make that easier, let me know.
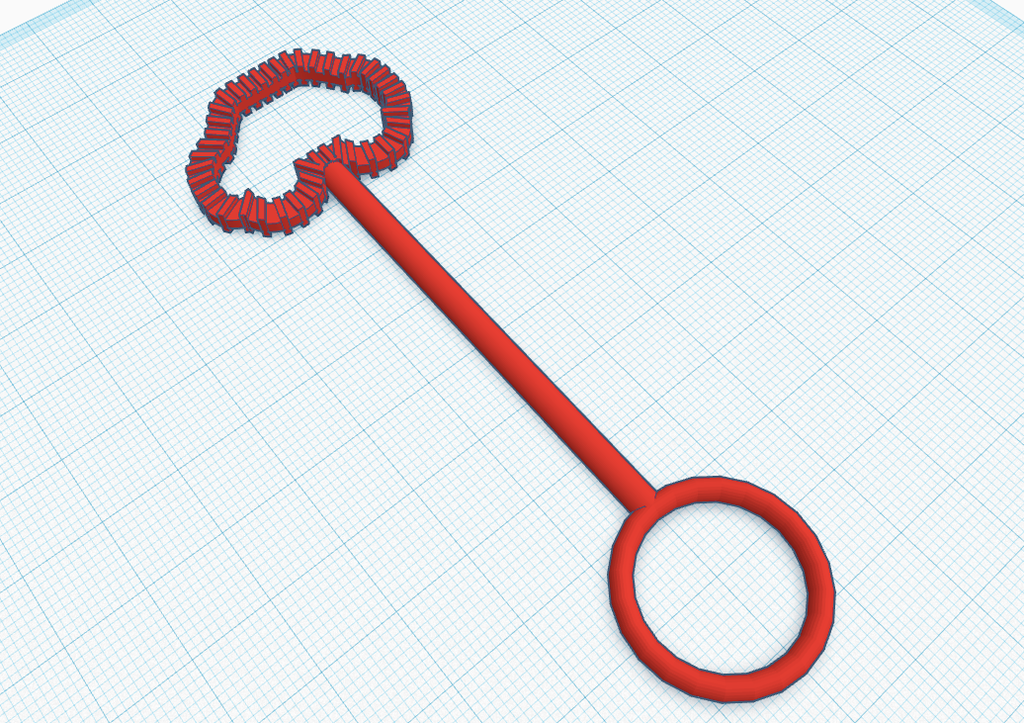
Remember, no matter the shape of the bubble wand, the bubbles will always be spheres. Though, if you have multiple holes, such as the Pokeball and Mickey Mouse, you are going to get mostly bubble clumps and if you have one hole, such as the car and crown, you are more likely to get one big bubble.
Instructable 309
Step 1: Supplies
I'm going to get into the designs a lot for the next few steps (since that's what 3D printing is all about) but you can skip around to what relates to the design you want to create.
Here are the files for the designs I created using the techniques talked about in the next steps.
For this project, all you need is your 3D Printer, Filament you want to use, a slicer for printing, and bubble solution. I printed mine in the color I wanted since I have a variety, but you could also print them all in one color and spray paint them. I don't really recommend sanding them as you don't want to tear off all the ticks. You could sand the handle if you wanted, but it should be pretty smooth because of the design.
If you are designing your own, I suggest Tinkercad.
Attachments


Step 2: Designing

While I used Silhouette Studio for some parts, the majority of bubble wand designs were created using Tinkercad.
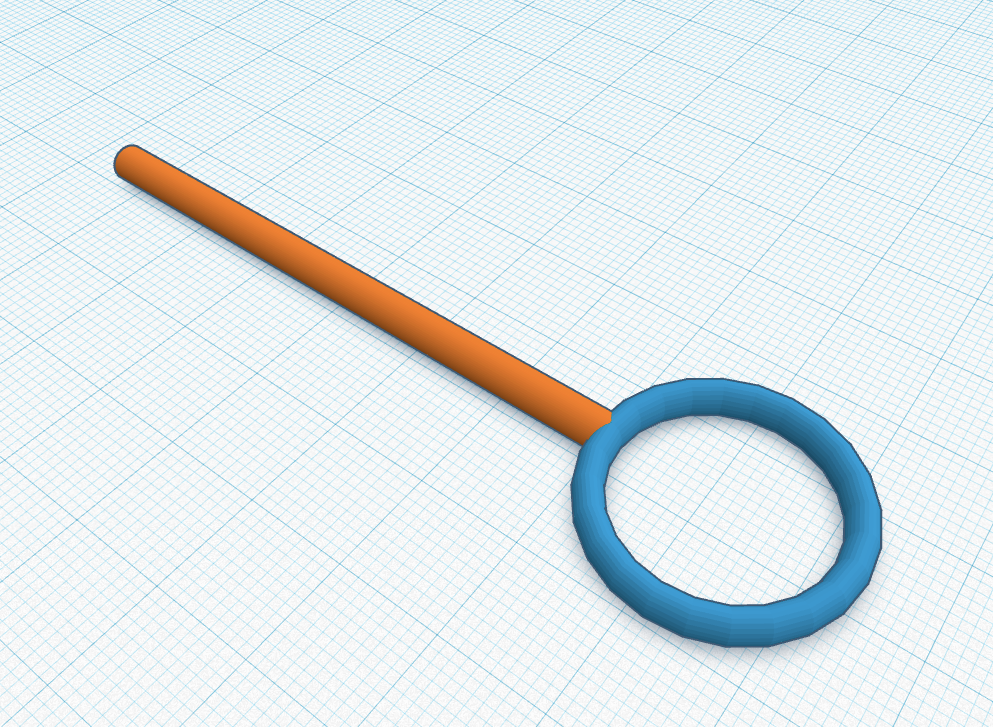
To start, you can design the part you'll hold onto. I wanted it smooth so I made it from a Cylinder and Torus.
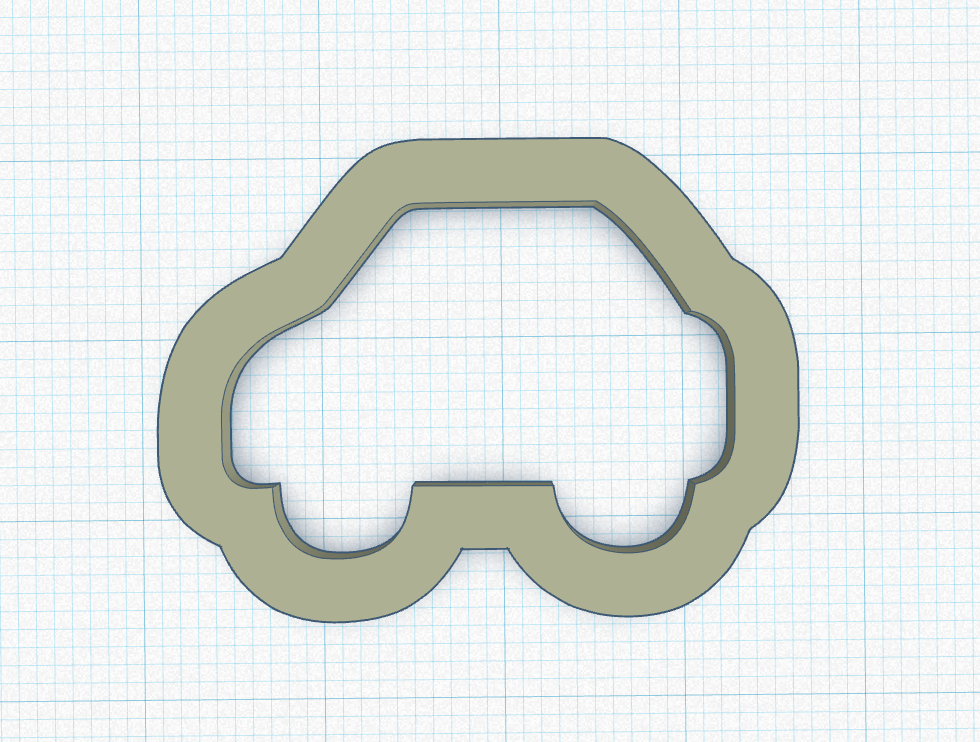
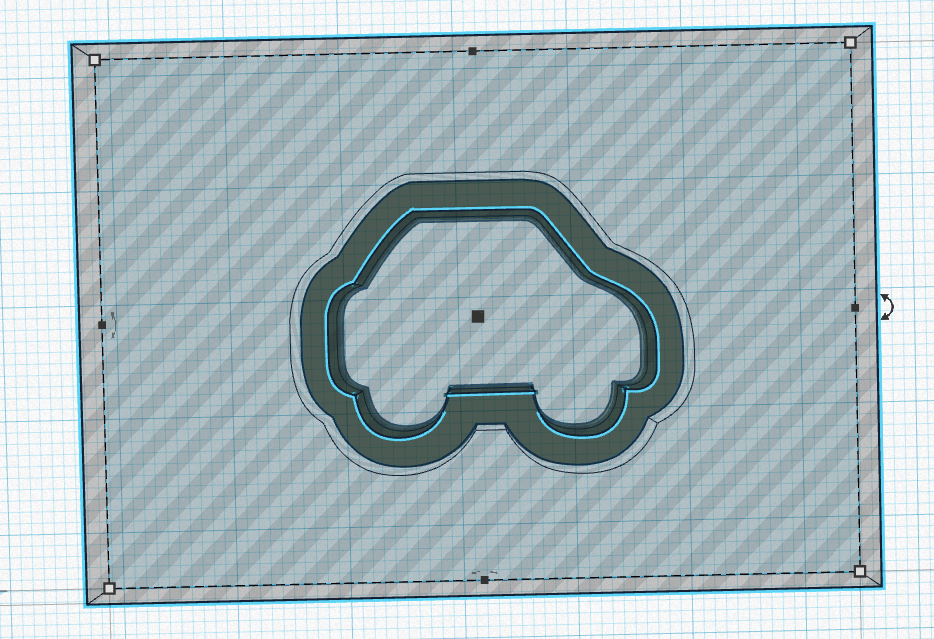
I'm going to show how I did one of the more complicated designs, the car.
I used Silhouette to make the shape outline and then brought it into Tinkercad. You need to do an offset to get the right shape, and I was able to do this easily with Silhouette. If you do a shape like a circle or square, you can just use the same shape but smaller to create the outline.
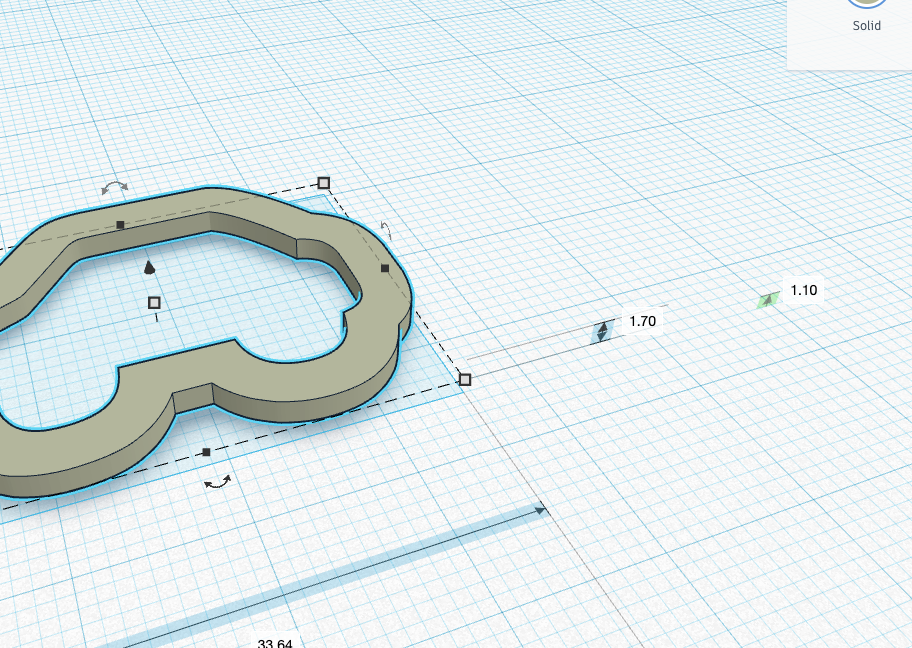
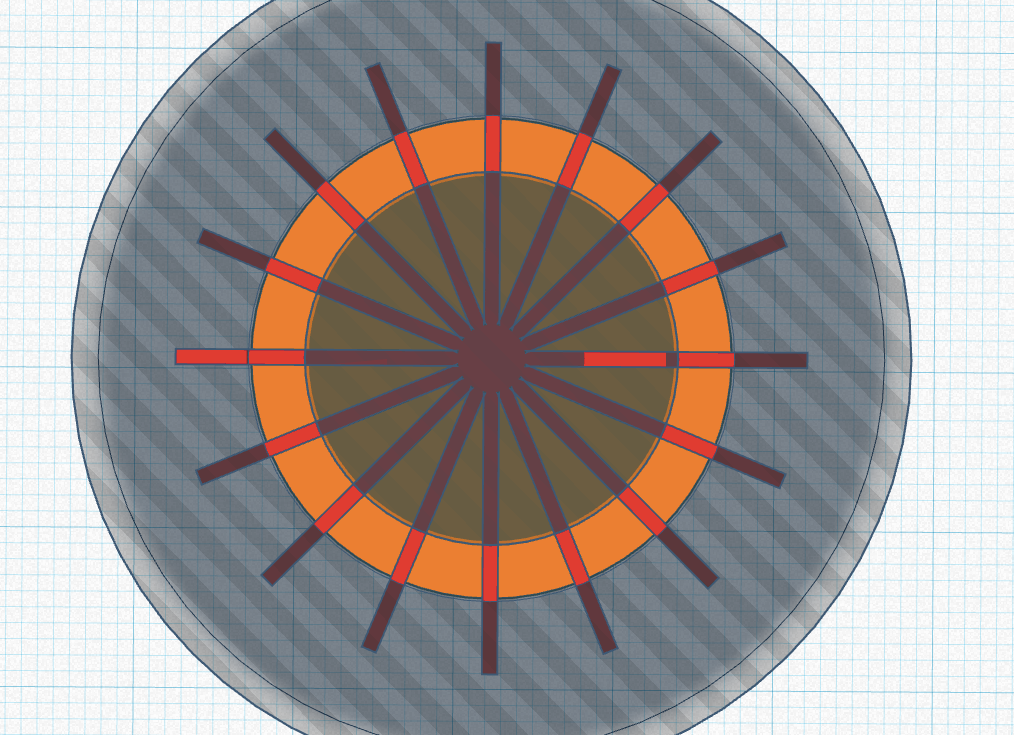
I wanted to make sure it was fairly thick going around so it is about 3mm wide. I decided the ticks going around it would be 3.70mm thick so I made the design 1.70mm thick and was 1.1mm up from the surface of the workplane. This meant for my final print, there would be 5 layers with just the ticks, 8 layers of the design, and then 5 more layers of the ticks sticking up (18 layers total)
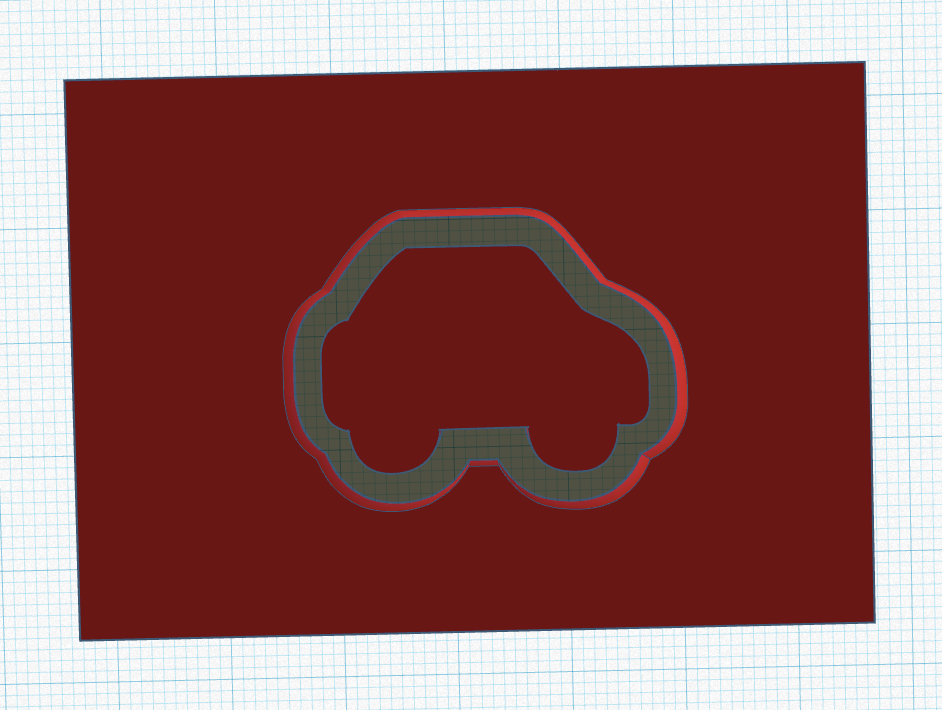
Now we need to make a cutout so we can remove all the excess of the ticks when we are done. I did this now and then moved it below the workplane until I needed it. Start by duplicateing the shape in the same size and line it up with the other; it HAS to be in the exact same spot. Move this second one below the workplane so you can see it.

Next, use a large rectangle to cut out the shape of the car into. Once you have that cutout, you can turn it into a hole and now save this until you are done.
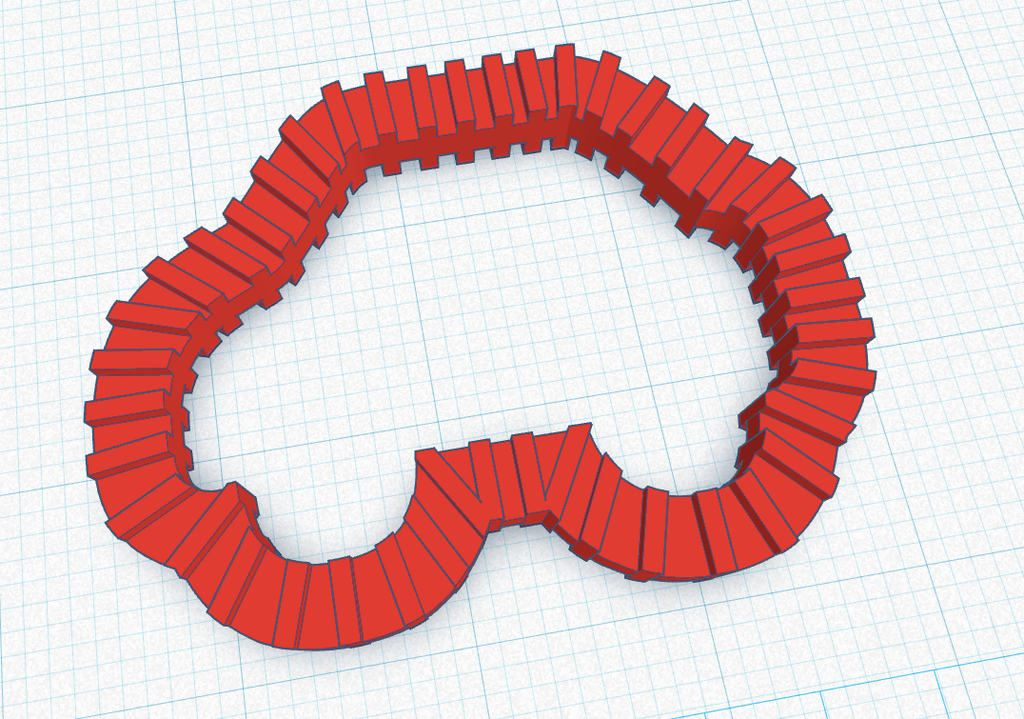
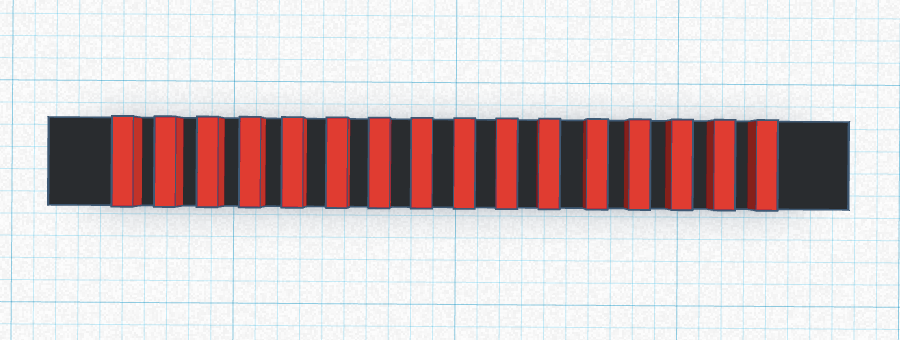
Time to add the ticks. For a shape like this, I created a rectangle that was 0.80mm wide, 3.7mm tall and then it needed to be long enough to stretch from inside to outside the shape, so mine were about 7mm. Start copying, rotating, and lining these ticks up all around the shape.

While adding the ticks, keep in mind that you want them to lead the bubble solution towards the wand opening. Meaning, you don't want the ticks to overlap in the middle. They can overlap in the outside if they need to.
Once you have all the ticks in place, you can bring the cutout up from under the workplane and group it with your working shape and ticks to make the final bubble wand. As long as it is perfectly lined up, it will just cut off the ends of the ticks and leave them flush with the design.
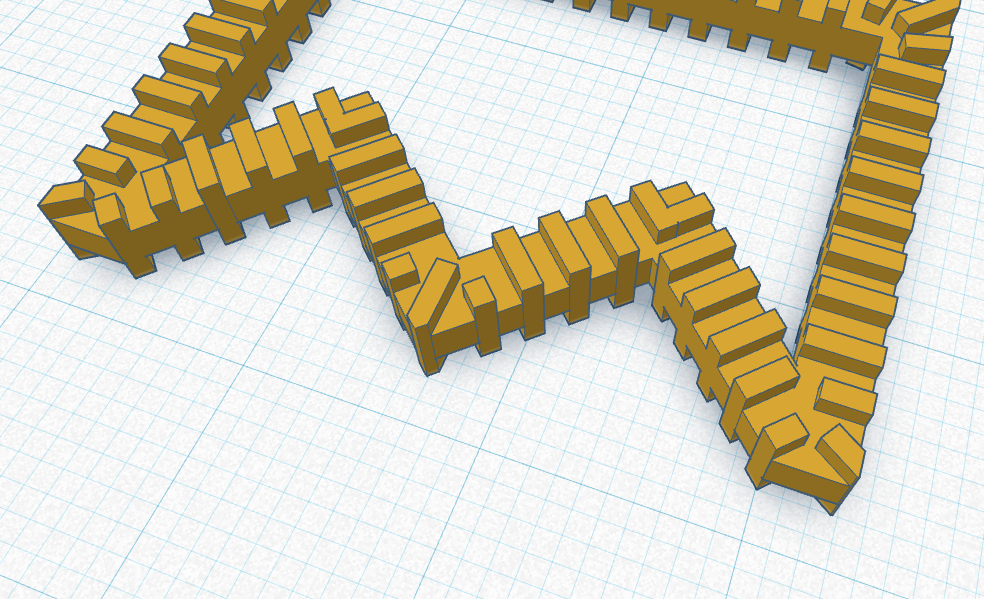
With the crown you can see how I wanted to avoid cutting off the flow of bubble solution to the middle of the design. Another thing to keep in mind is that you want to try to have these ticks be at corners as this will help it print. I didn't catch all the corners of the crown, but I tried to get those I could while still making the final bubble wand look nice.
Once the design is done, center it with the stick, group it all together, and you are good to print!
Step 3: Circles

Basic shapes like circles and squares and even straight lines are pretty easy to do.
For circles, you can take your rectangles and just stretch them across the circle/cylinder. Then copy and rotate them around until you have as many as you want. Group everything to cut off the ends. If you make the rectangles as wide as your cylinder, you only need to cut out the middle.


You can create a cutout to cut the inside and outside out or if you have a straight line, you can just make them just as long as you need them.
For straight lines, you can make your ticks the same length so you don't even need to trim them. This is what I did for the line across the Pokeball but this can work for any straight lines.
Step 4: Connecting Shapes - Lining Them Up


If you want to connect shapes together, as I did for the multiple circles, I recommend lining up the circles so ticks line up. Makes for a more polished look and easier print.
Step 5: Connecting Shapes - Removing Sections


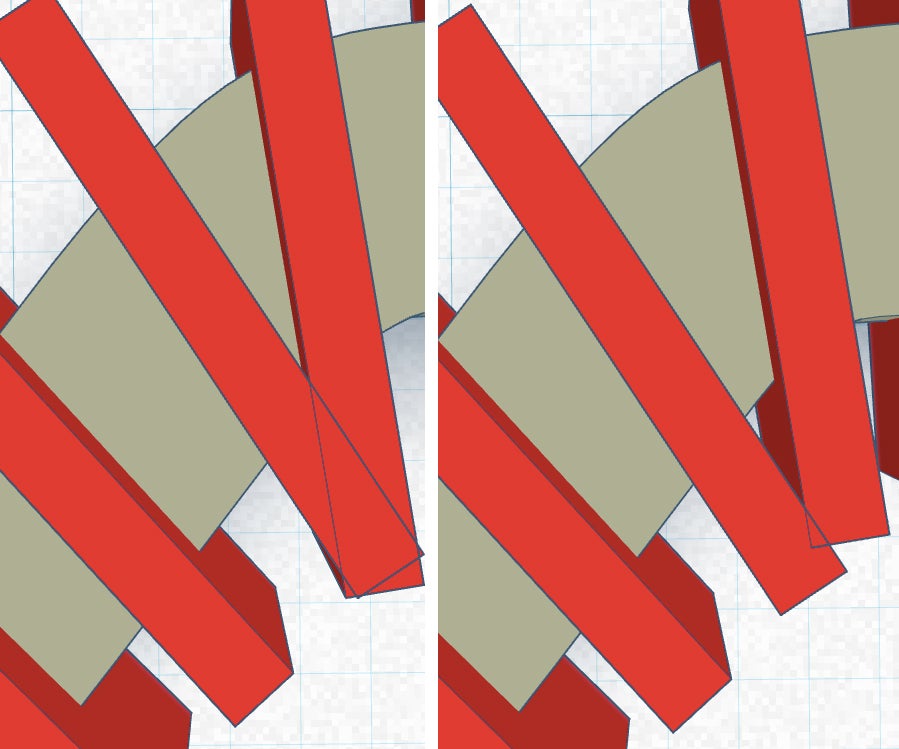
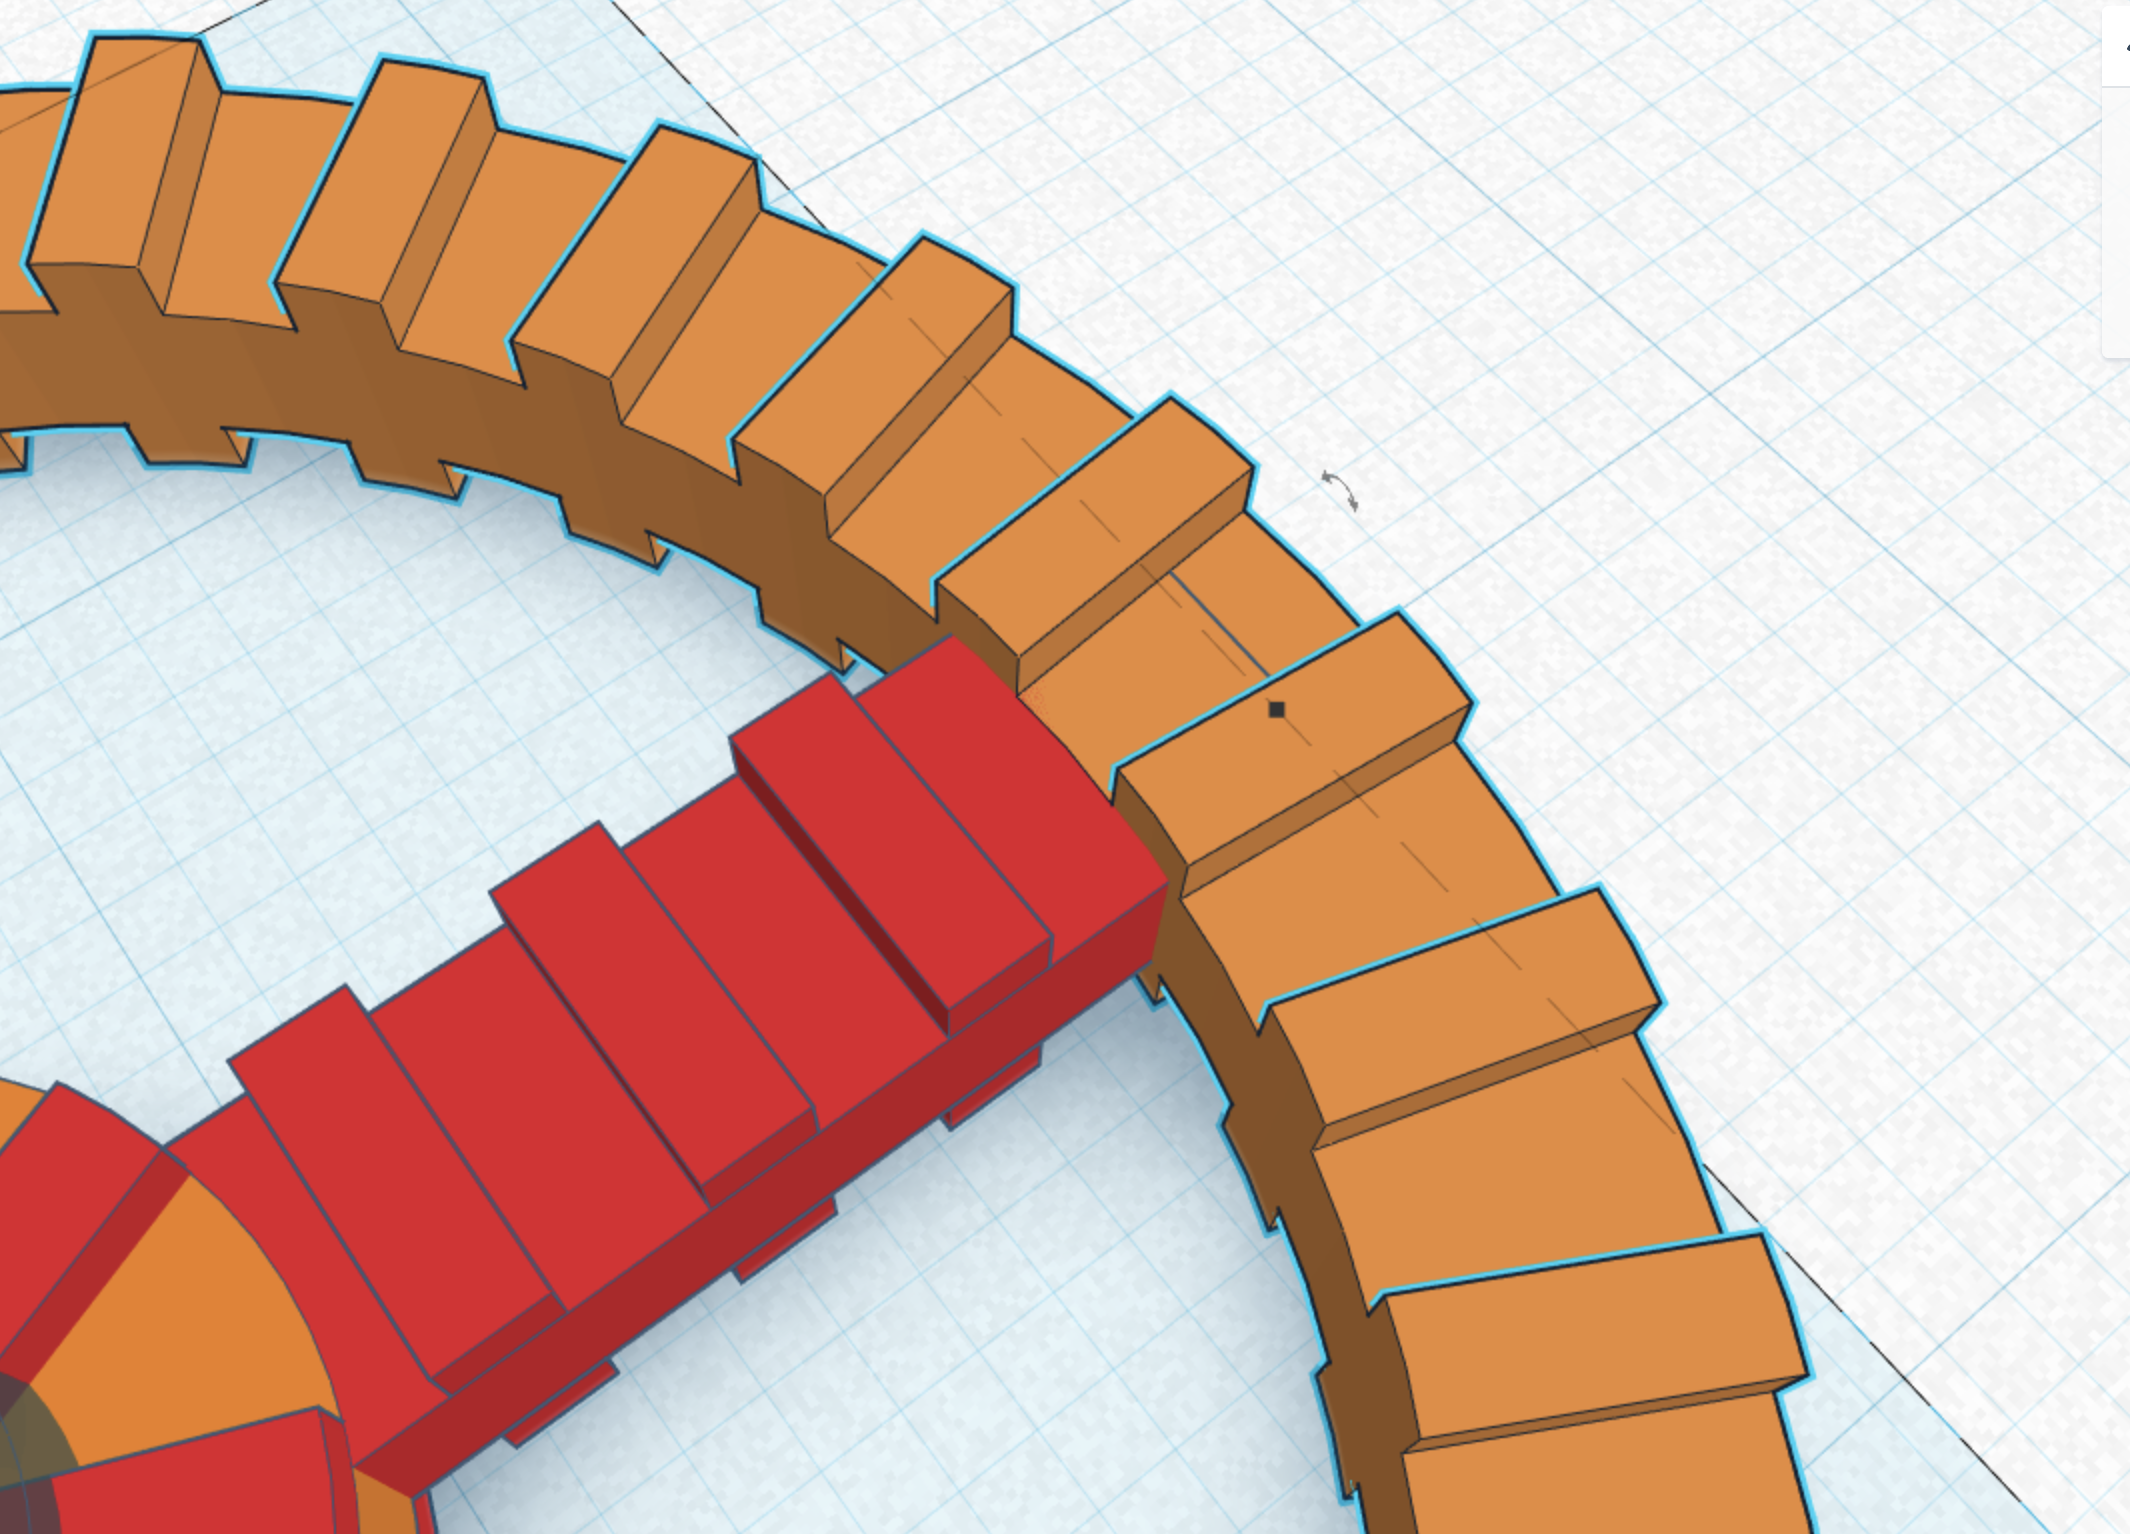
If you are going to overlap shapes (more than just lining them up) I recommend cutting out ticks that are going to look odd when grouped. You can see this where I added the ears to the head of Mickey Mouse. Since the head was the main shape, I cut out ticks from the ear.
The final image shows the difference it makes to just cut them out rather than leave them so they overlap.
Step 6: Connecting Shapes - Filling in Gaps


In some situations, you may want to connect shapes and have gaps. It's nice to fill in those gaps because it makes the final shape look nicer, and then you won't have weird small bubbles coming out too.
In these cases, create a shape that will fit the hole, make them the same thickness, and just group it to fill in the gaps.
Step 7: Slicing - to Add a Raft or to Not Add a Raft


Time to slice.
There are different things you need to pay attention to when slicing. Because of the ticks, the print will be bridging between them. Make sure the corners are either covered by having ticks touch them or adding in a little support. I needed support.
If you can, alter your design to work with the slicing. For the Pokeball, I had some corners exposed but I was able to just rotate the ticks to get them to line up with the corners so no support was needed.
Another thing you might need is a Raft. Sometimes I needed one and sometimes the print got all messed up when I used it. For me, I needed it for Mickey Mouse, but all the other designs I was able to print without a raft. For the crown, for some reason, it got way messed up when I used a raft so you may need to experiment with your own designs and see what works. For my raft, I only did 1 top layer and 1 bottom layer because I didn't want it too thick.
I also altered Speed and slowed it way down to 1200 mm/min. And this was with the first layer still printed at 50% of that speed.
Infill I did about 20%. Nothing special there.
I upped the Outline Overlap to 35% because I like to make sure small parts really get filled in, such as the ticks here.
I recommend keeping an eye on the first few layers of the print if you can. If it is going to fail, it should fail early on. The smaller ticks you have (such as on parts of the crown) the more likely it will fail.
Step 8: Changing Colors Between Layers


Something you can play around with these bubble wands is color changing between layers. I did a couple of experiments to give you an idea.
First, you can just change the color halfway through. This gives you a simple half and half color change; the Pokeball.
Second, you can start with one color, change it when you get to the center design (after the ticks stop) and then change it again when you get to the ticks again; bottom car in the first picture.
Third, you can do the same thing as above, but make the stem of the bubble wand thinner so the center of the design and the stick are one color and the ticks are another; center car in the first picture. You need to use support for this method and the stick will be more flimsy because it's thinner.
Except for the technique with the Pokeball of changing colors halfway through, I didn't really like the other methods like I thought I would, but I wanted to show them in case you do!
Step 9: A Look at the Designs


Step 10: More Pictures


Because I always have more pictures.

Participated in the
Party Challenge


