

Introduction: Custom Glass Jewelry- Glass Making


In this Instructable I will be showing how you can create your very own custom glass jewelry. Every single step in this process was done from scratch, and I did everything from making the glass, to ultimately attaching the pendant to a jewelry chain. I had to make the glass, then find a suitable piece and grind it to shape, and then bezel the glass to protect the edges, and then solder on jewelry findings.
There were so many steps involved in creating the jewelry, but I am so pleased with the final outcome!
Materials
• Clay
• Frit (Glass)
• Bezelling material (light gauge metal sheet)
• Jewelry findings
Tools
• Kiln
• Sanding wheel
• Super Glue
• Pliers
Step 1: Making the Clay Slab


The first and easiest step, is rolling out a slab of clay that is the same thickness throughout. I did this by putting a block of clay down on my work surface, and taking a rolling pin and slowly bring the clay down the the correct thickness. I made sure that the whole slab would be a uniform thickness by taking two thin strips of ¾ inch plywood and placing them on the very edges of the slab of clay, I could then rest the edges of the face of the rolling pin on those blocks, and that would make sure that every part of the clay would be ¾ of an inch thick throughout. I then cut the slab into a rectangle, and placed in on a plaster block and covered it with plastic so that it could slowly dry, and not crack or warp. I then fired the clay in a kiln, turning it back into a piece of stone.
Step 2: Prepping the Slab


To prep the slab for glass, I put down a thin coat of white glaze with an incredibly high melting temperature. The glass will not be melted at such a high temperature, so the glaze will not melt, and it will only turn into a powder. This powder will create a layer of separation between the glass and the clay, to make sure that it doesn’t stick. This way we can pull of the melted glass as a sheet, and use it to make jewelry from.
Step 3: Putting on the Glass and Frit


I used large chunks of glass (i believe it is called cullet) which is used for glass blowing, as well as frit, which is just finely ground colored glass. This process actually works, because the large chunks melt, and flow over the frit, creating unique patterns while also creating a thick layer over the frit so it isn’t so fragile. You can make an infinite amount of designs using different sized or different colored frit, and by combining colors you could create any designs you could imagine! After this step is done, load the slabs into the kiln, and melt away!
Step 4: Shaping & Grinding the Glass


First find suitable pieces of glass, and sketch out shapes and designs until you are satisfied. Then use anything you might use to sand glass, and shape them to size. I used a sanding plate for the pottery wheels at my school (they are designed to grind away glazes, which are essentially glass). Make sure to be very careful, and use a lot of water, so that the glass doesn’t crack or shatter, and also so you don’t inhale glass particles. When you are arriving at the final size of your jewelry piece, slow down your grinding so that you can minimize the tiny glass chips that come out of the edges (think of it almost as tear-out like with wood). I wanted to make a large pendant for a necklace, then two accompanying earrings also, so I designed complementing shapes, picked out similar pieces of glass, then started grinding. If you don’t want to spend forever grinding away glass, you can use a glass cutter to do the rough shaping before you start sanding it. Please also use protective gear like a respirator and goggles or a face shield, because you do not want find glass powder and shards in your eyes, face, or lungs.
Step 5: Making the Bezel


Ideally you would want to use a proper bezelling material, but I didn’t have access to any when I finished this project, so I used a light gauge metal sheet instead. I cut it down into thin strips around ¼ inch wide, then fastened it around the glass with a super strong cyanoacrylate glue. Once it was tacked on, I then gently rubbed the edges of the metal down over the front and back faces of the glass, providing a mechanical bond in addition to the chemical bond from the glue. Ideally you would want to use a metal that you can use solder with, because that way you can solder on findings in the next step. If you don’t want to add a metal band around your glass, you can also just use a diamond bit in a rotary tool or diamond drill bit to punch tiny holes in the glass, and then run wire through there, so you can loop them on a necklace or onto earring hooks.
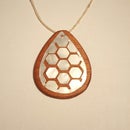
Step 6: Attaching Jewelry Findings


In this step, we will be attaching the clasps and hooks needed to turn these pieces into proper jewelry. I showed multiple different options and styles in the pictures, and you can pick out your necklace chain based on the shape of your glass. I chose to solder on the findings for my pieces, but there is a whole slew of different methods of attaching jewelry and making it wearable (you can just walk down the jewelry section in your local craft stores and find countless different methods).
Step 7: Final Thoughts

Overall, there were so many different steps involved in making these pieces, and they were quite a lot of work, but I am thrilled with the final result! I did everything from make the sheets of glass, to cut it and shaping it, and then ultimately adding the hardware to make them wearable. I am so satisfied with the outcome, and plan to do a bunch more in the future, with custom designs in the glass!
If you like this project, please vote for me in the contests this is submitted into, and also check out my other Instructables!
Thank you!
Brandon (16)

Participated in the
Jewelry Contest 2017

Participated in the
Glass Challenge 2017


