

Introduction: Easy Waterproof Clothing


While I was making my glow tie I realized that the solution I made to apply the glow power to the fabric was incredibly hydrophobic, which makes sense as it's silicone based. After some experimentation I found it was a great method for waterproofing all kinds of close knit fabrics, like tote bags and other large flat fabric surfaces.
I'm not that impressed with most commercial versions of waterproofing, and this method gives me full control of the efficiency of my waterproofing. Inexpensive, flexible, and easy to make, this homebrew solution is a great way to make almost anything waterproof.
Ready to waterproof all the things? Let's make!
Step 1: Supplies

Making your own waterproof solution requires 2 things:
- 100% clear silicone sealant (must be 100% silicone)
- Mineral spirits
You'll also need the following supplies:
The glow powder is added to a liquid medium which is then applied to the tie. The medium is made from silicone caulking which is diluted in mineral spirits.

You'll want to use 100% clear pure silicone caulking. Look for "silicone I" as "silicone II" has mold retarding agents, we want pure silicone. The silicone can be thinned with mineral spirits. You can find both the caulking and the mineral spirits at your local hardware store.
Step 2: Mixing Solution

To make a medium that can be brushed onto the fabric, we'll need to thin the silicone caulking with plenty of mineral spirits.
I started with a ratio of 5:1 - 5 parts mineral spirits to 1 part caulking. Put both into a mixing cup and mix thoroughly. At first this is going to look like too much mineral spirits and not enough caulking, but silicone is incredibly thick and after a few minutes of mixing the solution will begin to thin.
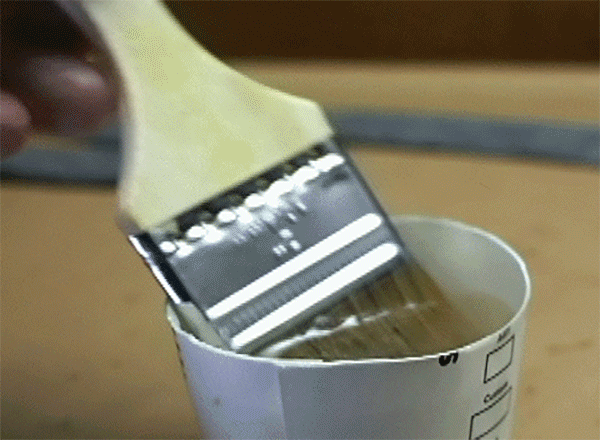
You're looking to achieve a very runny medium with no clumps, lumps, or anything even resembling the caulking. The GIF above should be the viscosity you are looking for, something like very runny maple syrup. It is also going to smell terrible, so make sure to work in a well ventilated area.
Step 3: Brush Onto Fabric

I used a bristle chip brush to apply the medium onto the tie. Chip brushes are meant for resin, acetone, and epoxy, so are a suitable choice for this application.

The brush was dipped into the mixture and generously applied all over the fabric. The fabric was hung to dry, making sure that the fabric was not overlapping anywhere - any overlapping fabric will bond together when it dries.

Special attention was given anywhere there were stitches, since this will be a weak spot in the waterproofing. After drying, multiple coats were applied to the fabric to ensure a good waterproof seal. Additional coats were put on seams and stitches to make them more durable.
The smell from the caulking is still pretty terrible even after a day of drying, but goes away after about a week.
Step 4: Hang Dry

The fabric was left to dry for an entire day after each coat, allowing the silicone to cure completely.
Step 5: Waterproofing Thoughts

This was a fun exploration into homebrew waterproofing. The process is simple, and the results are much better than commercial options. However there's a significant drying time between coats, which makes this a good waterproofing option if you prepare ahead of time, not in the heat of the moment.
Share your comments and results below.
Happy making!


