

Introduction: HacKErBox K.E (RPi-2 Based)


Hello! This is HacKErBox K.E project. I have done this project because i know raspberry pi is not only for education. Small computers are also good for hackers and programmers etc.. So i decided to use my rpi like a hacker mini computer and i want it to be portable. Then i started to plan and take actions depending on these criterias. Now i have a desktop speaker sized mini computer. Before starting i need to give you a small boring;
Warning:
This is a individual, original project and far from other HackerBox named projects. Please ask me for sharing and citation if you want to. Thank you for reading this part.
So let get start. :)
Materials and prices:
Raspberry Pi 2(w/Shipping): 40 Euro
Keyboard:10$
Ralink MT7601 WIFI (AKA Problem with Linux WIFI):4$
Monitor (Park Camera Monitor):15$
RTC (Real Time Clock Module):2$
Enclosure for RPi2:4$
Speaker case. (From junk)
DC Fan: From old projects
Features:
Static Proof (Not %100)
Damage Resistance
Modified monitor, cables
Custom Image (Used Kali Linux)
I am not using out of box kernel, image and drivers. This system must be work like a monster (Fast, stable, more
penetrative). For best result give up with classic raspbian image and go for Kali ARM distro.
I will be waiting for your feedbacks. Thank you for your interest and sorry if my english is bad.
Edit:23.03.16 This project is outdated and inside of the box is looking terrible now. So i will change this project to a smaller and far better version. For more information please go to last step.
Step 1: Decide Enclosure and Plan It


I decided to explain my work with pictures with less talking. I prepared case for my project and made a plan. At the begining i need to say 2 things:
1.Nobody will see what is inside if you don't show. So we want our project stable, hard, useful. Don't think about how does it look inside.
2.f you use different materials you need a different plan.
In the pictures i explained what i made. This step is for selecting and preparing our enclosure.
Step 2: Making It More Like Shock-proof


I want to use my HackerBox in hard conditions. So a simple static shell will be good for this project. You won't lose anything if you add this.I used aluminium foil to use it like a faraday cage.
The testing is very simple. You can also use a circuit with crystal oscillator in it. If you have an arduino you can power it and you will hear waves from your radio. (Note the frequency) I used a more powerful source. It is a ion generator.
You can watch video for visual and audial result.
Step 3: Modified Screen and Cables.


I modified the cables to work with usb power and get visual data from 3.5mm input. Then i modified the screen itself. I removed voltage regulator inside of it and shorted the power connectings. (I converted it from 12v to 5v) Referance picture can be helpful for you when you decide to solder your cable yourself. Because most of the video cables will be unsupported for your raspberry pi 3.5mm input. This won't be a big deal if you find a 4 ring jack.
Step 4: Open Holes for Power Inputs


We need some windows for connecting with outside. If you just want to use a power bank do not open this holes and put your power bank near the screen. We have a small place for hiding something you can use there for your power bank. When you drill some holes you can spray it for good lookin
Step 5: Add Stand


I added stand because i don't want to bend my neck down to see something on the screen. The stand is asymmetric because one side is more heavy. Stand is from my md80 mini camera.
Edit: I adjusted stand and centered it. This change did not break the balance of HacKErbox.
Step 6: Add Screen


I have used two wood sticks and 4 sponge for screen assembly. Now we can hold screen above from raspberry. Now we need to hold it from upper side. But i will do it at the end. Because i didn't finished my work inside.
Edit: I finished my work with screen. I added some hot glue to left side of screen and cover holds the right side.
Step 7: Add Front Cover


This is the step for our secret place. Also this cover holds our screens right side from above. I used a small screw to add my project an old looking spirit. You can try other things. You can add a slide for better looking.
Step 8: Window for Raspberry Interfaces.


Cut a window for your raspberry interfaces with your favorite ways and tools. I am waiting for raspberry pi case. I don't know the scale and i will edit this step later. Because i want to pull raspberry out for changing system image or adding someting to gpio pins.
Step 9: Testing OS and RTC


This is a final test before final assembly. I can give you technical support (information) for official Kali Linux ARM image if you need. Because this image has a lot of disadvantages if you use it directly. Also i can give you some information for compiling a new kernel and making raspi-config and other raspberry pi modules work with kali distro. So please ask me if you need some help. Ralink Mt7601 is ra0, not wlan0. Keep that in mind when working.
Step 10: Final Testing


I assembled my project and tested it for having:
1.Good electro magnetic shielding
2.Temperature between (35-40)
3.No short circuits
4.Working RTC module
5.Durability
Then i pentested my router and some password protected files.
Now i am working on extras.
I am waiting for your feedbacks. Your comments are much valuable for me. So please give some comment.. And if you want to support my project you can vote. I will be very happy! Thank you for your interesting.
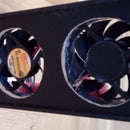
Step 11: Extras


I am working on extra cooling now. A fan is not necessary for normal usage but i will use this project outside and i need to overclock my system for some reasons.
Heat from monitor+heat from rpi+heat from sun=High temp stress inside.
Also aluminium shield will keep heat inside.
CASE
I have added raspberry pi case and changed interface windows. Now we can pull raspberry pi out.
USB FM Transmitter
https://www.instructables.com/id/USB-FM-Bug/
This is my other project. It works with USB Power. Now we can also share something with close-range people.
Step 12: Evolve!
23.03.2016
Now this project is a little bit outdated and i think we need a smaller HacKErBox now.
Bluetooth keyboard mod, small mouse mod and smaller casing are
COMING SOON!
I will add a link here and publish new HacKErBox as a new project. So stay tuned!

Participated in the
Hiding Places Contest

Participated in the
Crafting 101

![Tim's Mechanical Spider Leg [LU9685-20CU]](https://content.instructables.com/FFB/5R4I/LVKZ6G6R/FFB5R4ILVKZ6G6R.png?auto=webp&crop=1.2%3A1&frame=1&width=306)


