

Introduction: Steampunked Insulator-nightlight


Hi everybody
I am back again after some hard days.
This instructable is dedicated to my father in law who just had to leave us last month. Thanks to all Wolfgang and we will go on!!!
This is a three times premiere to me:
First premiere: This project had been done at one weekend
Second premiere: All parts that I used in this project had been grabbed from the bulky waste so I really haven´t paid anything for it . It is a real 100%-second hand project and the only thing I had t do was to cut two rings, one from a copper tube and one from a brass tube. It is nearly unbelievable but all other parts fit together without changing anything!!
Third premiere: I can present you two varieties of electrifying: One time I am working with my very beloved HV-flash unit from a Fujii disposal camera and the other time I use the direct power supply like a normal lamp also does.
Safety advice:
Don´t wreck your health and please obay the follwing advices:
***Disclaimers***This instructable works with voltages in excess of 250V. This is more than enough to give you a potentially fatal electric shock if handled incorrectly. If you are unfamiliar with how to work with high voltage, please refrain from performing this instructable. Exercise caution throughout the following steps to avoid electrical dangers and also use insulated tools like pliers and screwdrivers and so on.
If you choose to undertake this instructable, you do so at your own risk. (Thanks to member: the_don125)
And now let us start with this fantastic project.
Step 1: The Insulator


Now let me tell you a little bit about the glass top of the lamp.
As you can see at the following pictures, these 1"KV pin type" insulators had been used in former times to carry power lines to the houses. Today they have been nearly all replaced and the cables are running now in the ground.
Normaly these insulators are made of electrotechnical porcelain but sometimes they were also made of glass. So I am very happy to own now nine pieces of this glass type, given by a friend of mine after replacing.
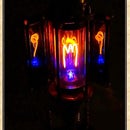
Step 2: The Neon Light Plasma Bulb


Here at that virtual place instructables.com
I met a now real good friend from Alsaka. That´s the place were these rare Neon fillled bulbs are coming from. It is been said that they worked, and still work? at control panels from oilrigs. They are made very robust as you can see and they are running with 230 Volts AC but you can can drive them with a flash unit from a disposal camera too. You can see the difference at the following photos. And only this bulb type fits in the Insulators hole so many thanks to you Bill!!!.
see also: this instructable
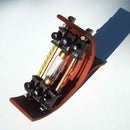
Step 3: Constructing the Bulbholder


Now let us take a look at the bulbholder. As I told you before, all parts are taken from other lamps which I found at the bulky waste.
A lot of the parts are made of brass and looked totally rotten. But polishing them a little bit with some steel wool after a short bathing in vinegar acid (please wear some rubber gloves at this step) let them shine brightly again. To protect them against oxidising again I covered them with some clear varnish for metals (in german Zappon-Lack) The antique triangle holder carried a lampshade made of glass or enameled metal at about 1900. So you see I love to work with antique materials from the victorian age as an authentic steampunk;-))) The bulbholder itself is also made of brass and insulated with white porcelain.
Now let´s see how I made it:
Step 4: Electrifying I (with 1,5 Volts Flash Unit)


Now I show you how the HV-flash unit from the Fuji disposal camera could be placed in the lamp stand. Beyond the red velvet there is a wodden plate which has to be pulled out. Then insulate the innerside of the brass stand with some tape and place the HV circuit in. Recover the wodden plate again and that´s it
The new switch will be placed in the screw hole at the side of the stand ann fixed with some melting glue.
Step 5: Electrifying II (with 230 Volts Electrical Power Supply)


Whenever you are working with metal parts and electricity be very careful. Obay the electrical rules of insulating your construction in the right way.
Use a two pole cord switch to make sure that there is no hidden electricity when the lamp is switched of. If you have to change the bulb,please switch of the lamp an best pull out the plug out before changing it is better for your own safety!!!
After fixing all contacts, please check them with a continuity tester before the first plug in.
Thanks to all for following
Yours Aeon Junophor

Participated in the
Metal Challenge


