

Introduction: The Desert_Eagle Knex Gun-True Trgger, Detatchable Clip , Sturdy, Good Range


Well, Hi again. This is my third instructable. It was my birthday yesturday :D, anyway... here are some details about ym gun:
it is 18 cm long ( kinda tiny for all its features) it has a good range(havent measured.never do)
ammo: green rods
clip: 12 green rods
strength: sturday, can take a bit of a beating
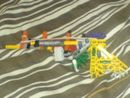
Looks: wlel look at the picture, it looks pretty cool :D
it does jam sometimes but normally its fine. somehow the faster you cock then gun, the better it works, so use long stretchy rubberbands, and dont use more than 2 or 1 thick one.
you can use a whole clip in 30 seconds
Step 1: The Upper Barrell


1. construct
2. construct
3. add two red connectors to the end of what you did in step 1
4. add these two together ( Good Luck LOL)
Step 2: The Back of the Barrell


this stpe is a bit tricky because i didnt want to dismantle my gun completely.
1. make two of these
2. join them together using two white connectors( and sorry there should be two black connectors on the other side so dont get confused)
3. again a bit tricky. ignore the black rod(the firing pin)add a blue spacer to one rod. Add an orange connector with a green rod attatched to it. Add another spacer.
On the other side: add these peices. dont worry if u dont have them, but they make the gun sturdy and stops the firing pin from jamming sometimes.
Add 3 yellow connectors.
Yep this step isnt finished, Add two green rods on the white connectors as shown below.
Step 3: The Trigger System


Again give a shouout to Bunduk for this ;)
1. Construct
2. construct(ignore the trigger)
3. dont be fooled, i know some of you will put the trigger on the forward bit. just look at the picture carefully, ignore the magazine/handle please.
Oh and by the way, im not sure if i told you this, but u need two yellow connectors to join the front and back part of the barrell together. and i no they keep ortating but its fine as soon as u add the trigger
4. Add a tanned connector to the end of the trigger
5. Add this on
6. connect these together
Step 4: The Handle/ Detatchable Clip


Yep this baby is sweet for quick reloading, just make as many clips as you want
1. make the clip( you can substitute white conenctors for blue, since u normally get more blue connectors
and by the way there are two white/silver rods, one u cant see.
2. make two of these(note u can add any small peices to the end, just to stop the middle peice from moving too much)
3. Add them to the black connectors by the white connectors by the mid barrell.* you may have to take them apart*
4. Slide the clip in.
5. push the grey connector into place, and it will *lock*
6. do the same for the other side.
Step 5: The Firing Pin and Safety


1.Simple to make, a semi circle black connector thingy with a grey/black long rod, covere din sellotape for strength( because of the recoil)
ps. i think its recoil, so dont start a row about what it means lol
oH AND BY THE WAY, youy can use any connecotr that you are comfortable with, just use tape!
2.
push two of the connectors away from the other one, then add a blaack connector on the firing pin.
Step 6: Loading, Rubberbands and Firing


CONGRATULATIONS!! YOU HAVE SUCCESSFULY MADE MY DEAGLE!!!!
well you can expreriment. you can put rubber bands on the trigger to the barrel and selloptape two yellow/red rods together to push the bullets up, or just find ur own way.
PLEASE LEAVE A COMMENT, FEEL FREE TO MODIFY IT AND POST IT , AND I AM NOT RESPONSIBLE FOR YOU BEING AN IDIOT AND HAVING THE FIIRNG PIN FLY IN YOUR FACE. IF YOU NEED HELP, THEN PLEASE FEEL FREE TO ASK. LATERS.


