

Introduction: Upgrading DIY PowerBank for Smartphones & Other USB Compliant Device


This is an upgraded DIY Powerbank projects for:
•DIY 1-Home made Powerbank using AA Batteries
•Links found here:
iPhone DIY Powerbank
https://www.instructables.com/id/iPhone-DIY-PowerBank/
And
•DIY 2- Home made Powerbank using 3 pcs of 18650 2200mAh Li-iOn battery (6600mAh)
•Links found here:
https://www.instructables.com/id/iPhoneSmartphone-DIY-Powerbank/
Step 1: Before & After Upgrade


*Images below shows the following:
Image 1 "Before"
Image 2 "After"
Image 3 "Rechargeable AA NiMh type @ 2800mAh
Step 2: *Type of Battery Connections


How to wire Batteries &
How Battery works -simplified
Image 1
•DIY 1 Powerbank using AA batteries used "Serial Connection"
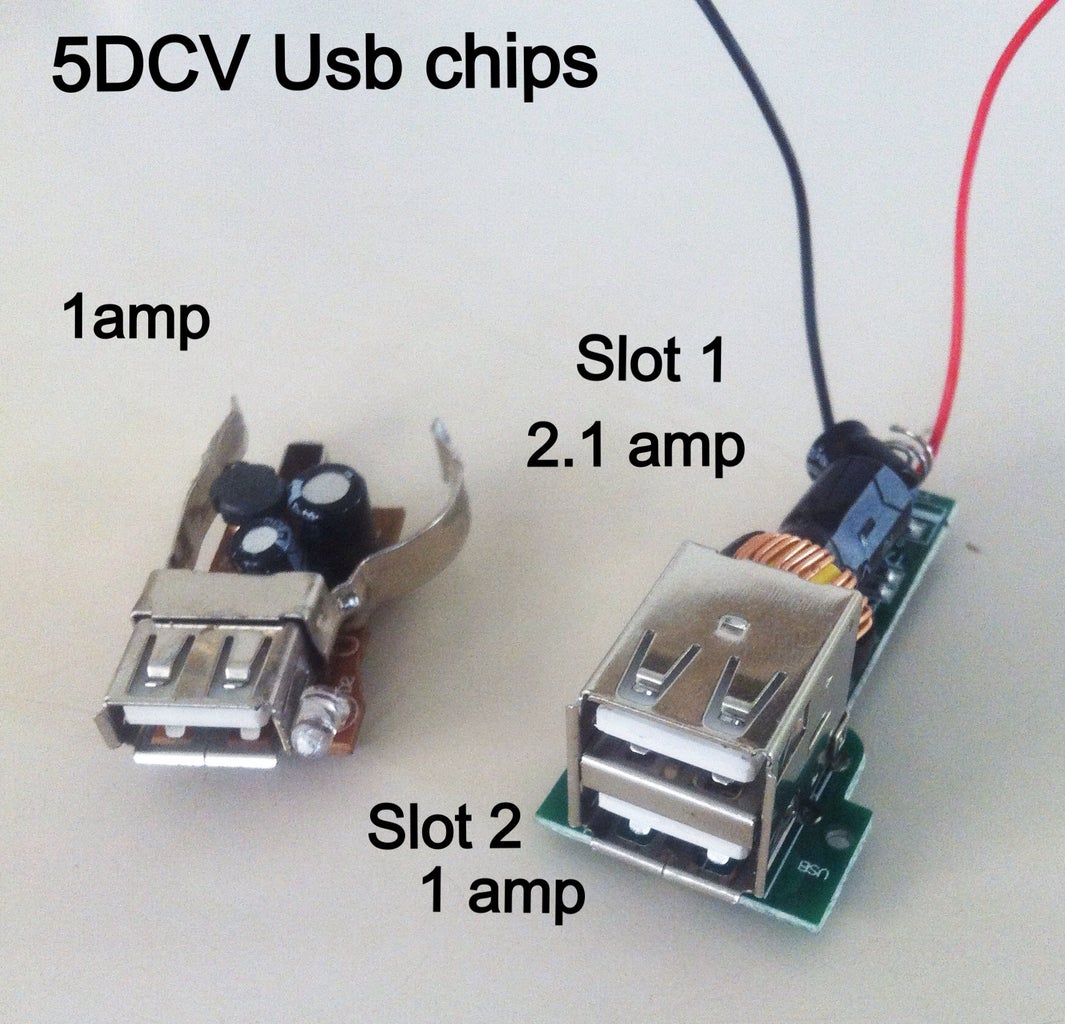
Step 3: USB Step Down Chipset

•Batteries used for upgrading DIY 1 Powerbank 2800 mAh NiMh x 8 pcs in Series connection
= 1.5v x 8 = 12v dc •Upgrade from Single USB chipset upgraded to Dual USB chipset 12vdc input to 5vdc output via USB
Slot 1 = 2.1 mAh Slot 2 = 1.0 mAh
Step 4: AA NiMh Powerbank Specs
DIY 1 Project Specs:
•2800 mAh
•Weight = 220 g = 7.7 oz
•Size: Width = 3.5 " Height = 2.0 " Depth = 2.0 "
Step 5: *Performance/Tests/battery Options

Performance upon tests:
• Can full charge iPhone 4 plus 40% left juice using NiMh 2800 mAh
•Other Types of AA Batteries Specs in mAh (capacity)
•Primary (non-rechargeable) zinc–carbon (dry cell) AA batteries have around 400–900 milliamp-hours capacity •Zinc–carbon batteries are usually marketed as "general purpose" batteries. Zinc-chloride batteries store around 1000 to 1500 mAh are often sold as "heavy duty" or "super heavy duty". •Alkaline batteries from 1700 mAh to 3000 mAh cost more than zinc-chloride batteries, but last proportionally longer.
•List of other Battery Types
http://en.m.wikipedia.org/wiki/List_of_battery_sizes
Step 6: *DIY 2
•Minor upgrade was applied here(before it was transparent that can be mistaken as a dangerous device.
•Spray painted with metallic Black
Step 7: *Battery Wirings Simplified

How Battery works -simplified for this project
•DIY 2 uses Parallel Connection
Step 8: Wiring Diagram

• How to wire:
Very simple!
Step 9: *DIY 2 Project Specifications

DIY 2 project Specs:
• 6600 mAh (2200mAh x 3)
•USB and Micro USB support
- Input 5vDC via Micro USB - Output 5v DC via USB
- 800 to 1.0 Ah charger is required to charge powerbank
•with Auto Stop Charge and Discharge controller chip
• 9 hrs to full charge powerbank via MicroUsb
•Led light indicators
Blue- when discharging
Red- when charging powerbank
• compatible to any USB compliant device like mp3s,digicams,router,pocket wifi ,portable DVDs,smartphones & tablets.
•Weight =230 g
= 8.11 oz
Step 10: DIY 2 Project Specification


DIY 2 project Specs:
• 6600 mAh (2200mAh x 3)
•USB and Micro USB support
- Input 5vDC via Micro USB
- Output 5v DC via USB
- 800 to 1.0 Ah charger is required to charge powerbank
•with Auto Stop Charge and Discharge controller chip
• 9 hrs to full charge powerbank via MicroUsb
•Led light indicators
Blue- when discharging
Red- when charging powerbank
• compatible to any USB compliant device like mp3s,digicams,router,pocket wifi ,portable DVDs,smartphones & tablets.
•Weight =230 g
= 8.11 oz
Step 11: Test Results


Performance upon tests:
• Can full charge iPhone 4 and HTC Sensation up to 3 Times
from low battery stage of 15%
• Can 1 time full charge an iPad mini from low battery stage.
•added more images of upgrade
Step 12: Instructables Links


Links on How to build Powerbank using AA Batteries
Titled
iPhone DIY Powerbank
https://www.instructables.com/id/iPhone-DIY-PowerBank/
•Links on How to build iPhone/Smartphone DIY Powerbank
https://www.instructables.com/id/iPhoneSmartphone-DIY-Powerbank

![Tim's Mechanical Spider Leg [LU9685-20CU]](https://content.instructables.com/FFB/5R4I/LVKZ6G6R/FFB5R4ILVKZ6G6R.png?auto=webp&crop=1.2%3A1&frame=1&width=306)


