

Introduction: Your Own Carbon Cycle


This instructable is about creating a man-made carbon cycle for your garden, effectively storing most of the carbon content of your organic waste in the soil, making it an ideal environment for your plants to grow roots in.
In a kind of Permaculture way of thinking: the planet will benefit, your garden will be rich in life, you’ll be happy.
Too good to be true, right??
Then let's do it now!!
To make it happen, we’ll be using biochar. You may already know about it, since it got pretty famous a few years ago for its carbon sequestration and soil amendment abilities. Let’s see what it is first and how and why it works. Then I’ll explain how I am producing my own biochar and experimenting with it.
The following is based on personal deduction and quite a number of my own assumptions about the theory that I'll explain. I’ll point them out along the way. I’d really appreciate if you would let me know where I got it wrong. That’d be a terrific chance of improvement for me.
I'm partecipating in the Backyard Contest so, if you like my work, please vote for me!!
Supplies
Two cans gasifier:
- Two tin cans of different size, nestable. I used a coffee and a soup can.
- Pliers and a can opener
- A couple of iron rods, about 6mm diameter
- Wood twigs and/or wood pellet and/or nut shells
Fuel preparation
55GAL drum gasifier
- Two 55gal drums OR a 55gal and a 30gal one
- A single corrugated roof sheet (24” x 12’)
- Several bolts and nuts. I used M6 bolts, 1 inch and 4 inches long.
- A few corner brackets
- Nibbler OR a cutting disk.
- Drill
- Drill bits. I favored step ones, as it was easier to open large holes
Step 1: What's Biochar


There is a lot of material about Biochar on the web and many people selling their own production. This is a shallow introduction on what I have understood about it.
A couple of years ago, I was searching online for wood gasifiers to make an out of the box barbecue grill, when stumbled upon biochar.
The first correlated concept one can find on the web is “carbon sequestration”.
The most eye catching fact about biochar is that it's the thing that makes the amazon forest so fertile. And it's man made.
What???!!!
Let's take a step back. Biochar is actually charcoal. It's called like that because it's essentially not made from wood. It's mostly made with byproducts from farming, cattle breeding, forestry and gardening, such as corn leaves and stalks, rice hulls, nut shells, manure, bushes and trees shavings, twigs and sticks.
The other, most important characteristic is that it’s not used as fuel. It’s actually used as a soil amendment.
Definitions:
https://biochar.international/the-biochar-opportun...
https://www.merriam-webster.com/dictionary/biochar
https://en.wikipedia.org/wiki/Biochar
and
https://www.permaculture.co.uk/biochar-soil-buildi...
What made biochar so famous weren’t its amendment properties, but the process itself of making it. This is considered one of the most promising way to counter climate changes as it actually reduces the carbon content of the atmosphere. By contrast the use of biomass as fuel is only carbon-neutral. The process turns the carbon a plant extracted from the atmosphere into a stable form, as it is charcoal, which isn't used as fuel, but stocked in soil.
But it gets better because the soil really profits from this. Adding biochar to the ground helps the soil getting more fertile and richer with life, especially over the long run.
The idea that burning organic waste to make charcoal is greener than composting it might seem counter-intuitive. You should first think of how much greenhouse gases are released during the composting process. Not only CO2, but also methane and many nitrogen compounds.
Biochar is not some charcoal made with those dirty and smoky processes as seen on tv like fifty years ago. It is mostly made with gasifiers, which are devices that allow to burn biomass in an extremely clean way.
The combustion inside a gasifier is pretty much complete as it burns only the gases produced by pyrolysis (woodgas) and charcoal is actually a byproduct. More on this later.
https://en.wikipedia.org/wiki/Wood_gas
On gasifiers:
The use of cookstove sized gasifiers is strongly encouraged in the poorest countries as an alternative to cooking with firewood because they don't produce smoke and even leave you with charcoal: They pollute a lot less and are also convenient for the users.
http://www.ethoscon.com/portfolio-item/ethos-confe... take a look at Anderson first.
In richer countries the use of biochar in agricultural contest is also strongly encouraged and even supported, bacause it increases crop yields and creates a new market by giving economic value to otherwise wasted material. It is even proposed as a way for large companies to get carbon credits and counter their core business emission.
http://www.european-biochar.org/en
http://www.agriculture.gov.au/ag-farm-food/climate...
https://www.dpi.nsw.gov.au/content/research/topics...
http://www.energyfarmers.com.au/
The process of actually making biochar can be pretty simple, and it doesn't have a minimum scale. You can d it with a couple of tin cans (if you only have a few twigs to burn). In fact, I recommend you trying it out on such a small scale first, to better understand how it works.
You might want to watch a few TED talks about biochar:
Step 2: How Soil Interacts With Plants

Biochar seems awesome, but why is it beneficial for my garden?
To answer this, it is important to understand how roots interacts with soil.
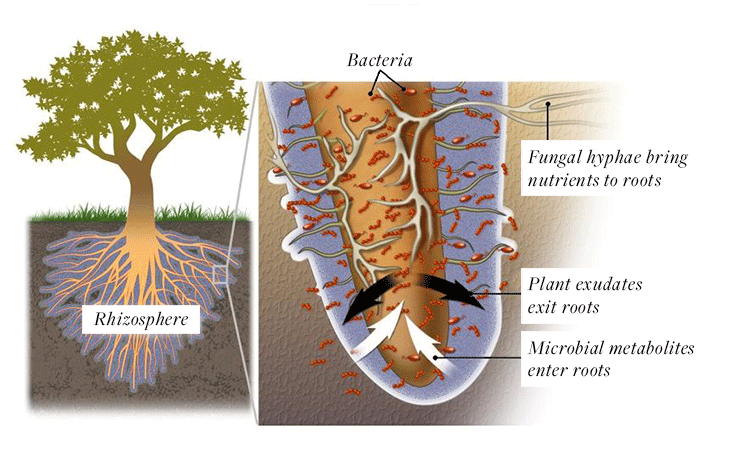
Soil provides physical support, of course, but all the nutrients as well. Most plants gather nutrients living in symbiosis with many bacterial and fungi. The roots sweat a liquid rich in sugars that promotes bacterial activity, which in turn, provide nutrients to the plants as a by-product of the decomposition of organic matter.
Beneficial fungi, on the other hand, feeding on rotting materials, help protecting the plants against diseases (Trichoderma). They also develop an underground capilary network which helps the roots in gathering water (Mycorrhizal).
https://www.sciencedirect.com/topics/agricultural-...
https://www.jstor.org/stable/4353764?seq=1#page_sc...
https://en.wikipedia.org/wiki/Plant_root_exudates
http://nautil.us/issue/34/adaptation/junk-food-is-...
To me, this is the reason why using mineral fertilizers is such a short-sighted policy: it actually limits the ability of the soil to produce nutrients as it reduces the bacterial population (personal assumption).
How biochar interacts with this?
Charcoal is no fertilizer.
It is considered an amendment. It's mostly composed of carbon and will last in your garden for about 100 years.
Pieces of charcoal scattered underground are like sponges. They stock on water and ions as they come available, and provide a perfect shelter to bacteria and fungi. So when a root finds a charcoal full of water, nutrients and bacteria it's like finding a pantry with home delivery and a waiter inside. However there is a minor downside: so long as the pantries are empty and the roots haven’t reached yet them, they will compete with plants for nutrients (personal deduction). But we'll see how to prevent it later in the experimentation chapter.
Pretty awesome!!
Step 3: Assessing Resources


This may be the most inspiring part of the whole process!! Just look around your garden. You know, by experience, how much in shavings and branches you cut to keep it clean and tidy. Wouldn't it be just right to turn those scraps into soil nurture, instead of waste them, knowing that's helping the planet too? The perfect solution would put the gasifier heat to some use too, but I'm not there yet. Some people use it to cook outside, but I would like to warm my house in winter instead.
My parents have a medium to large garden and all of their neighbors are farmers. Everyone here just burn those twigs. It doesn't seem worth the work to cut them into firewood, so they just burn them. That's a waste. And it's polluting.
I find using a garden shredder to manage them might be the right answer because while it make it a lot easier and faster to process the wood to a stockable form, it also results in an homogeneous fuel ready to be burned.
Be advised: don't be stingy on the shredder (as I did). Operating that machine is the most time consuming activity of this procedure.
So buy one that can digest much. Processing branches as you cut them is a lot faster than stock them and doing it later. My shredder can't handle fresh leaves so stocking is a must. On the other hand stocking them before shredding might help in drying the wood. Shredder are made with compost in mind so be sure that your wood chips have plenty of air to dry out. They are broken and have a lot of exposed surface so, given enough air, they should dry pretty well.
When you start seeing the possibilities for improvement biochar has for your garden, you may start thinking your supply is too limited. That’s what I realized. In that case you may want to consider growing Miscanthus Giganteus. It’s considered to be one of the best source of biomass when talking about thermal conversion (i.e. burning, not biofuel production). I’m also interested in it because it should be a good choice to suppress brambles too.
Step 4: Time to Make a Gasifier


What I'm going to explain is called TLUD (Top Lit Up Draft). It's the most simple kind of gasifier and the most common choice for diy-ers. Another kind that is commonly built is called retort. Retort are awesome because of their concept: biomass is cooked in a "pressure cooker" and the syngas produced inside the pot is lit under it, to keep the process running till all the syngas is burned and all that's left is charcoal. A retort is beyond my abilities for now. As you red "pressure cooker" you know that air leakage isn't allowed at all. I also wanted to design a gasifier that can be made with very little resources, a design that is good for a poor country.
TLUDs are easier to make and run well too.
It actually is a barrel fully loaded of fuel which is lit from the top and relies on two air intakes to burn the content. Once lit, it’s mandatory to burn the whole tank before extinguishing it and retrieving the charcoal.
I strongly suggest that you try building one with tin cans. It take a few minutes and it’s useful to familiarize yourself with the working principles. This way you can later make your own TLUD of the size and fashion you prefer.
Step 5: Two Cans Gasifier


This is a really easy and fast design only meant as a way to light a fire in a few moments. It's not convenient to bring around with you and it might ruin the surface it lay over.
Go get a couple of empty tin cans. One must be a little larger than the other so it’s possible to nest them. I used a coffee can and a soup one. Be sure the soup can is thinner AND shorter than the coffee one. The difference must be at least 5mm height and 1cm wide.
Remove top and bottom of the soup can with a can opener. You should be left with a kind of pipe. Get the coffee can. The top should be already open and you want to open a hole centered in the bottom. It should be a little smaller than the soup can to help gas mixing. I usually open a hole with a nail, then use some shear. You are done.
Lay the inner can on the iron rods to keep it rised from the ground, fill it with fuel and light it. When it's running put the coffee can over it as in the pictures, being careful as it must rest on the rods like the other can and let it burn till the end.
The first time you light it the paint will burn. It will be smoky and smelly. Doesn't last long.
As you'll notice it's not easy to light and it will only keep running if it got hot enough at the beginning. I suggest to burn little sticks for the first times. A lot more air pass through them compared to wood pellets. That helps a lot. You might also want to provide a little more draft with a chimney flue, conveniently made with another soup can pipe and placed on top.
If this piqued your interest I linked a couple of videos of much more durable stoves.
Some people also sell a gasifying camping stove which runs on the twigs you can find in the woods.
Step 6: Build a 55gal Drum Gasifier


I’ve designed this gasifier with poorer countries in mind, so it’s mostly made of salvaged or easy to find materials. I even tried to make use of most of the materials discarded during this process.
This is a prototype. It’s roughly made because of several trials and errors. Still, it works quite well. When I’ll make a nicer one, with no leakage, I’ll update the post.
You might find it a bit ugly. It really is very ugly.
This gasifier is my own design and you might find it unsatisfactory, but I really like it as it answer to my technical needs. I wanted a device as efficient as possible and that could digest a little of wet wood. Hence I put most of my attention into heat management. In fact, one of the main problems of secondary combustion is heat: if the woodgas-air mixture isn’t hot enough it won’t burn. My solution comes at the expense of barrel capacity, though.
The idea is to pre-heat the air feed using most of the heat radiated from the external drum, rising the whole temperature and drying the wood at the same time. To do so I’ve nested 3 containers and opened the main air intake right over the combustion chamber to recover as much heat as possible. This design also easily allows to completely seal the gasifier, choking any combustion process in case anything goes wrong.
About tools:
I liked to use the nibbler a lot, it's fast and it's a clean cut. Beware of the chippings! They are very sharp and might go anywhere if you aren't cautious.
I also used to put some kind of grease on the steel before drilling it to keep my bits in a good shape.
Step 7: Combustion Chamber


The combustion chamber of my prototype is a small drum: 41cm diameter, 71cm height, which is close to a 30gal drum, a little smaller actually. In my country it’s difficult to find a 30gal drum, so I had to cut to size a 55gal one. It’s frustrating. Actually, a 30gal drum might be a little too large. Still it’s a lot easier to start with a 30gal drum if you can get your hands on one. And I suppose that if you make a well made gasifier with no air leakage that will work well all the same.
To bring the 55gal drum to size:
First remove the cover and rubber gasket. Then cut out the last 12 cm from the bottom side with the nibbler and keep it for later use. You’ll have to drill a hole in the drum to start cutting with the nibbler. A 55gal drum has a 57cm diameter and a 179cm circumference. We need to reduce the drum circumference to 128cm, so cut the drum vertically twice and remove a sheet 42cm wide. You should now have a 128cm wide sheet plus 8cm overlapping to fix the bolts. Keep the sheet. Now it’s time to close the “pipe” again. It’s a lot easier if you use a ratchet strap to slowly tighten the barrel. It prevents deforming it and keeps it in place once you’re ready to fix it with nuts.
The combustion chamber needs a bottom again. I tried at first to use some metal meshes to do the job while providing maximum air flow, but they don’t survive the abuses of regular use. So I got the metal strip you took out from the side of the barrel and cut a small disk (41cm diameter). I fixed it to the drum with 4 corner brackets since it doesn’t need to be air tight. Quite the contrary: you want a good air flow through it! So drill as many 8mm holes in it as you can, actually more holes than my picture!
Now only the legs are left. The combustion chamber needs to be raised by 4cm from the ground so fix 4 corner brackets to the side of it sticking outside: they will provide support and help wiht centering the chamber while you assemble the gasifier.
Step 8: Build an Air Skirt


This piece must be light. There are already two drums nested and it's heavy to move as it is. The combustion chamber must resist a lot of abuses, but this "skirt" doesn't. That's another reason that led me to corrugated sheet.
Get the corrugated sheet and flatten it. I walked on it till satisfied! Flattening a corrugated sheet is a bit of nonsense, but I guessed that roofing sheets are easier to find than flat metal sheets. And a single sheet is enough for everything here.
You need to make a second “pipe” with this sheet. Cut the sheet along its length and obtain three 60cm x 77cm pieces. Again fix the pieces together with bolts to get a 77cm x 180cm strip. Actually It won’t reach 180cm, because of the overlapping. You’ll just need a pipe with 152cm circumference.
Step 9: Chimney Flue

I use a 1m length and 25cm diameter pipe.
Get the remaining corrugated roofing sheet and cut it in half. Bolt the two pieces together to get an 80cm circumference pipe.
Step 10: Covers!


Two covers are needed: One is the combustion chamber cover. It is fixed to the chimney and the air skirt, while the other goes over the first to maximize pre-heating. Both must be removable.
Combustion chamber cover:
Cut a disk from the barrel bottom you discarded earlier. Try cutting it as large as possible. Then cut a 20cm hole in the middle. To connect it with the air skirt I simply folded down the disk sides with a nipper like a metallic bottle cap. Then I simply lay the chimney flue over the central hole.
I can already hear your criticism, and you are actually right. This is where all the leakage comes from. The draft is reduced considerably, and draft is essential for this design, where the air intake is placed on top of the fire.
This sloppy, rough execution is functional to fast prototyping as changing the chamber or air skirt diameter would mean re-doing everything from scratch. I changed the design a few times and tested it with last year's wood harvest. I’m confident that I'll finish experimenting before burning all of this year's wood (!).I also expect that I will not change the version I'm using and describing. I’ll be making a neat one, with the same design and no leakage before next spring.
Drum Cover:
Get the drum cover and open a 32 cm hole in the middle. The chimney flue and the air intake will pass through it.
Step 11: Assembly


Take the pristine 55gal barrel. Nest the combustion chamber inside it. It should sit on its legs, centered. Now place the air skirt between them. You are going to use the 10cm long bolts to keep everything in place, forming 8 spokes.
So clamp the air skirt to the external barrel to keep it at the right height, then drill through the three sheets. Put the bolt in the holes and use nuts to fix the three metal sheets 4cm from each other. Repeat the same procedure on the opposite site. Now the air skirt will be hanging on the two bolts. To fix the other bolts you need to clamp the skirt to the inner chamber, instead. Pry all 6 holes before assembling the bolts.
The covers and the chimney flue aren’t fixed, they lay in place.
Step 12: Running a TLUD


Fill the inner chamber with the wood chips made earlier. You can add small sticks, nut shells, etc… I think shredded wood and small things are the best fuel, otherwise it’s easy to cause uneven air circulation and burning. This may result in the gasifier burning completely on one side and not the other.
Many people use an accelerant to light the fire (oil, wax or worse) but I find it easy and proper to simply light it as I would a fire pit: over the minced wood I make a twigs pyramid and light it from the bottom. As the fire is running I close the combustion chamber with its metal bottle cap cover. The wood might come out of the central hole, that’s ok. Don’t worry if there is too much wood and the cover doesn’t sit completely on its place: the twigs will be rapidly consumed. Now I immediately put the outer cover on and then the chimney. The chimney sits inside the outer cover hole, over the cover of the combustion chamber.
Flames should come out on top. There isn’t much to do now, relax, drink a beer, or shred more wood. It will keep on burning for about half an hour or more.
How do you know it’s done? If left unchecked the fire will end burning the charcoal as well. So look out for two signs: the flame may turn blue or it get very smoky.
In the first case the woodgas finished and only charcoal is burning. In the second the woodgas was too small to continue burning, so it went out before actually transforming all the wood in charcoal. This might happen with really uneven burning.
Another way I use to understand if charcoal is ready is measuring the barrel temperature with an infrared thermometer. The temperature at the foot will be especially meaningful. Check it on all side to see if there are any big difference. Remember, you are measuring on an air conduct, so the values will be influenced by the wind. The closer to the top you get them, the worst.
In both cases get the water hose and quench the fire.
BUT you should have a drum cover sitting around. Instead of quenching the fire with water you can remove the chimney and the external cover (careful, it will be very hot!) and seal the drum with the other cover. The charcoal will stop burning because of oxygen deprivation and, once cold it’s ready to use. That would mean a long wait before the next load, but if you fear that the wood chips didn’t burn properly it might be the best choice: without oxygen the wood will keep on torrefacting (becoming charcoal) without releasing all that smoke. Once cold you’ll see the inside covered in tar. It will burn with the next load.
Either way you can topple the drum and recover your first load of biochar!!
And it was made from your very own garden for your own garden!!!
Step 13: Troubleshooting


Now what's shown in the pictures is mostly a failure. The TLUD started smoking a lot, or maybe you thought it was done, so you light it down with a garden hose, topple it, and find yourself with quite a lot of soaked wood.
The wood won't take long to dry out, since it was really hot and dry before, but still...
If something goes wrong it may be good to know how a TLUD works. At first the wood is lit from the top and it uses both primary and secondary air intakes to run. This provides the heat to start the pyrolysis process of the wood immediately under which produce woodgas. This gas rise upward and mixes with the secondary air, before oxidizing and burning. The wood will burn downward and the gases will keep on burning at the top. The process is kept running by the primary air that goes through the wood chips till it reaches the pyrolysis front. That's where are the right conditions to burn: heat, fuel and oxygen. My conclusion here is that charcoal and syngas compete for oxygen and that the first one is much stronger. This is crucial: the pyrolysis front advances downward and exhausts all the oxygen from the primary air, so that neither the charcoal over it nor the woodgas can burn. Once the gases reach the top of the barrel the secondary air is flows in and they finally burn. Then:
My TLUD is smoky how can I fix it?
As long as it keeps on running you can be sure that the primary air is enough. Probably the syngas (and the smoke) cannot burn thoroughly. The cause should be a lack of oxygen in the secondary air or an inefficient air-gas mixing. Try to enlarge the secondary air intake or to change the barrel design.
My TLUD stops running before finishing the wood and then it makes a lot of smoke. What’s the problem?
Ultimately, if the fire shuts down it lacks oxygen or heat. Try providing more primary air and check the wood for dryness. TLUD are weak against wet fuel as water content may lower the temperature a lot.
Step 14: Experimenting With Biochar


During my first summer of experimenting, despite wasting a lot, I still managed to fill the black tank you've seen in the picture four times. As almost everyone on the web say so, the best way to use it would be to mix it with composting material or manure to fill it with nutrients, then mix it into soil.
I didn’t do it. My composting pile is two meters high, I shove mostly grass on the top and get soil by the foot. Putting the biochar there would mean seeing it again in a few years. I think the very best option would be to soak it in compost tea to fill it with all the good stuff. But, since I don't usually make compost tea, that's a little too much commitment for now. I tried it as it was. I simply mixed it with the soil in my mother's geranium pots. At the same time I tried raising vegetable in other pots, comparing those with biochar and those without.
The difference was big. Plants with biochar suffer thirst a lot less than others.
On the other hand vegetables raised on my biochar grew a lot slower (first picture, broccoli plants)
That’s what I hinted at earlier: charcoal will retain water for the plants to use, but will compete with them for nutrients untill it's full.
Currently it's the second year charcoal is mixed with pots soil and I can see that the negative effect reduced a lot (second picture, Plumbago flowers, the flowery one has charcoal).
Taking advantage of the water retention effect I finally managed to grow my lawn where I couldn’t before: we have a containment wall made of huge wire mesh cubes, filled with round stones and there was no way to grow anything over it. Rain water would wash away dirt and nutrients, draining through the stones, even when using non-woven fabric to prevent it. Now in a short ten centimeters (8cm dirt over 2cm biochar) soil grass is enduring summer heat and growing nicely.
I've decided that spreading charcoal under the plant / the soil is better than mixing it in, especially in pots. Actually pots is almost the only chance that's doable. Spreading it as a bottom layer will make best of it's ability to prevent water and nutrients leakage, reducing the competition for ions with roots in higher layers (personal assumption).
Step 15: Conclusion
Biochar is pretty easy to make and needs only a bit of your time. The scientific community opinion about it is positive, both for its carbon sequestration and soil amendments aspects. I’m still experimenting with it, but I’m already amazed by its simple water retention ability and how that helps my plants to resist water shortage.
I hope you're inspired by this chance like I am!! I especially love this process as it is a virtuous circle.
Biochar is at hand reach and can make a difference.
Thank you for reading!!
Paleseu is a participant in the Amazon Services LLC Associates Program,
an affiliate advertising program designed to provide a means to earn advertising fees by advertising and linking to amazon(.com, .co.uk, .ca etc) and any other website that may be affiliated with Amazon Service LLC Associates Program.
Step 16: References

Participated in the
Backyard Contest


