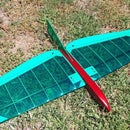
Introduction: A Simple Elegant 30 Minute Balsa Glider
I was busy assembling my 3D printer, and the weather outside was so awesome, I though would it not be cool to go fly a plane in the park with my 4 year old son. Was a great Idea till I realized all his other plans well a little un-serviceable i.e.: US. Anyways, when I was a kid, I didn't have much cash so I would buy a sheet of balsa to make chuck gliders. I decided to make us a nice elegant looking one. I was thinking this was the opportunity to but a multi-dihedral glider like a JS1, with wing tips.
Remember the Guillows kits, this is just way cooler.
So I decided how about a Instructable, excluding the photo's it took about 30 minutes... with photo's about 50 minutes
Step 1: The "T" Tail
Firstly, this project only needs simple tools:
- Craft or Balsa knife
- Balsa Stripper or Steel rule
- engineer square or plastic square
- CA glue (aka super glue)
- sanding block
First task is to randomly cut a length of wood, about 18mm to 20mm , rectangles are also airfoils but we shape it too. This was one strip of 810mm long 2.5mm thick sheet (3/32 Imperial X 4" X 32"). For the tail, I cut a 150mm length off, there is a algorithm to work this out on a real plane, but I have built enough glider to know more or less whats the correct length. Else it looks stupid and flies stupid.
The more modern Gliders have pretty lines, so on the Tail I trimmed off a triangle, 5mm created the illusion and it looks awesome. The Vertical stab was cut from an off cut at a random size and plays the part. This is glued to the horizontal stab using CA, nothing special but looks the part.
Step 2: The Wing
Going back to the long strip of wood. For Polyhedral wings you then need two cut identical pieces, for each section so once again I cut a random length. I decided two 100mm pieces was good. I then cut another two pieces, this time shorter at 50mm, these where cut at an angle to to give it a sweep back look. If you have look at the images you can see the way the wings leading edge sweeps back. I rounded the leading edge of the wing for the fun off it, perhaps later I will curve the top of the airfoil, it should improve the glide.
I then sanded the 4 sections to have a slight angle on them. This is what creates the polyhedral, these them just CA glued together creating the Polyhedral wing. short and sweet.
The wing lets that where added later where done using the off cuts from this part of the process.
Step 3: The Fuselage
Fuselage was made from a piece of offcut 1/6" or 6.5mm sheet good think to remember here is the tail and wing must be glued on a flat section creating a wing incidence of 0 degrees. The shape of the fuselage was randomly drawn and cut out using a balsa knife. then the bottom and front edges where sanded round. The wing is glued on at roughly 40 of the fuselage length from the nose, else we will add to much lead weight later. fuselage is squared and glued in with CA. The Tail was glued in place and the squared by eye, while glue is setting.
Step 4: Making It Fly
The Glider is Done, to balance it, I took balsa blades add them till it was nose heavy. a plane must balance at roughly 30% of the wing cord (distance from leading edge to trialing edge). I drilled 4mm holes in the nose weighed the 3 blades and used some capillary solder of the same weight plus a little extra to hold onto. this is then melted into the hole. Gently it is hammered flat securing it in place.
You glider is done, if you don't spend time taking photos and making pretty, then this process take round 30 minutes of less
the first flight of the Glider made 20meters or so. I then made my 4 year old a launcher from scrap and an elastic band, flights went to 30 or so meters.

Participated in the
Make It Fly Contest 2016


