Introduction: How to Plot a New Horizons Map


I've made this guide to help you plot you New Horizons map.
First you need a copy of Photoshop, Photopaint or a free image editing software like GIMP.
Program skills you will need:
- Scaling Images
- Copy and Paste
- Create a new layer
- Hiding and Showing Layers
- Group and Ungroup
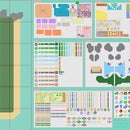
Download Plotting New Horizons Map.psd Below.
If you haven't already, check out my New Horizons Map Maker
Attachments

Supplies
Photoshop, Photopaint or a free image editing software like GIMP.
Step 1: How to Get Your Map

1. Open your Nook Phone and go to the Map
2. Press the Left Joycon Home Button to take a screen shot.
3. Press the Right Joycon Home Button to return to the main menu
4. Open the Album
5. Select your photo and then press A to open Edit and Posting
6. Select post and post on either Facebook or Twitter
7. Open Facebook or Twitter on your computer and save the image you just uploaded.
8. Copy the image into Scaling Map.psd
Step 2: Scaling Your Map


Once you have copy and pasted your map into the .psd you need to scale the map to fit into the grid.
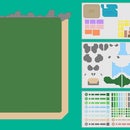
How to scale varies from program to program, so if you are having trouble scaling an image please use their help information. I have included pictures of what scaling looks like for Corel Photo Paint.
1. Select the layer that your map is on
2. Open the scaling tool and look for X and Y Measurements.
3. The original dimensions of your map should be X:54.187 and Y:30.48
4. Change these numbers to X:61.299 and Y:34.248
5. Apply the scaling to your map image.
Step 3: Adjusting the Grid


1. Expand the Map Objects Layer.
2. Expand the Outlets Tab and Unhide what ever outlets you have.
3. Unhide the Pier Layer.
4. Select the Map Objects Group and move the grid around until your outlets and pier are inside the purple grids.
(This may take a bit of fiddling as the map is a bit blurry)
I have included my own Scaled and Original maps to help you get a good idea of what placement we're aiming for.
5. Unhide the Resident Services Grid and place it over your RS Building in alignment with the grid.
6. If everything lines up your pretty much done.
Step 4: Bonus Round: Finding Edges

If you really want to make it easy to plot your map you can use the effect Find Edges.
1. Copy and paste your scaled map
2. For GIMP: Filters > Edge-Detect > Edge > 1.000
For Corel Photopaint: Effects > Contour > Find Edges > Soft > 50.
For Photoshop: Filter > Filter Gallery > Stylize tab > Glowing Edges
(I don't actually have photoshop so there might be a better way to do this)
3. Make sure your map layer is below the grid layers.


