Introduction: Katelin Makes a PVC Flute for School


As a class project everybody had to make a musical instrument for science class. I chose to make a flute.
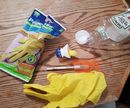
Supplies
Materials: For my flute I used a Schedule 40 PVC pipe, a wine cork,
a1/2 inch PVC coupling, and missing from photo a piece of plastic laminate.
Tools: Folding clamping workbench, cordless drill, 1/4" drill bit, files, Allan keys, laminate router with a 1/4" straight cut bit, scissors, missing hack saw.
Jigs: Two jigs for routering the mouthpiece and drilling the finger holes.
Safety Equipment: Safety glasses and ear plugs.
Step 1: Drill Your First Finger Hole


I put the pipe in the jig. Then I clamped the jig in the work bench. I used the cordless drill and 1/4" bit to drill the first finger hole.
Step 2: We Drilled the Rest of the Finger Holes


We put the allan key in the first hole we drilled to keep the pipe from rotating while we drilled the rest of the finger holes. This keeps the finger holes in a straight line.
Step 3: We Made the Mouthpiece


We clamped the mouthpiece jig in the work bench. Then I put the allan key into the right finger hole and jig hole. Then I drilled the two mouthpiece holes.
Step 4: I Routered the Mouthpiece


I moved the pipe to the right position in the jig. With my dad's help I routered the mouthpiece.
Step 5: Making the Reed

I used the small file to make the mouthpiece hole closest to the finger holes flat and thin like a reed.
Step 6: Seperating the Reed Hole From the Blow Hole


We measured the wine cork, and cut it with a sharp knife so it was the same length as the distance between the two mouthpiece holes. Then we pushed the cork into the flute until it was between the holes and the mouthpiece.
Step 7: Making the Block for the Flute


I filed out the inside of the coupling so it would slide all the way down the pipe, then I cut it in half with the hack saw. So the plastic laminate would fit underneath.
Step 8: Finishing the Block


I cut a one inch square of plastic laminate from a roll of laminate edging. Then I slipped the fitting and the laminate onto the flute. So it completely covered the blow hole and a little bit of the reed hole. You have to move the block a little bit until you find the right spot.
Step 9: Play Your Flute!


Participated in the
Scraps Speed Challenge


