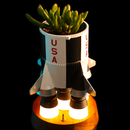
Introduction: Lamp Planter
This planter has a ring of LEDs around it, transforming any plant into a lamp
Supplies
PLA + 3D printer
soldering iron
1x LED ring (12V 100mm) aliexpress
1x PWM led controller 12V aliexpress
1x DC jack plug aliexpress
1x 12V DC transformer
2x small screws
4x electrical wire
1x plant
Step 1: 3D Printing
3D files are available here (Cults3D)
Front, Back and Knob are printed normally 0.4mm nozzle 0.2mm layers
Skin and Planter can also be printed normally, but to get a nicer finish and less print time, I printed them with a 1mm nozzle and vase mode. If you do that for the Skin piece, you must also print two Locking tabs and glue them inside as shown.
I used Black PLA and Wood PLA (with bamboo particles)
Step 2: Wiring
The DC jack plug gets a 6cm wire on (-) and 8cm wire on (+)
Solder two 2cm wires to the LED ring. you're done with soldering :)
connect the LED wires to the PWM board, then attach the DC jack plug to the Back piece and connect the wires to the PWM board as well.
The LED ring is attached with double-sided tape, and the PWM module is screwed to the Back piece
Step 3: Assembly
-Insert the knob
-Group Back and Front pieces
-Slide and turn the Skin piece
Step 4: Done!
Now you have your lamp planter, you just put your favorite plant inside and let it shine! :)
just 2 warning points:
To water the plant, remove the inside planter to avoid getting water over the electric components.
When the lamp is at full power, the LED become warm so it might not be good for the plant and 3D printed parts, so try to use it in the low settings.


