

Introduction: Yard Pumpkin Lanterns


I came up with this idea after seeing the many paper bags with candles in them and faces on them.
I started saving the Folgers coffee containers from work since they were just going in the garbage anyway. As I was collecting I originally started with the idea that I would use individual LED lights just set inside. Which could still be done if I wanted to. But I came across a cheap set of low watt patio lights. After buying these I now knew I had to save at least 12 containers.
Step 1: Faces and Cutting Containers


Go online and just search Pumpkin faces. You'll find scores of inspiration. Knowing I needed 12 faces I found something that would work. You can draw the faces on the surface with a sharpie. But if your confident in your cutting skills just got at it. Using my utility knife/box cutter I carefully cut out a different face in each container.
WARNING: Be very careful when cutting the container as it tends to be slippery to hold due to size.
The hardest part cutting the plastic(Hence the warning). Using your box
cutter or utility knife start out with the smaller areas first. You want to do this because as you cut away portions the container will become a bit flimsy feeling when cutting and can cause you to have a hard time keeping your cuts to follow the lines if you've drawn.
On the lids just cut an X about an 1 inch in four directions to allow placing the light fixture thru the top.
Step 2: Ligthing Tests


As mentioned before my initial thought was to use cheap portable LED lights. So the first two pics show this. Then I got the patio string lights. I knew right off that I was going to paint the outer surfaces Orange. I thought that since the interior was red it would just help with the illumination.
After string the lights into the containers it became really obvious that I'd have to paint regardless. My first test lantern with stake mounted on it you'll see the printing on the containers was still noticeable when lighted and in the dark. So I realized I had to give a dark base coat before painting the outer orange coat. I had some old brown spray paint. That did the trick. The last pick was after the I had a couple done and used the LED lights just to see.
Step 3: Mass Pumpkin Painting


I set up my portable spray paint booth with spinning spray turntable (both other Intructables of mine).
Before painting I just taped a couple paper towels over the opening on the inside with painters tape to prevent the paint from affecting the inside.
I then sprayed each container with the dark brown paint I had. Let dry and then painted each with Orange paint.
One can of each did all 12.
I left the lids black, no need to paint those.
Step 4: Line the Interiors


Using Yellow film acetate I Duct Taped into place over the face opening. This helps diffuse the lights and makes the faces more pronounced.
Post Note: After I having all of these done and finished, and displayed I noticed the tape actually shows up when its dark outside and the lanterns on. So I may go back and remove tape and put in place with clear hot glue instead.
Step 5: Stake Assemblies


I bought some heavy duty stakes (a pack of six I think were like $3). The black squares are throw away components from my work (which are actually tube holders for paper rolls we use). I save these constantly as I'm always finding uses for them.
Holding the top of the stake on top of the round portion of the square I roughly drew what I would hope to be a template to hold the stake in place. I then cut out the portion, basically a T and a square hole.
Pushing the stake through from opposite side and fitting it tightly into the holes. Note: It still wiggles.
Step 6: Hot Glue Stakes and Attach to Pumpkins


NOTE: SEE NEXT STEP FOR RETRO FIT!
Next phase I hot glue each stack combined with the square grid.
Then placing the assembly on the bottom of the each container and hot glue each.
They probably aren't the best in stability but for the time being they seem to be working.
Step 7: RETRO FIT: Hot Glue Not Long Lasting


After I placed all my lanterns I noticed some of the stakes and base attachments were a tad wobbly. I decided to remove the whole lot from the ground and store til closer to Halloween based on how wobbly they were. As I was removing from the ground a couple actually separated from the container. So I went with the Gorilla Glue (pictured).
This stuff is awesome. However be sure to wear rubber gloves. This stuff is super sticky and will stain. Just a fine bead placed all along the edges of the base and a more substantial amount around the stake to base portion does the trick. Let sit over night and if you have any small blocks of wood to rest on the edges will help make sure of a good seating.
After my first test with this the connection is rock solid. I can hold the stake and shake my hand and it holds nicely.
Another tip: Drill 4 small holes on the outer edges of the bottom of the container. That way any rain that may occur will be able to find its way out of the bottom and no fill up an potentially pop the low watt bulbs inside.
Step 8: Place Lanterns and String Lights


Actually the title on this step should be the other way around. To make sure I placed each lantern properly from each other I laid out the light strand and where I was expecting them to be displayed.
I then took one lantern at a time starting at the beginning I placed one bulb attachment into the lid(NO LIGHT BULBS YET). And put lid back on the lantern. Once I found my first position I removed the lid holding the lantern in place, I used my fist pushing down from the inside of the bottom of lantern to push stake into the ground. (DON'T try pushing with lid on or with the sides, its too flimsy and I was afraid the hot glue would separate from the container)
Replace the lid on the first placed lantern. Then systematically stretch from lantern to next light outlet, place lantern, and so on and so on till all the lanterns are in position.
After all lanterns are in the ground, go to each lantern, remove the lid to get access to the bulb outlet an insert a bulb in each.
Once all bulbs are attached plug in and enjoy.
I wish I could get a better pic of them in the dark. Phone camera just doesn't cut it. I may break out one of my old digital cameras to see if I can.
POST NOTE: Successful Gorilla Glue test last night, after placing all the lanterns back outside, we had 30-40mph winds yesterday evening. And all are still standing this morning.
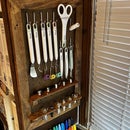
Step 9: Lantern Storage

With this many lanterns and their odd size and shape I had to create a custom storage container. This holds all the lanterns and light strand.

Participated in the
Halloween Contest 2018


