Introduction: Make a Custom Stuffed Animal
Designing and making your own stuffed toy is a fun project and a great way to practice some basic sewing skills like sewing curved seams, creating facings, using fusible interfacing and following a simple pattern. If you keep the shape of the body simple, this kind of creature is a fairly easy project. For mine I decided to make up a whimsical animal and I'm calling it a Flying Fox: part fox, part bat.
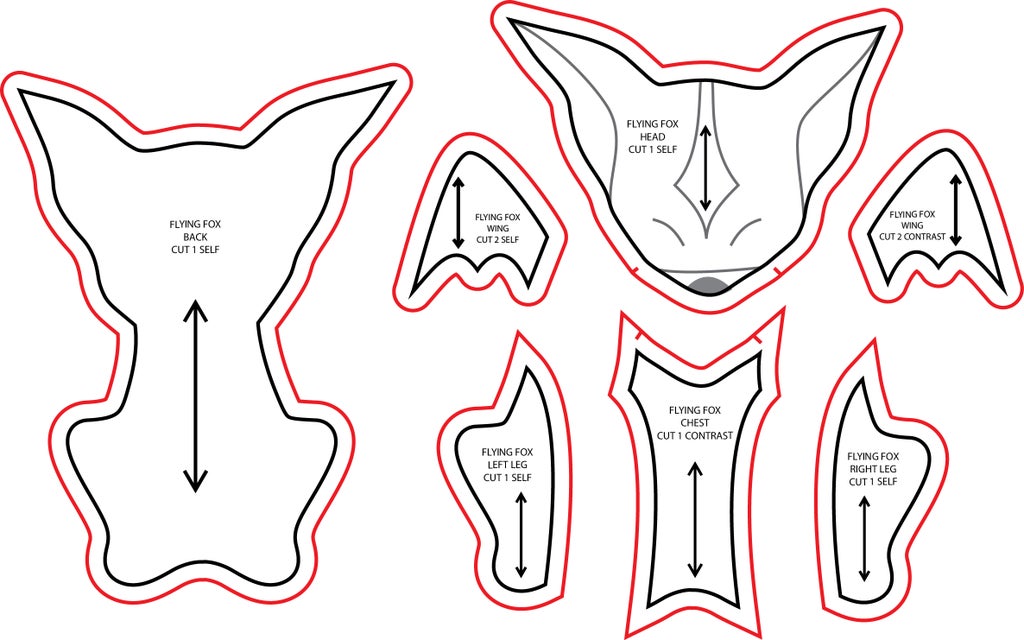
To create my design I sketched an idea, then traced my sketch in Illustrator and used it create a pattern which I am providing for you to download here. You can also design your own pattern, of course, and I'll give you some tips about the best way to do that in a minute. Or you could make a much simpler version of this kind of stuffed animal by eliminating the seamed panels and just using one piece for each side, it's up to you!
If you're just starting out with machine sewing and this project seems a little above you skill set you might want to check out my free Machine Sewing Class (particularly the lesson on sewing curved seams) where I go into more depth about how to master the simple techniques you'll use in this project.
Step 1: Tools and Materials
For this project you'll need some basic machine sewing tools:
- Sewing machine
- Iron and ironing board
- Extra bobbins
- Standard sewing machine needles
- Fabric shears
- Paper scissors
- Thread snippers
- Seam ripper
- Hand sewing needles
- Pins
- Magnetic pin holder
- Transfer paper
- Tracing wheel
- Tailor’s chalk or disappearing marker
- Flexible measuring tape
- Clear 18"x2" ruler
- A computer and printer if you want to download my pattern, or paper and pencil or a drafting program if you want to design your own. My pattern should be printed on 11"x17" paper. Make sure it is scaled to 100% when you print.
Materials:
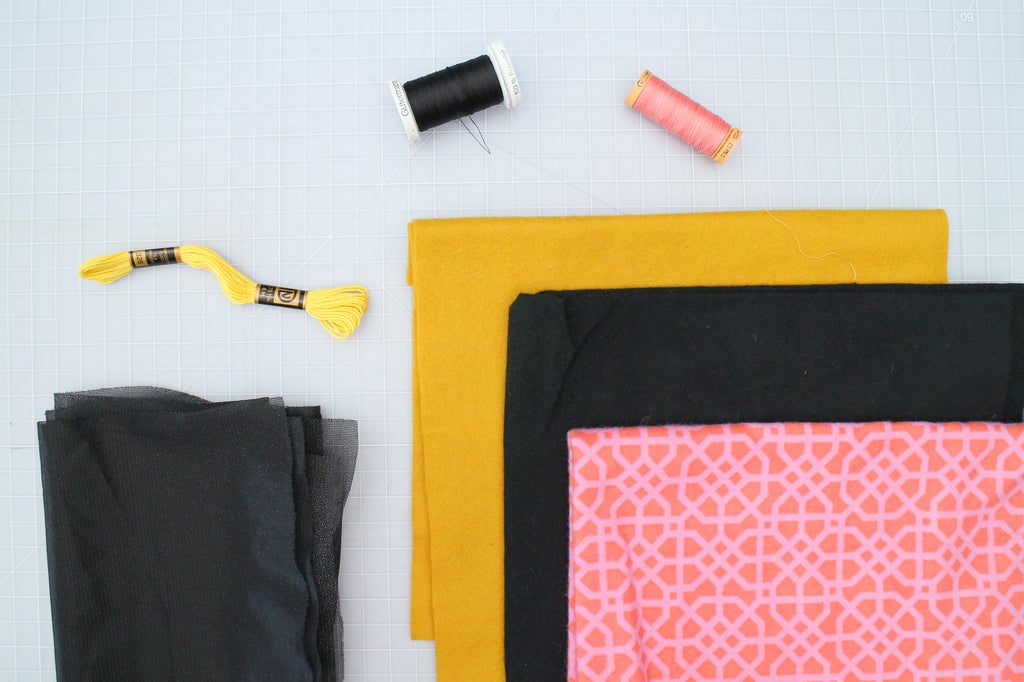
- 1/2 yard solid flannel cotton or other midweight fabric - I used a 100% cotton snuggle flannel in black from Joann Fabrics
- 1/2 yard contrast fabric - I used a 100% cotton snuggle flannel in "pink geo" from Joann Fabrics
- 1 yard knit fusible interfacing
- 1/4 yard yellow felt - I used this poly craft felt in gold from Joann Farbrics
- yellow embroidery floss
- all purpose thread to match your fabric
Attachments
Step 2: Pattern Anatomy
Whether you are following my pattern, or creating your own, you need to know a little about how to read the information on a pattern, so if you're unfamiliar with sewing patterns, here's some useful info. This is a very simple pattern, but it still follows the basic rules of pattern marking.
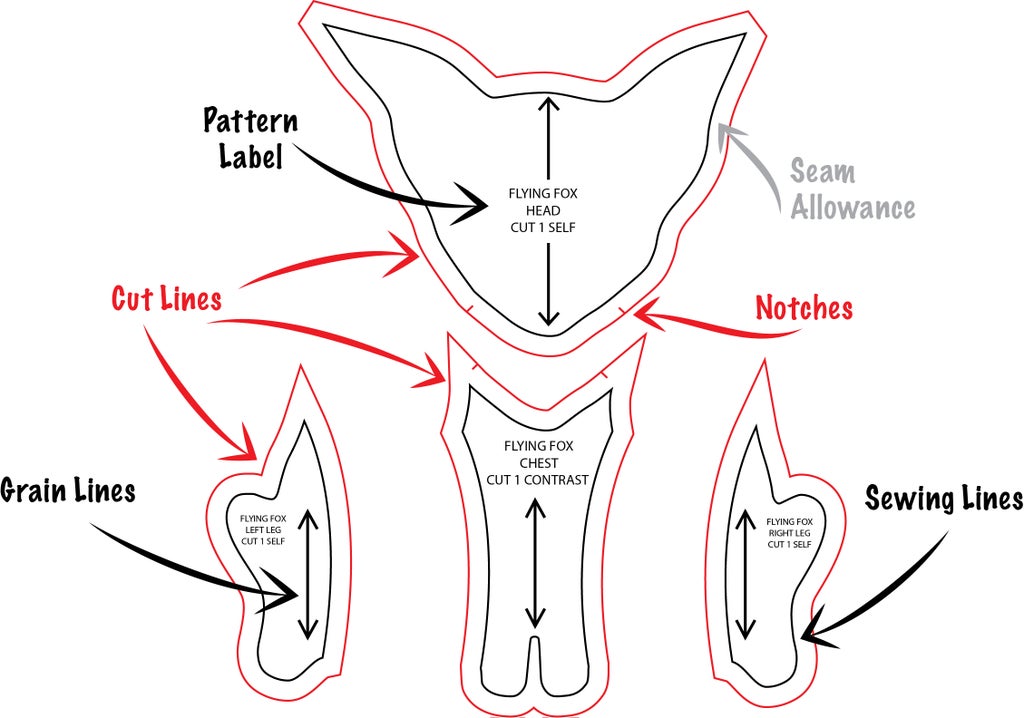
Cut Lines: the lines on a pattern that indicate where you need to cut your fabric, these are usually the outside borders of the pattern, but may include internal cut-outs as well.
Sewing Lines: internal lines on a pattern that indicate where two or more pieces are going to be joined by a line of stitching. Not all patterns mark the sewing lines but I usually do.
Seam Allowance: The space between the sewing line and cut line.
Pattern Label: Each pattern piece should be labeled with some information to identify it. This information should tell you: which piece of the pattern this is, what material it should be cut in (the main material of a design is called the "self," and a secondary material is call the "contrast"), and how many copies of that piece should be cut. (If you need to cut more than one copy of the exact same pattern piece for a design, you can usually just create one pattern piece in paper, and then cut it out in multiple layers of fabric.)
Grain Lines: Lines with arrows on both ends tell you how to orient pattern pieces in relation to the grain of your fabric. The grain lines on the pattern should always be parallel to the grain of the fabric.
Notches: where notches are marked on a pattern, you should snip into the seam allowance after the pattern is cut out. Notches help you identify important points on a pattern like the place where one piece should meet another. When you have patterns with multiple pieces, you use a specific system of notches to mark different pieces. We'll talk more about this later.
Step 3: Creating Your Own Pattern
If you want to come up with your own design, here's a little about the method I used to make mine.
The basic structure of this kind of stuffed creature is just a front and back panel sewn together and stuffed. To give my Flying Fox some details, I've divided the front panel into three separate sections that will be cut in different fabrics and seamed together. The details of the face are just shapes cut out in felt and topstitched to flannel. I also created clean finished wings faced with contrasting fabric, and little felt feet that are sewn into the bottom seam.
To create a pattern for all this in Illustrator, I first traced my sketch, then offset the outline of the whole body (minus the wings) by 1/2". I added this extra 1/2" to the design because I wanted to account for the dimensionality of the stuffing. Then I adjusted the internal detail lines a little to extend all the way to the new larger outline.
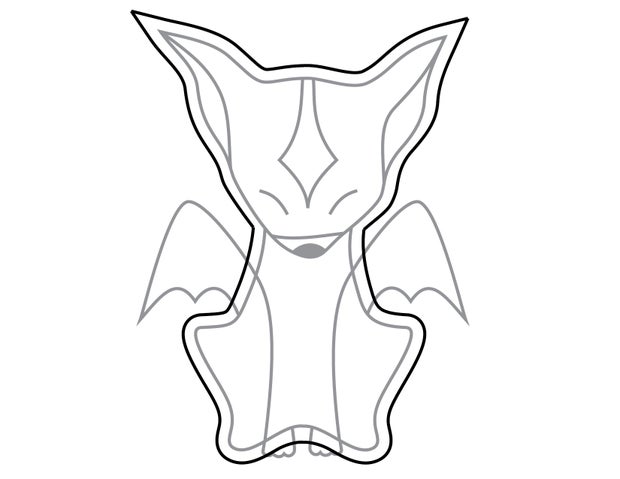

I separated out each individual piece, making sure to flip the back piece, and added red seam allowance lines offset another 1/2" around the edge of each piece.
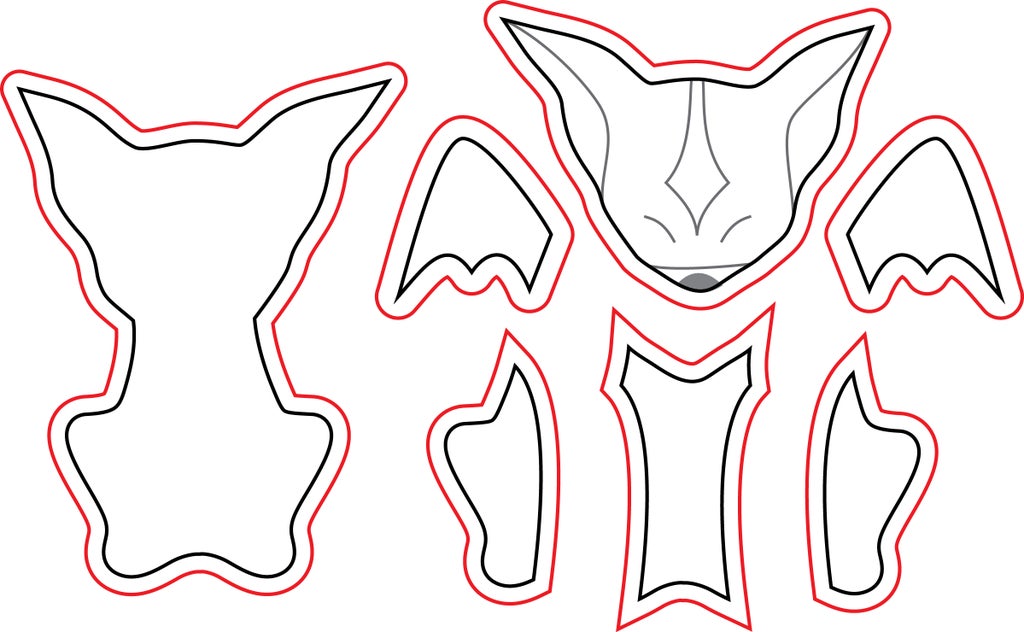
Following the rules for pattern labeling, I labeled each piece and added a grainline.
Step 4: Fuse the Fabric
I'm using some soft cotton flannel for the body of this stuffed creature, but, while I like the feeling or "hand" of the fabric, the weight is a little lighter than I think is quite right for this project, so I decided to re-enforce it with fusible interfacing.

Fusible interfacing is designed to add stability to fabric. Fusible comes in all kinds of weights and structures, but the kind I'm using here is a fairly light knit fabric with a layer of adhesive on one side.
To attach most fusible, you lay it on an ironing board with the glue side facing down onto the wrong side of your fabric.

Since the fusible is synthetic, we don't want to iron directly on top of it, so it's good to use a "press cloth." A press cloth is just a piece of light to medium weight cotton scrap fabric that you put between the iron and your fabric when you are ironing anything that might potentially be damaged by the iron. I'm just using a piece of muslin here.

Place the muslin over the fusible and iron on a high setting with steam. Press down hard and run your iron in little circles until you have fused the entire piece of fusible to the fabric.

I fused both my black and patterned flannel, but not the yellow felt.
Step 5: Cut Out the Pattern
To cut out the pattern, lay out your fabric on a flat cutting surface with the right side facing up, then arrange the pattern pieces with the grainline arrows parallel to the grain of the fabric. I cut the large back panel, the chest and one set of wings out in the patterned pink flannel, and the head, legs and another set of wings out in the black flannel (I also accidentally cut another large back piece out in black as you can see here :)


Pin the pieces down with the pins in the seam allowances.

Then use your fabric scissors to cut around each pattern piece.

Step 6: Mark the Seam Allowances
Now use your transfer paper and tracing wheel to mark the sewing lines through from the pattern onto the fabric.


I usually keep the paper pinned to the fabric until I'm going to use each piece, it helps you keep track of what's what.
Step 7: Sew the Chest and Leg Panels
Now let's assemble the four pieces of the front panel, starting with the chest and legs.
Remove the paper patterns from the chest and leg pieces and lay them out next to each other, as you can see, we have some concave and convex curves here. For more details help on how to pin and sew these kinds of curved seams, see the Sewing Curved Seams lesson of my Machine Sewing Class.
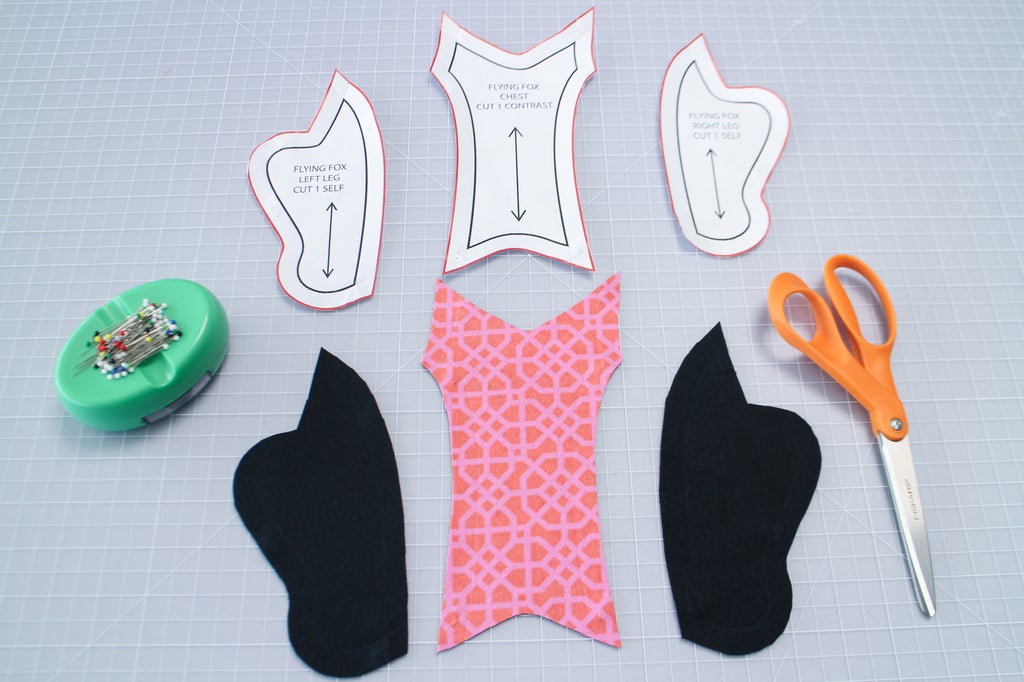
Snip the concave seam allowances on the sides of the chest piece, then pin them to the convex curves of the leg piece that you are attaching it to.


Repeat on the other side.

Then sew both sides on your machine being careful not to sew any folds into the seam.

When you're done it should look like this:
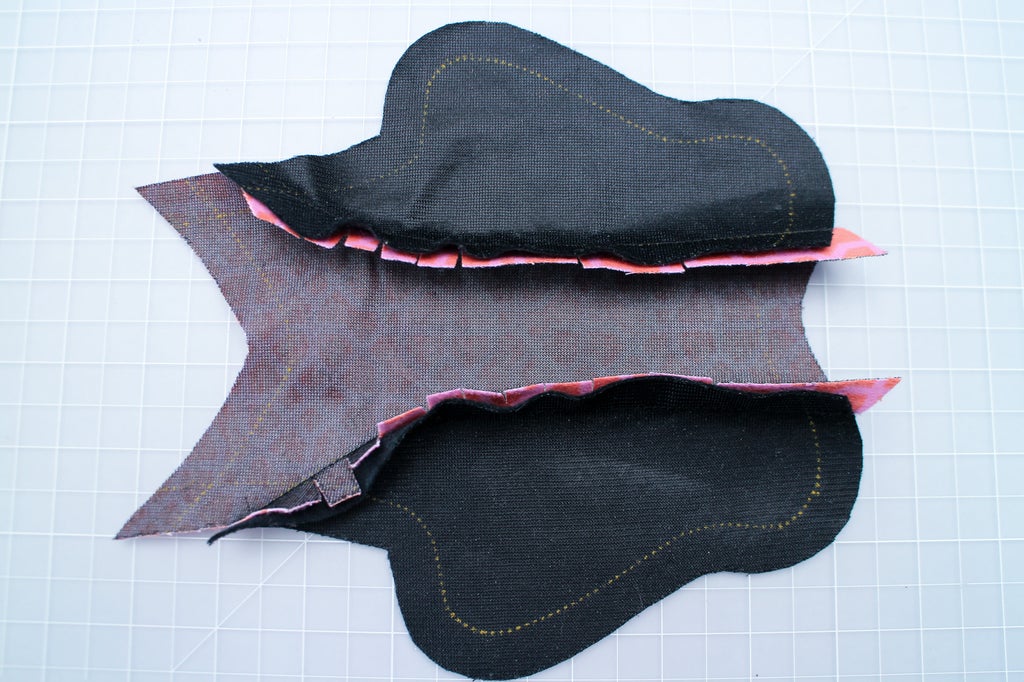
Fold the unclipped seam allowances over the clipped ones and then press the seams flat with your iron from the front side.

To make the seams less bulky, it can also be a good idea to clip one or both layers of the seam allowances shorter. Clipping one seam allowance shorter than the other is called grading, and is often done in garments to give seams a clean professional look.
Step 8: Attach the Head
To attach the head section, use the same method, but before you remove the paper, clip into the seam allowance at the notches I've marked down near the nose. These show you where the sewing lines of the chest should meet the head. Don't clip all the way to the sewing line, just about 1/4 in.

Now use the same clipping method to attach the head to the chest. Use the notches you clipped in the seam allowance to line the two pieces up correctly.


Sew the seam on your machine and press is flat.

Step 9: Make the Wings
Now we're going to create a pair of wings for the little flying fox that are clean finished with contrasting fabric on each side.
Take the two sets of wings you've cut out and lay them on top of each other, with right sides facing together.
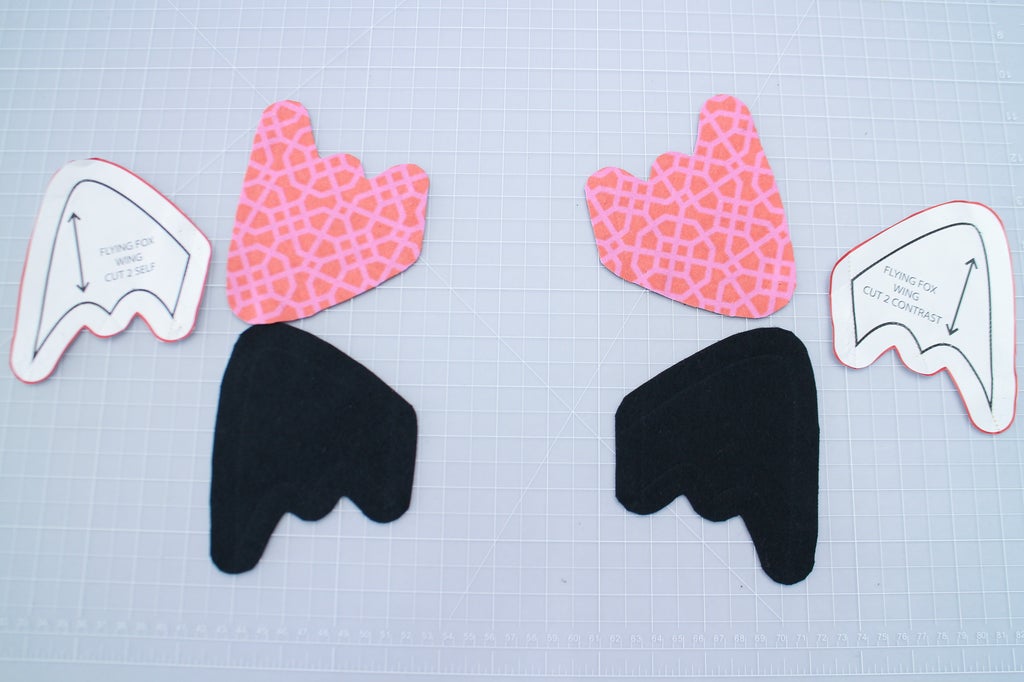
Sew each one together along the sewing lines, leaving the bases open.
Here's some tips for sewing around small curves:
- use a short stitch length
- go slow
- stop pressing the foot pedal and just turn the hand wheel when you need to
- when you start to get off track, lower the needle, raise the presser foot, and rotate the fabric slightly

At the sharp corners, lower your needle, raise your presser foot, turn your fabric 45 degrees and sew forward, back, forward, creating one stitch that cuts off the tip of the corner. Then turn your fabric again and continue sewing down the other side. Sewing this extra stitch that makes the corner slightly blunt will help you create a nice neat point when you turn the wings right side out.
When both the wings are sewn, take your scissors and trim the seam allowances very close to the sewing line, about 1/8". Snip a few triangles into the seam allowance around the convex curves.

Now turn them both inside out, and use a dull pencil, chop stick, or another pointy but not sharp object to push out the corners.


Press flat with an iron.

Step 10: Add the Face Details
Before we sew the two sides of the fox together, we need to add the face details or we won't really be able to do it later. First, cut them out in felt. Since they are so small, I found it easier to trace them onto the felt with my disappearing marker than to pin them down. I flipped them upside down to trace them so the side I was marking on would be the back side of the felt.


I arranged them and pinned them down on my fox face and then topstitched them down with matching thread.


Step 11: Hand Stitch the Eyes
Ok, one last detail to add before we sew the whole thing together, the eyes. I just stitched these with some contrast embroidery thread.
First I used my transfer paper and tracing wheel to mark the position of the eyes from the pattern.

Then I threaded a needle with yellow embroidery thread, and tied a knot on one end. For a great explanation of how to do this, check out this excellent lesson from Jessyratfink's Hand Sewing class.
I followed the line of the eyes with a simple running stitch.


And tied a knot in the back. If you don't know how to do this, once again, Jessyratfink has the instructions you need in this lesson on Tying Off To Finish Sewing.

Step 12: Sew It All Together
Now we can sew it all together, sandwiching the wings and feet into the side seam.
First, pin the feet onto the front panel, right sides to right sides, and sew them down, about 3/8" on from the edge.


Then do the same with the wings positioning them folded over the front so they will end up sewn into the side seam.


Then lay the front and back panels of the fox on top of each other with right sides together.


Pin around the edges and then sew along the sewing line, leaving an opening at the bottom about 3" long.


Step 13: Trim, Turn and Stuff
Now, trim the seam allowance of the whole thing the way you did on the wings. Trim down to about 1/8" and clip triangles into the convex curves.


Turn the whole thing rightside out, and then use a pointed but not sharp object to push out the corners.

Take some of your pillow stuffing and stuff the fox. Begin with small pieces and make sure you get them all the way up into the points of the ears. Use your pointy object to help. Try to distribute the stuffing evenly throughout the creature.
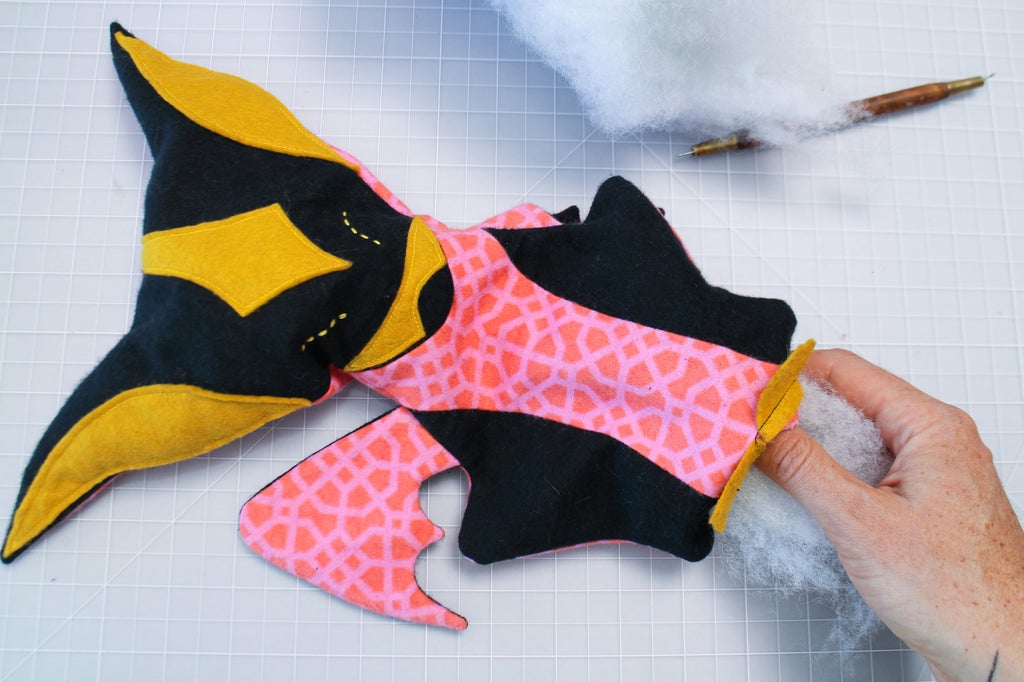

Step 14: Hand Sew the Opening
The last step is to hand sew the bottom opening closed. First, snip the concave curve of the seam allowances, then fold the seam allowances in and pin them together.


Use a slipstitch to sew the opening closed. Again, for a great description of how to do this see this Handsewing Lesson by Jessyratfink.
Step 15: You're Done!
Now you have a cute friend to keep you company! I'm sure you can see how easily you could customize a design like this and use these techniques techniques to create all kinds of creatures. If you've made this design, or created your own version, post an "I Made It" in the comments section below.
For more detailed instruction on beginning sewing techniques, check out my free Machine Sewing Class!


